ChevyParts
My Garage
My Account
Cart
OEM Buick LeSabre Door Hinge
Interior Door Hinge- Select Vehicle by Model
- Select Vehicle by VIN
Select Vehicle by Model
orMake
Model
Year
Select Vehicle by VIN
For the most accurate results, select vehicle by your VIN (Vehicle Identification Number).
41 Door Hinges found

Buick LeSabre Hinge Strap, Passenger Side Part Number: 20001857
$13.11 MSRP: $18.75You Save: $5.64 (31%)
Buick LeSabre Lower Hinge, Driver Side Part Number: 20300529
$51.89 MSRP: $74.25You Save: $22.36 (31%)
Buick LeSabre Lower Hinge, Front Passenger Side Part Number: 25716655
$18.08 MSRP: $25.87You Save: $7.79 (31%)
Buick LeSabre Hinge Strap, Front Lower Passenger Side Part Number: 20004614
$11.96 MSRP: $48.56You Save: $36.60 (76%)Ships in 1-2 Business Days
Buick LeSabre Hinge Assembly, Passenger Side Part Number: 1714401
$54.35 MSRP: $71.87You Save: $17.52 (25%)
Buick LeSabre Lower Hinge, Front Passenger Side Part Number: 20693416
$14.24 MSRP: $109.84You Save: $95.60 (88%)Ships in 1-2 Business Days
Buick LeSabre Hinge Strap, Driver Side Part Number: 20004615

Buick LeSabre Lower Hinge, Front Driver Side Part Number: 20693417
Buick LeSabre Lower Hinge, Driver Side Part Number: 20300449

Buick LeSabre Upper Hinge, Rear Passenger Side Part Number: 20003765

Buick LeSabre Upper Hinge, Front Passenger Side Part Number: 20300444
Buick LeSabre Upper Hinge, Rear Driver Side Part Number: 20003766

Buick LeSabre Upper Hinge, Front Driver Side Part Number: 20300445
Buick LeSabre Hinge Assembly, Driver Side Part Number: 1714402
Buick LeSabre Hinge, Rear Passenger Side Part Number: 25602096
Buick LeSabre Hinge, Rear Driver Side Part Number: 25602097

Buick LeSabre Hinge Strap, Front Upper Part Number: 20095425

Buick LeSabre Lower Hinge, Front Passenger Side Part Number: 20693418
| Page 1 of 3 |Next >
1-20 of 41 Results
Buick LeSabre Door Hinge
Want to cut long-term maintenance and repair costs? Choose OEM Door Hinge. Those parts deliver top durability you can trust. On our site, you'll find a huge catalog of genuine Buick LeSabre parts. Prices are unbeatable, so you can keep more in your pocket. Every OEM Buick LeSabre Door Hinge includes a manufacturer's warranty. You can also get an easy return policy that keeps buying risk free. Fast delivery, get your car on the road quickly. It's simple to search, compare, and order. Stop guessing about quality or fit. Order today and save with parts that last.
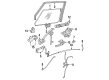
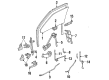
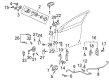
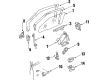
The Buick LeSabre Door Hinge is a critical part that symbolizes durable and high-performance cars associated with the Buick Company. Appropriate for the door of LeSabre, this Door Hinge solves problems such as the doors sagging, which are caused by wear and tear of the door throughout the period the car is in service. Hence, the Buick LeSabre Door Hinge is not only significant in the literal sense, but also adds greater efficiency and generally augments the vehicle's protection. Fitted for different models of LeSabre manufactured since 1959 till 2005, the Door Hinge is made of high-quality steel and coated with a corrosion-proof material. Hinge roller kits and replacement check straps are specific consumables that can help bring back the sound operation without getting stuck with shutters and doors that close on their own accord, thus improving the usability of the doors and gates offered on the market. Buick LeSabre Door Hinge is highly relied on in the automotive market because of its due-hardened construction and the kits that comes with hardened steel pins and brass bushing for easier installation. The fact that so much attention is paid to these details helps to remind the consumer of the credibility of the Buick LeSabre while at the same time pointing to the car's sell rate as a highly successful car throughout the duration of its manufacturing. Being the Buick LeSabre Door Hinge, this component also reflects the car manufacturer's ability to experiment and invent while maintaining the reliability of the model; therefore, the Door Hinge continues to remain important in the car's history by guaranteeing the smooth and safe opening and closing of the car doors for many years of use.
Buick LeSabre Door Hinge Parts and Q&A
- Q: How to replace the front door hinge on Buick LeSabre?A:You can replace the front Door Hinge by starting with door opening and door trim panel and water deflector removal. Disconnect the door latch electrical connectors along with the power window motor electrical connector before removing the door wiring harness retainers then pull out the door wire harness. Begin by taking off the body fasteners of the door check link followed by disconnecting fasteners from the intermediate and both hinges. In pairs lift the door as one lifts to remove it while marking both the door and body positions of the hinge halves. Secure studplates in the door to prevent falling before removing the hinge fasteners from the pillar and the hinge half from the pillar. Start by removing both hinge fasteners from the door before extracting the hinge half out of the door. Users should position the hinge half on the body before they add the hinge to body fasteners which need to be tightened to 35 n.m (26 lb ft). Position the door half of the hinge according to the made markings and mount the hinge on door fasteners before tightening them to 34 n.m (24 lb ft). Climb down the door before matching the hinge pairs and use loctite(R) blue gm p/n 12345382 (or Canadian P/N 10953489) to secure the Door Hinge fasteners at 24 n.m (18 lb ft). The door check link should be installed following paint touch-up repairs on door fasteners. The door wire harness will be inserted through a front opening. The wiring harness retainers must be installed while connecting power window motor electrical connectors and inserting door latch electrical connectors. Use the Door Striker only for positioning the door correctly before putting on the water deflector along with the door trim panel. Do not adjust the door with the striker to protect both components from damage.

Related Buick LeSabre Parts
 Buick LeSabre Emblem
 Buick LeSabre Door Armrest
 Buick LeSabre Door Lock
 Buick LeSabre Door Moldings
 Buick LeSabre Door Seal
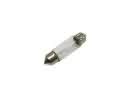 Buick LeSabre Interior Light Bulb
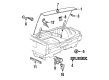
 Buick LeSabre Liftgate Hinge
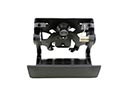 Buick LeSabre Tailgate Handle
 Buick LeSabre Tailgate Latch
 Buick LeSabre Tailgate Lock
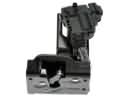 Buick LeSabre Tailgate Lock Actuator Motor
 Buick LeSabre Window Crank Handles