ChevyParts
My Garage
My Account
Cart
OEM Buick Neutral Safety Switch
Transmission Neutral Safety Switch- Select Vehicle by Model
- Select Vehicle by VIN
Select Vehicle by Model
orMake
Model
Year
Select Vehicle by VIN
For the most accurate results, select vehicle by your VIN (Vehicle Identification Number).
30 Neutral Safety Switches found


Buick Neutral Safety Switch Part Number: 24221125
$86.84 MSRP: $147.85You Save: $61.01 (42%)Ships in 1-2 Business DaysProduct Specifications- Other Name: Switch, Parking/Neutral Position & Back Up Lamp; Back Up Light Switch; Range Sensor; Back-Up Switch; Transmission Safety Starting Switch; Speed Sensing; Back Up Lamp

Buick Neutral Safety Switch Part Number: 12450002
$35.68 MSRP: $111.28You Save: $75.60 (68%)Ships in 1-2 Business DaysProduct Specifications- Other Name: Switch, Transmission Safety Starting Switch Or Speed Sensing; Back Up Light Switch; Back-Up Switch
- Replaced by: 88987185

Buick Paddle Switch, Black, Driver Side Part Number: 23156473
$28.44 MSRP: $44.51You Save: $16.07 (37%)Ships in 1-2 Business DaysProduct Specifications- Other Name: Switch, Automatic Transmission Manual Shift Auxiliary Position; Transmission Range Sensor; Range Sensor; Shift Paddle
- Position: Driver Side
- Replaces: 22771713
Buick Paddle Switch, Black, Passenger Side Part Number: 23156471
$24.10 MSRP: $36.36You Save: $12.26 (34%)Ships in 1-2 Business DaysProduct Specifications- Other Name: Switch, Automatic Transmission Manual Shift Auxiliary Position; Transmission Range Sensor; Range Sensor; Shift Paddle
- Position: Passenger Side

Buick Neutral Safety Switch Part Number: 1994356
$84.51 MSRP: $157.69You Save: $73.18 (47%)Product Specifications- Other Name: Switch, Parking; Switch, Transmission Safety Start/Warning

Buick Neutral Safety Switch Part Number: 1994289
$54.51 MSRP: $101.72You Save: $47.21 (47%)Product Specifications- Other Name: Switch Assembly-Automatic Transmission Neutral Start; Back Up Light Switch; Back-Up Switch; Transmission Safety Starting/Sensing; Back Up Lamp

Buick Paddle Switch, Passenger Side Part Number: 23156477
$21.07 MSRP: $32.97You Save: $11.90 (37%)Ships in 1-2 Business DaysProduct Specifications- Other Name: Switch, Automatic Transmission Manual Shift Auxiliary Position; Transmission Range Sensor; Switch, Transmission Control
- Position: Passenger Side
- Replaces: 13297283

Buick Neutral Safety Switch Part Number: 24226755
$84.49 MSRP: $124.09You Save: $39.60 (32%)Ships in 1-2 Business DaysProduct Specifications- Other Name: Switch, Transmission Control
- Replaces: 24205999


Buick Neutral Safety Switch Part Number: 12450157
Product Specifications- Other Name: Switch, Transmission Safety Starting Switch Or Speed Sensing; Range Sensor; Switch, Transmission Safety Start/Warning


Buick Neutral Safety Switch Part Number: 1994362
Product Specifications- Other Name: Switch Assembly-Parking/Neutral Position; Back Up Light Switch; Back-Up Switch; Switch, Transmission Safety Starting Switch Or Speed Sensing; Switch, Transmission Safety Start/Warning


Buick Neutral Safety Switch Part Number: 15705308
Product Specifications- Other Name: Switch, Parking/Neutral Position & Back Up Lamp; Back Up Light Switch; Back-Up Switch; Switch, Transmission Safety Start/Warning; Switch, Starting Or Temperature Switch; Switch, Back Up Lamp
- Replaces: 15679680


Buick Neutral Safety Switch Part Number: 10075403
Product Specifications- Other Name: Switch, Back Up Lamp; Back Up Light Switch; Back-Up Switch
Buick Neutral Safety Switch Part Number: 1994290
Product Specifications- Other Name: Switch Assembly-Automatic Transmission Neutral Start; Back Up Light Switch; Back-Up Switch; Transmission Safety Starting/Sensing; Back Up Lamp

Buick Back-Up Switch Part Number: 1994299
Product Specifications- Other Name: Ns Switch; Back Up Light Switch; Switch, Transmission Safety Start/Warning; Switch, Back Up Lamp

Buick Back-Up Switch Part Number: 10094661
Product Specifications- Other Name: Switch, Back Up Lamp; Back Up Light Switch

Buick Neutral Safety Switch Part Number: 12450159
Product Specifications- Other Name: Switch, Transmission Safety Starting Switch Or Speed Sensing; Back Up Light Switch; Back-Up Switch; Switch, Transmission Safety Start/Warning
- Replaces: 11516115

Buick Neutral Safety Switch Part Number: 1994359
Product Specifications- Other Name: Switch Assembly-Parking/Neutral Position; Back Up Light Switch; Back-Up Switch; Switch, Transmission Safety Start/Warning

Buick Neutral Safety Switch Part Number: 12450049
Product Specifications- Other Name: Switch, Transmission Safety Starting Switch Or Speed Sensing; Back Up Light Switch; Back-Up Switch; Switch, Transmission Safety Start/Warning
- Replaces: 01994361, 01994346, 1994361, 22595527, 1994346

Buick Neutral Safety Switch Part Number: 1994363
Product Specifications- Other Name: Switch Assembly-Parking/Neutral Position; Back Up Light Switch; Back-Up Switch; Switch, Transmission Safety Start/Warning
- Replaces: 1994335

Buick Parking Brake Warning Switch Part Number: 10136720
Product Specifications- Other Name: Switch, Parking Brake Indicator
| Page 1 of 2 |Next >
1-20 of 30 Results
Buick Neutral Safety Switch
Want to cut long-term maintenance and repair costs? Choose OEM Neutral Safety Switch. Those parts deliver top durability you can trust. On our site, you'll find a huge catalog of genuine Buick parts. Prices are unbeatable, so you can keep more in your pocket. Every OEM Buick Neutral Safety Switch includes a manufacturer's warranty. You can also get an easy return policy that keeps buying risk free. Fast delivery, get your car on the road quickly. It's simple to search, compare, and order. Stop guessing about quality or fit. Order today and save with parts that last.
Buick Neutral Safety Switch Parts Questions & Experts Answers
- Q: How to replace the Neutral Safety Switch on Buick Century?A:In order to replace the pnp switch, one should remove the throttle body air inlet duct. Next, with the help of a special tool, separate the automatic transaxle range selector cable from the wiring harness clip or strap and remove it from the at range selector lever and the at range selector cable bracket. Then, remove the at range selector cable from the console shift control or column shift control and pull it through the dash from the side of the engine compartment. For installation, plug the at range selector cable via the dash from the engine compartment side to attach it to the at range selector cable bracket, and at range selector lever. Cable a cable to a wiring harness clip or strap, and attach it to a console shift control or the column control. Finally re-install the throttle body air inlet duct.
- Q: How to Determine if Your Neutral Safety Switch Needs Replacement on Buick Rainier?A:Begin the replacement of the park/neutral position switch by engaging the parking brake and putting the transmission in neutral. Use a hoist to lift the car before removing the transmission control lever nut that connects to the manual shaft and pulling off the lever. Follow these steps to replace the park/neutral position switch: disconnect electrical connectors from the switch then remove the bolts which secure the switch to the transmission before removing the switch from the manual shaft. Silence occurs when the switch requires assistance to detach itself from the manual shaft. At such times apply filing actions to the outer shaft perimeter to eliminate burrs. Place the switch hub flats adjacent to manual shaft flats before pushing the switch along the manual shaft until the mounting bracket reaches transmission mounting bosses. New switches will include positive assurance brackets as standard so the neutral position adjustment tool becomes redundant during installation. Install two bolts to the transmission plus the j 41364-a neutral position adjustment tool (J 41364-A) to the switch. Position the tool slots on the switch to match the lower tabs of the tool then apply gentle torque to the two bolts. Adjust the tool to match the upper locator pin with the switch slot before tightening switch bolts to 25 nm (18 ft. Lbs.). First detach the j 41364-a from the switch before you remove the positive assurance bracket. Fasten the control lever nut to 25 nm (18 ft. Lbs.) after reattaching the transmission control lever onto the manual shaft. Connect the electrical connectors and reinstall the manual shaft with its nut to complete the installation. Finally, lower the vehicle and check the switch for proper operation, ensuring the engine starts only in the p (Park) or n (Neutral) positions; proceed to replace the switch if it does not function properly.


Related Buick Parts
 Buick Headlight Switch
 Buick Air Bag Clockspring
 Buick Automatic Transmission Shift Position Sensor Switch
 Buick Body Wiring Harness Connector
 Buick Brake Light Switch
 Buick Dimmer Switch
 Buick Door Harness Connector
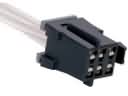 Buick Instrument Panel Harness Connector
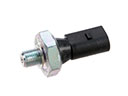 Buick Oil Pressure Switch
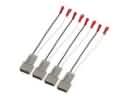 Buick Speaker Connector
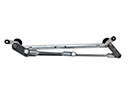 Buick Wiper Pivot
 Buick Wiper Switch