ChevyParts
My Garage
My Account
Cart
OEM Buick Terraza Engine Mount Bracket
Engine Mount- Select Vehicle by Model
- Select Vehicle by VIN
Select Vehicle by Model
orMake
Model
Year
Select Vehicle by VIN
For the most accurate results, select vehicle by your VIN (Vehicle Identification Number).
4 Engine Mount Brackets found


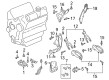
Buick Terraza Mount Bracket Part Number: 12594433
$30.60 MSRP: $61.44You Save: $30.84 (51%)


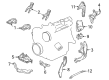
Buick Terraza Strut Bracket Part Number: 10274661
$177.35 MSRP: $301.93You Save: $124.58 (42%)Ships in 1-3 Business Days

Buick Terraza Mount Bracket Part Number: 10216970

Buick Terraza Lower Bracket Part Number: 10325272
Buick Terraza Engine Mount Bracket
Want to cut long-term maintenance and repair costs? Choose OEM Engine Mount Bracket. Those parts deliver top durability you can trust. On our site, you'll find a huge catalog of genuine Buick Terraza parts. Prices are unbeatable, so you can keep more in your pocket. Every OEM Buick Terraza Engine Mount Bracket includes a manufacturer's warranty. You can also get an easy return policy that keeps buying risk free. Fast delivery, get your car on the road quickly. It's simple to search, compare, and order. Stop guessing about quality or fit. Order today and save with parts that last.
Buick Terraza Engine Mount Bracket Parts Questions & Experts Answers
- Q: How to replace the Engine Mount Bracket on Buick Terraza?A:The replacement of Engine Mount bracket requires technicians to first eliminate the air cleaner outlet duct and Engine Mount struts while lifting and sustaining the vehicle. The first step involves taking out the Catalytic Converter together with the right front wheel with its tire and the right engine splash shield. The first step replaces Engine Mount to frame nuts after inserting a wood block between the Oil Pan and jack support to avoid damage. The first step to replace the Engine Mount bracket to Oil Pan bolts is to elevate the engine with a utility stand and block of wood under the Oil Pan. After elevating the engine remove the Engine Mount bracket to Oil Pan bolts followed by the Engine Mount and bracket. The Engine Mount bracket needs to be separated from the Engine Mount through removing the Engine Mount bracket to Engine Mount nuts. To install the bracket start by placing it on the Engine Mount before you connect the Engine Mount bracket across the Engine Mount nuts while tightening them to 50 n.m (37 lb ft). The installation process for the Engine Mount and bracket needs you to start with Oil Pan attachment before securing the Engine Mount bracket to Oil Pan bolts at 58 n.m (43 lb ft). Use the utility stand to lower the engine before installing the frame nuts to Engine Mount and tightening them to 47 n.m (35 lb ft). To finish the repair install the right engine splash shield, right front wheel and tire, catalytic converter and lower the vehicle before you install the Engine Mount struts then reconnect the air cleaner outlet duct.

Related Buick Terraza Parts
 Buick Terraza Cam Gear
 Buick Terraza Crankshaft Gear
 Buick Terraza Dipstick
 Buick Terraza Engine Mount
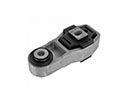 Buick Terraza Engine Mount Torque Strut
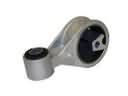 Buick Terraza Engine Torque Strut Mount
 Buick Terraza Motor And Transmission Mount
 Buick Terraza Piston
 Buick Terraza Rod Bearing
 Buick Terraza Timing Cover
 Buick Terraza Valve Cover Grommet
 Buick Terraza Valve Stem Oil Seal