ChevyParts
My Garage
My Account
Cart
OEM Cadillac Battery Cable
Car Battery Cable- Select Vehicle by Model
- Select Vehicle by VIN
Select Vehicle by Model
orMake
Model
Year
Select Vehicle by VIN
For the most accurate results, select vehicle by your VIN (Vehicle Identification Number).
305 Battery Cables found

Cadillac Negative Cable Part Number: 22991297
$34.97 MSRP: $65.70You Save: $30.73 (47%)Ships in 1-2 Business DaysProduct Specifications- Other Name: Cable Assembly-Battery Negative Cable Extension; Cable, Battery Ground(Negative)

Cadillac Positive Cable Part Number: 23507275
$215.34 MSRP: $404.40You Save: $189.06 (47%)Ships in 1-2 Business DaysProduct Specifications- Other Name: Cable Assembly-Battery Positive; Battery Cables; Cable, Battery(Positive)
- Replaces: 23304107
Cadillac Positive Cable Part Number: 84488910
$208.20 MSRP: $390.98You Save: $182.78 (47%)Ships in 1-2 Business DaysProduct Specifications- Other Name: Cable Assembly-Battery Positive; Battery Cables; Cable, Battery(Positive)
Cadillac Positive Cable Part Number: 23421391
$54.34 MSRP: $102.05You Save: $47.71 (47%)Ships in 1-2 Business DaysProduct Specifications- Other Name: Cable Assembly-Generator Battery Jumper; Battery Cables; Cable, Battery(Positive)
- Replaced by: 84048978

Cadillac Positive Cable Part Number: 84027034
$104.19 MSRP: $195.65You Save: $91.46 (47%)Ships in 1-2 Business DaysProduct Specifications- Other Name: Cable Assembly-Battery Positive Cable Extension; Battery Cables; Cable, Battery(Positive)
Cadillac Positive Cable Part Number: 84048979
$52.98 MSRP: $99.51You Save: $46.53 (47%)Ships in 1-2 Business DaysProduct Specifications- Other Name: Cable Assembly-Generator Battery Jumper; Battery Cables; Cable, Battery(Positive)
- Replaces: 23421390, 23304104
Cadillac Positive Cable Part Number: 84417083
$29.38 MSRP: $55.18You Save: $25.80 (47%)Ships in 1-2 Business DaysProduct Specifications- Other Name: Cable Assembly-Starter Solenoid; Battery Cables; Cable, Battery(Positive)
- Replaces: 84025059

Cadillac Positive Cable Part Number: 15371932
$165.63 MSRP: $299.79You Save: $134.16 (45%)Ships in 1-2 Business DaysProduct Specifications- Other Name: Cable, Battery (Positive); Battery Cables; Cable, Battery(Positive)
Cadillac Positive Cable Part Number: 84212645
$71.87 MSRP: $134.97You Save: $63.10 (47%)Ships in 1-2 Business DaysProduct Specifications- Other Name: Cable Assembly-Auxiliary Generator Battery Jumper; Battery Cables; Cable, Generator
- Replaces: 23402574
Cadillac Positive Cable Part Number: 84488907
$230.91 MSRP: $433.64You Save: $202.73 (47%)Ships in 1-2 Business DaysProduct Specifications- Other Name: Cable Assembly-Battery Positive; Battery Cables; Cable, Battery(Positive)
Cadillac Positive Cable Part Number: 84488913
$256.79 MSRP: $464.78You Save: $207.99 (45%)Ships in 1-2 Business DaysProduct Specifications- Other Name: Cable Assembly-Battery Positive; Battery Cables; Cable, Battery(Positive)
- Replaces: 84365533

Cadillac Positive Cable Part Number: 84118758
$249.69 MSRP: $468.90You Save: $219.21 (47%)Ships in 1-2 Business DaysProduct Specifications- Other Name: Cable Assembly-Battery Positive Cable Extension; Battery Cables; Cable, Battery(Positive)
- Replaced by: 84442130
- Replaces: 23342259
Cadillac Positive Cable Part Number: 23421390
$52.98 MSRP: $99.51You Save: $46.53 (47%)Ships in 1-2 Business DaysProduct Specifications- Other Name: Cable Assembly-Generator Battery Jumper; Battery Cables; Cable, Battery(Positive)
- Replaced by: 84048979
Cadillac Positive Cable Part Number: 84488911
$239.16 MSRP: $432.86You Save: $193.70 (45%)Ships in 1-2 Business DaysProduct Specifications- Other Name: Cable Assembly-Battery Positive; Battery Cables; Cable, Battery(Positive)
Cadillac Positive Cable Part Number: 84048978
$54.34 MSRP: $102.05You Save: $47.71 (47%)Ships in 1-2 Business DaysProduct Specifications- Other Name: Cable Assembly-Generator Battery Jumper; Battery Cables; Cable, Battery(Positive)
- Replaces: 23421391
Cadillac Positive Cable Part Number: 84025061
$75.74 MSRP: $142.22You Save: $66.48 (47%)Ships in 1-2 Business DaysProduct Specifications- Other Name: Cable Assembly-Starter Solenoid; Battery Cables; Cable, Battery(Positive)
- Replaces: 23321138

Cadillac Positive Cable Part Number: 23247636
$102.19 MSRP: $204.38You Save: $102.19 (50%)Ships in 1-2 Business DaysProduct Specifications- Other Name: Cable Assembly-Battery Positive Cable Extension; Battery Cables; Cable, Battery(Positive)


Cadillac Positive Cable Part Number: 88860071
$30.26 MSRP: $54.04You Save: $23.78 (44%)Ships in 1-2 Business DaysProduct Specifications- Other Name: Cable Assembly, Battery; Battery Cables; Ground Strap; Negative Cable; Cable, Battery Negative And Engine Ground; Cable, Battery Ground(Negative)
- Replaces: 12007887, 15320972
Cadillac Positive Cable Part Number: 23234930
$36.86 MSRP: $69.22You Save: $32.36 (47%)Ships in 1-2 Business DaysProduct Specifications- Other Name: Cable Assembly-Battery Positive Cable Extension; Battery Cables; Cable, Battery(Positive)
Cadillac Positive Cable Part Number: 84064703
$137.61 MSRP: $258.41You Save: $120.80 (47%)Ships in 1-2 Business DaysProduct Specifications- Other Name: Cable Assembly-Starter Solenoid; Battery Cables; Cable, Battery(Positive)
| Page 1 of 16 |Next >
1-20 of 305 Results
Cadillac Battery Cable
Want to cut long-term maintenance and repair costs? Choose OEM Battery Cable. Those parts deliver top durability you can trust. On our site, you'll find a huge catalog of genuine Cadillac parts. Prices are unbeatable, so you can keep more in your pocket. Every OEM Cadillac Battery Cable includes a manufacturer's warranty. You can also get an easy return policy that keeps buying risk free. Fast delivery, get your car on the road quickly. It's simple to search, compare, and order. Stop guessing about quality or fit. Order today and save with parts that last.
Cadillac Battery Cable Parts Questions & Experts Answers
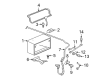
- Q: How to replace the negative battery cable extension on Cadillac CTS?A:To replace the negative cable extension cable of the battery, first strip the front compartment side sight shield. Remove negative cable battery, or disconnect the battery negative cable after disconnecting the battery negative cable, then remove the battery negative cable ground bolt. Raise the vehicle and the Battery Cable Termainal Bolt. Noting the routing of the battery negative cable extension cable, and take it from the vehicle. For installation, extend the battery cable extension cable (negative cable) and attach it to the vehicle while following the fastener caution. Install the Battery Cable Terminal Bolt and tighten it to 35 Nm (26 lb ft) and install the battery negative cable ground bolt and tighten it to 20 Nm (15 lb ft). Last, reinstall the front compartment side sight shield, and connect the battery negative cable.
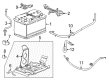
- Q: How to replace the positive battery cable on Cadillac Escalade?A:The battery positive cable replacement process starts with disconnecting the negative battery cable before removing the under hood junction block cover. Delocate the junction block retainers from their locked positioning and open the retainers before taking off the junction block. First remove the mega fuse cover and then disconnect the positive battery cable connector from the underhood bussed electrical center (UBEC). Disconnect the jumper cable to mega fuse nut followed by the generator battery jumper cable terminal from the mega fuse stud. The first step for removal starts with the detachment of positive battery cable channel and clips from plenum front panel studs then moving to remove positive battery cable terminal from mega fuse stud before removing the positive battery cable from the vehicle. When installing the max fuse procedure starts with inserting the positive battery cable and connecting its terminal to the mega fuse stud. First reinstall the positive battery cable channel with its clips on the plenum front panel and then connect the generator battery jumper cable terminal to the mega fuse stud using the generator battery jumper cable to secure it to mega fuse nut with 9 N.m (80 lb in) torque. Reattach both the positive battery cable connector to its place on the UBEC and install the mega fuse cover. Turn the junction block retainers to the open position after which align the junction block to fit the 4 bracket pivots . Lock the pivots by pushing the retainer down to its locked position. Install the under hood junction block cover followed by restoring connection to the negative battery cable.
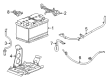
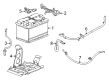
- Q: How to Replace the Battery Cable (LC3) on Cadillac XLR?A:The replacement procedure starts with disconnecting the battery negative cable. You must first loosen the battery positive cable nut then remove the battery positive cable from its battery position. First locate and remove the stud cover on the fuse/relay center before taking out the battery positive cable nut while disconnecting the positive lead from its location on the fuse/relay center stud. Remove Battery Cable clips after disconnecting the battery negative cable from its frame rail stud by unfastening the nut. After disconnecting the negative Battery Cable bolt from the right rear cylinder head you should remove the Battery Cable bolt that secures the negative cable as well as the ground pack of the engine harness. Untangle the supercharger followed by the separation of starter jumper wiring from the engine harness connector. Unscrew the positive terminal nut of the Battery Cable then detach the terminals from the starter solenoid. First unscrew the battery positive/starter cable nut and slide the boot toward the generator for disconnecting the cable from the stud. To start replace the positive Battery Cable routing clip bolt alongside removing the battery positive and negative cable assembly. The installation process should begin by connecting the battery positive and negative cable assembly first. The installation of the battery positive and starter cable requires placing its terminal on the generator stud at the 2-4 o'clock position before tightening the terminal nut to 20 nm (15 lb ft). Push the boot onto the stud and the nut before resettling it into position. Attach the positive Battery Cable routing clip bolt into its designated section on the cable retaining clip and secure it at the engine front with 35 nm (26 lb ft) torque setting. Position the engine harness leads on the solenoid beforehand adding the positive cable terminals followed by installer a large nut to 12 nm (106 lb in) and a small nut to 4 nm (35 lb in). The starter jumper wiring harness requires connection to the engine harness connector before supercharger installation. The installation process begins with positioning the battery negative cable along with the engine harness ground pack to the right rear cylinder head before fastening the Battery Cable bolt to its place and tightening the battery negative cable routing clip bolt to 35 nm (26 lb ft). Position the battery negative cable on the frame rail stud before installing the negative Battery Cable to frame rail nut then tighten it to 11 nm (97 lb in). Insert the battery clips afterwards install the positive Battery Cable lead to the fuse/relay center stud followed by the positive Battery Cable nut tightening to 12 nm (106 lb in). The operation involves closing the stud cover followed by connecting the positive Battery Cable to the battery and securing the nut at 8 nm (71 lb in). Subsequently connect the negative Battery Cable.