ChevyParts
My Garage
My Account
Cart
OEM Cadillac Catera Radiator
Cooling Radiator- Select Vehicle by Model
- Select Vehicle by VIN
Select Vehicle by Model
orMake
Model
Year
Select Vehicle by VIN
For the most accurate results, select vehicle by your VIN (Vehicle Identification Number).
2 Radiators found

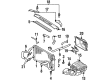
Cadillac Catera Radiator Part Number: 52482600
Cadillac Catera Radiator Part Number: 52463050
Cadillac Catera Radiator
Want to cut long-term maintenance and repair costs? Choose OEM Radiator. Those parts deliver top durability you can trust. On our site, you'll find a huge catalog of genuine Cadillac Catera parts. Prices are unbeatable, so you can keep more in your pocket. Every OEM Cadillac Catera Radiator includes a manufacturer's warranty. You can also get an easy return policy that keeps buying risk free. Fast delivery, get your car on the road quickly. It's simple to search, compare, and order. Stop guessing about quality or fit. Order today and save with parts that last.
Comprehension of Radiators pertains to the importance of the Cadillac Catera- a luxury sedan made by Cadillac from 1996 to 2001. Functioning as the heater cooler, the radiator plays a great role of transferring heated air from the engine coolant and blowing cool air to maintain the right temperature of the car engine. The Radiators are usually built-in with distinct features such as lightweight aluminum system that makes the coolant to flow with increased efficiency and heat transfer. The following is one of the best radiators that can be used in different models of Catera; thus, its use is effective to maintain the efficiencies of the car's radiator. The Radiator also increases the performance of the engine and most importantly, the reliability of the car through avoiding excessive heating. Problems like leaks, and the presence of trapped air interferes with the function of radiator hence the call for proper servicing ranging from changing of bad hoses and refilling the coolant. Another fine example of the Cadillac Catera would be to relate that car's luxurious features combined with a powerful V6 engine will highly appreciate a properly functioning radiator for the comfort of driving. The Radiators designed with a specific shape and used for specific purpose distinguishes Cadillac, at the same time promising quality and performance. Being one of the mechanisms of Cadillac Catera's cooling system, this radiator points to company's commitment to quality and quality and clients' needs, making Cadillac Catera an iconic product in the car manufacturing history.
Cadillac Catera Radiator Parts Questions & Experts Answers
- Q: How to service and repair the radiator on Cadillac Catera?A:The service procedure requires Battery Cable negation before Radiator work begins. The first service step includes releasing self-locking tabs on upper Radiator covers before unscrewing their upper Radiator cover screws. First drain engine coolant from the system before removing the intake air resonator. The electrical connectors at the primary cooling fan and cooling fan control switches require detaching. First disconnect the surge tank hose from the Radiator and disconnect the Transmission Oil Cooler hoses from the oil cooler pipes and proceed to remove Transmission Oil Cooler pipe retainer bracket bolts then securely position the pipes away from the Radiator. First disconnect the coolant hose from the secondary auxiliary coolant pump and then remove the secondary air cut-off valve bracket bolts from the fan housing as well as Transmission Oil Cooler to Radiator bracket bolts. After separation of the front condenser bracket bolts and Radiator inlet/outlet hoses from the Radiator it enables access for the Transmission Oil Cooler removal. Start by disconnecting the secondary auxiliary coolant pump connector then remove the upper mount retainers of the Radiator. Lift and gently shake the component before removing the lower retainers from the Radiator support. The primary fan bolts with the primary fan should be taken off the Radiator while also removing cooling fan control switches if needed. Start your installation process by putting back the cooling fan control switches which were taken off. Mount the primary fan to the Radiator by setting the tab then tighten its bolts to 4 nm (35 inch lbs.). Place the Radiator combination with the primary fan onto the support while confirming that its tabs lock into position at the retaining points and resting correctly in the brackets. The installation requires connecting secondary auxiliary coolant pump connector then attaching the Radiator inlet/outlet hoses with condenser-to-Radiator bracket bolts until they achieve full seating. Fasten the secondary air cut-off valve bracket onto the fan housing by using torque of 4 nm (35 inch lbs.). The coolant hose attaches to the secondary auxiliary coolant pump before installing Transmission Oil Cooler components with their bracket fasteners to a full stop while connecting Transmission Oil Cooler hoses to the oil cooler pipes along with retaining bracket installation to seat position. Finally install the surge tank hose to the Radiator as well as reconnect both primary cooling fan electrical connectors and cooling fan control switches. Follow installation of the intake air resonator with cooling system filling and conclude by positioning upper Radiator covers followed by screw and self-locking tab insertion before reconnecting the negative Battery Cable.

Related Cadillac Catera Parts
 Cadillac Catera A/C Condenser Fan
 Cadillac Catera Coolant Reservoir Cap
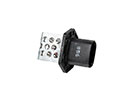 Cadillac Catera Cooling Fan Resistors
 Cadillac Catera Cooling Hose
 Cadillac Catera Fan Blade
 Cadillac Catera Fan Shroud
 Cadillac Catera Radiator Cap
 Cadillac Catera Radiator Hose
 Cadillac Catera Radiator fan
 Cadillac Catera Thermostat
 Cadillac Catera Thermostat Housing
 Cadillac Catera Water Pump