ChevyParts
My Garage
My Account
Cart
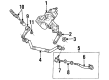
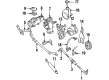
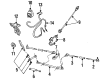
OEM Cadillac Center Link
Steering Drag Center Link- Select Vehicle by Model
- Select Vehicle by VIN
Select Vehicle by Model
orMake
Model
Year
Select Vehicle by VIN
For the most accurate results, select vehicle by your VIN (Vehicle Identification Number).
9 Center Links found

Cadillac Center Link Part Number: 90510647
$233.79 MSRP: $407.32You Save: $173.53 (43%)Ships in 1-2 Business DaysProduct Specifications- Other Name: Rod, Steering Connecting; Steering Center Link; Drag Link; Rod, Steering Intermediate


Cadillac Center Link Part Number: 19149619
Product Specifications- Other Name: Rod Kit, Steering Connecting; Drag Link
- Replaces: 89040375, 12471375

Cadillac Center Link Part Number: 7837639
Product Specifications- Other Name: Rod Assembly, Intermediate; Drag Link
- Replaced by: 26059126

Cadillac Center Link Part Number: 7834621
Product Specifications- Other Name: Rod Kit, Steering Linkage Intermediate; Drag Link

Cadillac Center Link Part Number: 26050588
Product Specifications- Other Name: Rod, Steering Connecting; Drag Link Repair Kit; Drag Link; Center Link Assembly
Cadillac Center Link Part Number: 26059132
Product Specifications- Other Name: Rod Kit, Steering Connecting; Drag Link; Rod Kit, Steering Intermediate
- Replaces: 26037656
Cadillac Center Link Part Number: 26059131
Product Specifications- Other Name: Rod Kit, Steering Connecting; Drag Link; Rod Kit, Steering Intermediate

Cadillac Center Link Part Number: 26050592
Product Specifications- Other Name: Rod Assembly, Steering Linkage Relay; Drag Link Repair Kit; Drag Link; Center Link Assembly; Rod, Steering Connecting
Cadillac Center Link Part Number: 26050590
Product Specifications- Other Name: Rod Assembly, Steering Linkage Relay; Drag Link Repair Kit; Steering Center Link; Drag Link; Center Link Assembly; Rod, Steering Connecting
Cadillac Center Link
Choose OEM Center Link, you're making the optimal decision for superior quality and perfect performance. You can feel confident because each component goes through stringent quality checks. Every part is carefully built to comply with Cadillac's factory specifications. You'll enjoy a smooth, worry-free installation that fits just right. At ChevyPartsGiant.com, you'll find it easy to get top-quality OEM Cadillac Center Link. You can shop at highly competitive prices and protect your budget. All our genuine Cadillac parts include a dependable manufacturer's warranty. You'll also appreciate our straightforward return policy and swift delivery services for extra convenience.
Cadillac Center Link Parts and Q&A
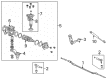
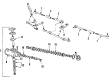
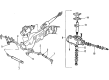
- Q: How to service and repair the center link on Cadillac Catera?A:To service and fix the Center Link, start by raising and supporting the vehicle while ensuring supplementary support is added at the other end, so that it cannot drop from the hoist. Pull off the inner trace rod ball studs nuts, and use the tie rod / wheel stud puller (J6627-A) to transfer the internal trace rods from the relay rod. Then, pull out the relay rod ball stud nut from the Pitman Arm and use the relay rod removal tool (J42400) to lift the relay rod ball stud from the Pitman Arm. Repeat the same process for the Idler Arm. For installation, connect the relay rod to the Idler Arm using linkage installer (J42089) on the relay rod ball stud by tightening it to 30 nm (22 ft. Lbs.) to make sure that the ball stud taper sits well. Use washers and nuts to mount the linkage damper (J42089) that came from the disassembled clutch linkage. Fine-tune the adjustment until the clutch clutch pedals are aligned. Reinstall the cylinder hat, the clutch pressure plate, and clutch release arm. Install the relay rod to the Pitman Arm and remove the linkage installer (J42089) and tighten to 30 nm (22 ft. Lbs.), reinstall and remove. Replace with anewlabel self-locking relay rod ball stud nut and tighten it to 60 nm (44 ft. Lbs.). Insert the inner tie rods into the relay rod, using the linkage installer (J42089) apply on the tie rod ball stud until it's tightened to 30 nm (22 ft. Lbs.) before removal. Finally, replace a new self-locking tie rod ball stud nut and tighten it to 60 nm (44 ft. Lbs.) lowered the vehicle and toe adjust to the correct specification.

Related Cadillac Parts
 Cadillac Steering Wheel
 Cadillac Drag Link
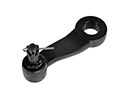 Cadillac Pitman Arm
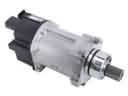 Cadillac Power Steering Assist Motor
 Cadillac Power Steering Pressure Switch
 Cadillac Radius Heat Shield
 Cadillac Steering Column Cover
 Cadillac Steering Column Seal
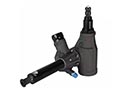 Cadillac Steering Gearbox
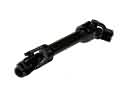 Cadillac Steering Shaft
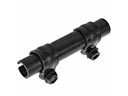 Cadillac Tie Rod Adjusting Sleeve
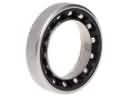 Cadillac Upper Steering Column Bearing