ChevyParts
My Garage
My Account
Cart
OEM Cadillac Door Moldings
- Select Vehicle by Model
- Select Vehicle by VIN
Select Vehicle by Model
orMake
Model
Year
Select Vehicle by VIN
For the most accurate results, select vehicle by your VIN (Vehicle Identification Number).
680 Door Moldings found


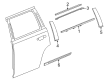
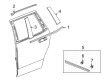
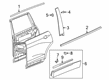
Cadillac Belt Weatherstrip, Rear Driver Side Part Number: 23227744
$134.01 MSRP: $200.36You Save: $66.35 (34%)Ships in 1-3 Business DaysProduct Specifications- Other Name: Molding Assembly-Rear Side Door Window Belt Reveal *Exterior Bright; Door Moldings; Weatherstrip; Molding, Back/Rear Window Glass Reveal
- Position: Rear Driver Side
- Replaces: 23445728, 20963513

Cadillac Belt Weatherstrip, Rear Passenger Side Part Number: 23227745
$134.01 MSRP: $200.36You Save: $66.35 (34%)Ships in 1-2 Business DaysProduct Specifications- Other Name: Molding Assembly-Rear Side Door Window Belt Reveal *Exterior Bright; Door Moldings; Weatherstrip; Molding, Back/Rear Window Glass Reveal
- Position: Rear Passenger Side
- Replaces: 23445729, 20963514


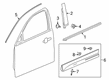
Cadillac Body Side Molding, Silver, Outer Passenger Side Part Number: 23264123
$98.18 MSRP: $146.13You Save: $47.95 (33%)Ships in 1-3 Business DaysProduct Specifications- Other Name: Molding, Cab And Load Carrier Outer Side Decoration; Door Moldings; Weatherstrip; Belt Weatherstrip
- Position: Outer Passenger Side


Cadillac Belt Molding, Rear Driver Side Part Number: 84337035
$142.60 MSRP: $213.19You Save: $70.59 (34%)Ships in 1-3 Business DaysProduct Specifications- Other Name: Molding Assembly-Rear Side Door Window Belt Reveal; Molding, Rear Side Door Window Reveal
- Position: Rear Driver Side

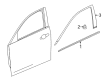
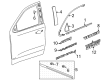
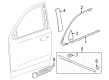
Cadillac Belt Molding, Front Passenger Side Part Number: 84445406
$134.29 MSRP: $192.16You Save: $57.87 (31%)Ships in 1-2 Business DaysProduct Specifications- Other Name: Molding, Front Door Window Reveal; Door Moldings
- Position: Front Passenger Side
- Replaces: 23296751, 22744650, 23222005

Cadillac Window Molding, Front Passenger Side Part Number: 84693616
$45.93 MSRP: $68.36You Save: $22.43 (33%)Ships in 1-3 Business DaysProduct Specifications- Other Name: Molding, Front Door Belt Trim Finish & Window Garnish; Door Moldings; Molding, Front Door Window(Inner/Outer)
- Position: Front Passenger Side


Cadillac Belt Molding, Black, Rear Driver Side Part Number: 85590194
$70.13 MSRP: $104.39You Save: $34.26 (33%)Product Specifications- Other Name: Molding Assembly-Rear Side Door Window Belt Reveal; Molding, Back/Rear Window Glass Reveal
- Position: Rear Driver Side
- Replaces: 84844393, 84914984, 85138607

Cadillac Belt Molding, Front Passenger Side Part Number: 84844388
$50.40 MSRP: $75.02You Save: $24.62 (33%)Ships in 1-3 Business DaysProduct Specifications- Other Name: Molding, Front Door Window Reveal; Door Moldings; Molding, Front Door Window(Inner/Outer)
- Position: Front Passenger Side

Cadillac Body Side Molding, Silver, Outer Driver Side Part Number: 84276449
$78.98 MSRP: $117.56You Save: $38.58 (33%)Ships in 1-3 Business DaysProduct Specifications- Other Name: Molding, Cab And Load Carrier Outer Side Decoration; Door Moldings
- Position: Outer Driver Side

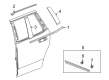
Cadillac Belt Molding, Black, Rear Passenger Side Part Number: 85590199
$60.95 MSRP: $90.72You Save: $29.77 (33%)Ships in 1-3 Business DaysProduct Specifications- Other Name: Molding Assembly-Rear Side Door Window Belt Reveal *Black; Molding, Back/Rear Window Glass Reveal
- Position: Rear Passenger Side
- Replaces: 84844398, 85138612

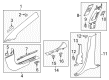
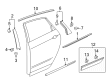
Cadillac Sill Trim, Titanium, Rear Passenger Side Part Number: 84283033
$56.60 MSRP: $84.25You Save: $27.65 (33%)Ships in 1-2 Business DaysProduct Specifications- Other Name: Molding, Rear Side Door Sill
- Position: Rear Passenger Side
- Replaces: 23411848, 84126055, 84074992
Cadillac Body Side Molding, Silver, Outer Driver Side Part Number: 23264122
$98.18 MSRP: $146.13You Save: $47.95 (33%)Ships in 1-3 Business DaysProduct Specifications- Other Name: Molding, Cab And Load Carrier Outer Side Decoration; Door Moldings; Weatherstrip; Belt Weatherstrip
- Position: Outer Driver Side
- Replaces: 22834250

Cadillac Applique, Rear Passenger Side Part Number: 86814811
$123.51 MSRP: $184.65You Save: $61.14 (34%)Ships in 1-3 Business DaysProduct Specifications- Other Name: Applique, Rear Quarter Panel; Molding, Cab And Load Carrier Outer Side Decoration; Molding, Fuel Door & Body Side
- Position: Rear Passenger Side
- Replaced by: 85604005

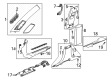
Cadillac Rear Sill Plate, Black, Passenger Side Part Number: 84962615
$65.91 MSRP: $98.10You Save: $32.19 (33%)Ships in 1-3 Business DaysProduct Specifications- Other Name: Molding, Rear Side Door Sill; Molding, Door Sill And Rocker
- Position: Rear Passenger Side
- Replaces: 84270262

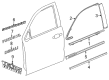
Cadillac Belt Molding, Black, Front Passenger Side Part Number: 84126966
$58.18 MSRP: $86.60You Save: $28.42 (33%)Ships in 1-3 Business DaysProduct Specifications- Other Name: Molding Assembly-Front Side Door Window Belt Reveal *Black; Door Moldings; Molding, Front Door Window(Inner/Outer)
- Position: Front Passenger Side

Cadillac Belt Molding, Gloss Black, Front Driver Side Part Number: 84682628
$92.78 MSRP: $138.09You Save: $45.31 (33%)Product Specifications- Other Name: Molding, Front Door Window Reveal; Door Moldings
- Position: Front Driver Side
- Replaced by: 42903813
Cadillac Belt Weatherstrip, Black, Rear Driver Side Part Number: 84126983
$72.43 MSRP: $107.80You Save: $35.37 (33%)Ships in 1-3 Business DaysProduct Specifications- Other Name: Molding Assembly-Rear Side Door Window Belt Reveal *Black; Door Moldings; Weatherstrip; Molding, Back/Rear Window Glass Reveal
- Position: Rear Driver Side

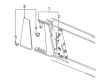
Cadillac Reveal Molding, Rear Upper Passenger Side Part Number: 84239732
$70.94 MSRP: $105.59You Save: $34.65 (33%)Ships in 1-3 Business DaysProduct Specifications- Other Name: Molding Assembly-Rear Side Door Window Upper Reveal; Molding, Rear Side Door Window Reveal
- Position: Rear Upper Passenger Side

Cadillac Reveal Molding, Black, Rear Upper Passenger Side Part Number: 84365527
$41.18 MSRP: $61.30You Save: $20.12 (33%)Ships in 1-3 Business DaysProduct Specifications- Other Name: Molding Assembly-Rear Side Door Window Upper Reveal; Door Moldings; Molding, Rear Side Door Window Reveal
- Position: Rear Upper Passenger Side

Cadillac Body Side Molding, Black, Front Driver Side Part Number: 84704779
$83.71 MSRP: $124.59You Save: $40.88 (33%)Ships in 1-3 Business DaysProduct Specifications- Other Name: Molding, Front Side Door; Door Moldings; Molding, Cab And Load Carrier Outer Side Decoration
- Position: Front Driver Side
| Page 1 of 34 |Next >
1-20 of 680 Results
Cadillac Door Moldings
Want to cut long-term maintenance and repair costs? Choose OEM Door Moldings. Those parts deliver top durability you can trust. On our site, you'll find a huge catalog of genuine Cadillac parts. Prices are unbeatable, so you can keep more in your pocket. Every OEM Cadillac Door Moldings includes a manufacturer's warranty. You can also get an easy return policy that keeps buying risk free. Fast delivery, get your car on the road quickly. It's simple to search, compare, and order. Stop guessing about quality or fit. Order today and save with parts that last.
Cadillac Door Moldings Parts Questions & Experts Answers
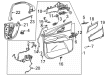
- Q: How to replace the Front Side Door Moldings on Cadillac DeVille?A:The first step to replace the Front Side Door Opening Frame Garnish Molding requires removing the trim panel. Remove the front and rear retainers until you detach the garnish molding from the weather strip assembly. Start your installation by putting the front retainer piece through the garnish molding and into the inner panel then install the weather strip assembly along with the garnish molding before you put in the rear retainer. Finally, reinstall the trim panel.
- Q: How to remove the door moldings on Cadillac Eldorado?A:To remove the body side molding, you need the following tools: Heat Gun (J 25070), gray double-coated foam tape (3M P/N 06380). Start by cleaning the repair area with Liquid Wash and Wax GM P/N 1052870 or its equivalent, and then dry with a clean lint-free cloth. If there are any adhesive traces on the body panel and the back of the molding, remove them using varnish makers and painters (VM&P) naphtha or isopropyl alcohol. Mask the proper position of the molding with the masking tape; adjacent moldings may be used as their guide. Warm the body panel up to a minimum of 21°C (70°F) by using the Heat Gun (J 25070). Apply the grey double-coated foam tape (3M P/N 06380) to the molding, and close the door before installation. Layout the molding while lining it with the tape guideline placed into the body panel; make sure you pull off the backing from the molding just before installation without it touching the adhesive. Now align the two pins on the molding with the guide holes on the door, fix the molding onto the body & apply hand pressure over it's length for 30 seconds to have a good bond with it. Finally, take off the masking tape guideline and clean any tape traces on the body, if needed.
- Q: How to replace the door moldings on the side door opening frame on Cadillac SRX?A:Start garnish molding replacement by removing the air bag screw cover from the molding then unscrew the moldings tie. Extract the side door garnish molding from its locator holes then disengage the seat belt guide from the molding before removing the seat belt anchor bolt. To install the seat belt guide first place the seat belt through the garnish molding before inserting the guide. Order the retaining slots on the side door garnish molding to match the body pillar holes before pushing the panel inward to lock the retainers into place. First reinsert the seat belt anchor bolt and apply forces until it reaches a torque of 2 N.m (18 lb in). After that, place the garnish molding screw and finish by installing the air bag screw cover.