ChevyParts
My Garage
My Account
Cart
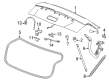
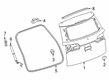
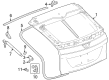
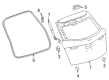
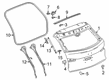
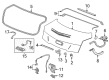
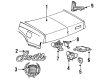
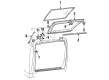
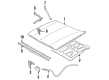
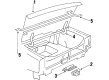
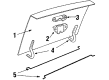
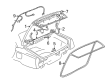
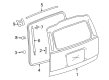
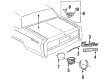
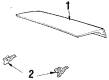
OEM Cadillac Liftgate Hinge
Luggage Compartment Door Hinge- Select Vehicle by Model
- Select Vehicle by VIN
Select Vehicle by Model
orMake
Model
Year
Select Vehicle by VIN
For the most accurate results, select vehicle by your VIN (Vehicle Identification Number).
48 Liftgate Hinges found

Cadillac Hinge, Rear Driver Side Part Number: 84844097
$292.06 MSRP: $436.65You Save: $144.59 (34%)Ships in 1-3 Business DaysProduct Specifications- Other Name: Hinge, Rear Compartment Lid And End Gate; Door Hinge; Hinge, Rear Compartment Lid
- Position: Rear Driver Side
- Replaces: 84721079, 84617930

Cadillac Hinge, Passenger Side Part Number: 84256736
$120.09 MSRP: $201.37You Save: $81.28 (41%)Ships in 1-2 Business DaysProduct Specifications- Other Name: Liftgate Hinge; Door Hinge; Hinge, Rear Compartment Lid And End Gate
- Position: Passenger Side
Cadillac Hinge, Driver Side Part Number: 84256735
$146.81 MSRP: $219.49You Save: $72.68 (34%)Ships in 1-3 Business DaysProduct Specifications- Other Name: Liftgate Hinge; Door Hinge; Hinge, Rear Compartment Lid And End Gate
- Position: Driver Side

Cadillac Hinge Part Number: 84798262
$27.54 MSRP: $40.99You Save: $13.45 (33%)Ships in 1-2 Business DaysProduct Specifications- Other Name: Hinge, Rear Compartment Lid And End Gate
- Replaced by: 85812747

Cadillac Hinge, Rear Passenger Side Part Number: 23350972
$47.91 MSRP: $69.15You Save: $21.24 (31%)Ships in 1-2 Business DaysProduct Specifications- Other Name: Hinge, Rear Hatch Window; Liftgate Hinge; Door Hinge; Hinge, Rear Compartment Lid And End Gate
- Position: Rear Passenger Side

Cadillac Hinge, Passenger Side Part Number: 23276956
$18.57 MSRP: $27.64You Save: $9.07 (33%)Ships in 1-3 Business DaysProduct Specifications- Other Name: Liftgate Hinge; Door Hinge; Hinge, Rear Compartment Lid And End Gate
- Position: Passenger Side

Cadillac Hinge, Rear Driver Side Part Number: 23227800
$59.29 MSRP: $88.25You Save: $28.96 (33%)Ships in 1-3 Business DaysProduct Specifications- Other Name: Hinge, Rear Compartment Lid And End Gate; Door Hinge
- Position: Rear Driver Side
- Replaces: 23179230


Cadillac Hinge Part Number: 15134524
Product Specifications- Other Name: Hinge, End Gate Closing; Liftgate Hinge; Door Hinge
- Replaces: 15767489, 15762178


Cadillac Lift Cylinder, Rear Driver Side Part Number: 23198275
$87.33 MSRP: $129.98You Save: $42.65 (33%)Product Specifications- Other Name: Hinge, Rear Compartment Lid; Back Glass Lift Support; Liftgate Door Support.; Hinge Assembly
- Position: Rear Driver Side

Cadillac Hinge, Passenger Side Part Number: 20728028
Product Specifications- Other Name: Hinge Assembly Rear Compartment Lid; Door Hinge; Hinge, Rear Compartment Lid
- Position: Passenger Side

Cadillac Hinge Part Number: 15645317
Product Specifications- Other Name: Hinge, End Gate Closing; Liftgate Hinge; Door Hinge

Cadillac Hinge Part Number: 15645318
Product Specifications- Other Name: Hinge, End Gate Closing; Liftgate Hinge; Door Hinge

Cadillac Hinge Part Number: 14039220
Product Specifications- Other Name: Hinge, Hood Panel

Cadillac Hinge, Rear Passenger Side Part Number: 20633144
Product Specifications- Other Name: Hinge, Rear Compartment Lid; Door Hinge
- Position: Rear Passenger Side

Cadillac Hinge, Rear Passenger Side Part Number: 25543720
Product Specifications- Other Name: Hinge, Rear Compartment Lid; Door Hinge
- Position: Rear Passenger Side
Cadillac Hinge, Rear Driver Side Part Number: 25543721
Product Specifications- Other Name: Hinge, Rear Compartment Lid; Door Hinge
- Position: Rear Driver Side

Cadillac Hinge, Rear Passenger Side Part Number: 25697611
Product Specifications- Other Name: Hinge, Rear Compartment Lid And End Gate; Door Hinge; Hinge, Rear Compartment Lid
- Position: Rear Passenger Side
- Replaces: 25632950

Cadillac Hinge Part Number: 15260499
Product Specifications- Other Name: Liftgate Hinge; Door Hinge; Hinge, End Gate Closing
Cadillac Hinge Assembly, Rear Driver Side Part Number: 20578533
Product Specifications- Other Name: Hinge, Rear Compartment Lid; Door Hinge; Hinge
- Position: Rear Driver Side

Cadillac Hinge, Rear Driver Side Part Number: 20166703
Product Specifications- Other Name: Hinge, Rear Compartment Lid And End Gate; Door Hinge
- Position: Rear Driver Side
| Page 1 of 3 |Next >
1-20 of 48 Results
Cadillac Liftgate Hinge
Choose OEM Liftgate Hinge, you're making the optimal decision for superior quality and perfect performance. You can feel confident because each component goes through stringent quality checks. Every part is carefully built to comply with Cadillac's factory specifications. You'll enjoy a smooth, worry-free installation that fits just right. At ChevyPartsGiant.com, you'll find it easy to get top-quality OEM Cadillac Liftgate Hinge. You can shop at highly competitive prices and protect your budget. All our genuine Cadillac parts include a dependable manufacturer's warranty. You'll also appreciate our straightforward return policy and swift delivery services for extra convenience.
Cadillac Liftgate Hinge Parts and Q&A
- Q: How to replace the trunk/liftgate hinge on the removable rear panel mid gate on Cadillac Escalade?A:Before starting the task push the rear seat down and verify that the rear mid gate is stowed and closed tight. Take out the hinge trim cover from the mid-gate area before removing the hinge attachment nuts and separating the hinge from the vehicle. Fix the hinge to the vehicle while keeping the Fastener Notice from Service Precautions in mind. Install the four retaining nuts and tighten them using a torque value of 25 N.m (18 lb ft). Put the hinge trim cover in position over its opening and raise the rear seatback.
- Q: How to replace the liftgate hinges on Cadillac SRX?A:Mark the position of the liftgate hinges with a grease pencil before you open the liftgate to start replacing them. Take off the upper right vehicle body grommet, disconnect its electrical connector and washer hose before doing the same on the upper left side and disconnecting both electrical connectors. Keep the liftgate open while disconnecting its assist rods from the top ball studs. Open the access panel doors in the header trim panel and take off the nuts that hold the liftgate hinge to the vehicle. With help raise the liftgate off the vehicle while you disconnect bolts between the hinges and liftgate. You should install the new liftgate hinges by setting them exactly at the vehicle location marks then bolt them to the liftgate and tighten the nuts to 25 N.m (20 lb ft). A partner holds the liftgate while you connect the vehicle mounting nuts before slamming the access doors in the header trim panel and fitting the liftgate support rods to the upper holder stud. Reconnect two electrical connectors at the upper left corner then install the grommet while placing the liftgate support. Afterward, link the electrical connector and washer hose at the upper right corner and set the grommet there before returning the liftgate to its place.


Related Cadillac Parts
 Cadillac Door Lock
 Cadillac Window Motor
 Cadillac Bumper Reflector
 Cadillac Car Speakers
 Cadillac Center Console Base
 Cadillac Dash Panel Vent Portion Covers
 Cadillac Door Latch Cable
 Cadillac Instrument Panel Light Bulb
 Cadillac Seat Heater Pad
 Cadillac Seat Switch Panel
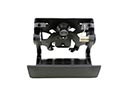 Cadillac Tailgate Handle
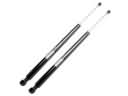 Cadillac Tailgate Lift Support