ChevyParts
My Garage
My Account
Cart
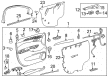
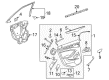
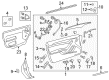
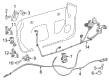
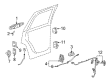
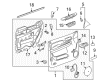
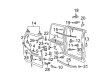
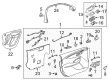
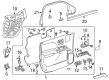
OEM Cadillac Door Lock
Power Door Lock Actuator- Select Vehicle by Model
- Select Vehicle by VIN
Select Vehicle by Model
orMake
Model
Year
Select Vehicle by VIN
For the most accurate results, select vehicle by your VIN (Vehicle Identification Number).
304 Door Locks found


Cadillac Lock Actuator, Front Passenger Side Part Number: 13579523
$132.83 MSRP: $195.09You Save: $62.26 (32%)Ships in 1-2 Business DaysProduct Specifications- Other Name: Lock, Front Side Door; Door Lock Actuator Motor; Door Latch Assembly; Door Lock Actuator; Door Lock; Lock Assembly; Lock; Latch; Latch, Front Side Door
- Position: Front Passenger Side
- Replaces: 13503802, 13577984, 13503814


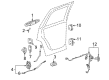
Cadillac Lock Actuator, Rear Passenger Side Part Number: 22862238
$152.75 MSRP: $224.34You Save: $71.59 (32%)Ships in 1-2 Business DaysProduct Specifications- Other Name: Lock, Rear Side Door; Door Lock Actuator Motor; Door Lock; Lock Assembly; Latch, Rear Side Door
- Position: Rear Passenger Side
- Replaces: 25843164, 20825340, 25992282, 20922247, 22791036


Cadillac Lock Actuator, Rear Passenger Side Part Number: 22862035
$185.73 MSRP: $272.79You Save: $87.06 (32%)Ships in 1-2 Business DaysProduct Specifications- Other Name: Latch Assembly-Rear Side Door; Door Lock Actuator Motor; Door Lock; Lock Assembly; Latch, Door Lock
- Position: Rear Passenger Side
- Replaces: 22785478


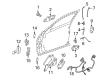
Cadillac Lock Actuator, Front Driver Side Part Number: 22862244
$185.94 MSRP: $277.99You Save: $92.05 (34%)Ships in 1-3 Business DaysProduct Specifications- Other Name: Lock, Front Side Door; Door Lock Actuator Motor; Door Lock Actuator; Door Lock; Lock Assembly
- Position: Front Driver Side
- Replaces: 20922215, 25876534, 20786539, 22791029


Cadillac Lock Actuator, Rear Driver Side Part Number: 22862242
$160.40 MSRP: $235.58You Save: $75.18 (32%)Ships in 1-2 Business DaysProduct Specifications- Other Name: Lock, Rear Side Door; Door Lock Actuator Motor; Door Lock; Lock Assembly; Latch, Rear Side Door
- Position: Rear Driver Side
- Replaces: 20825339, 22791035, 25992281, 20922246, 25843163


Cadillac Lock Actuator, Front Driver Side Part Number: 23190383
$198.44 MSRP: $288.91You Save: $90.47 (32%)Ships in 1-2 Business DaysProduct Specifications- Other Name: Latch Assembly-Front Side Door (Left-Hand); Door Lock Actuator Motor; Door Lock Actuator; Door Lock; Lock Assembly; Latch, Front Side Door
- Position: Front Driver Side
- Replaces: 22922943, 22791011, 25876536, 19210210, 20922217, 25831217


Cadillac Lock Assembly, Front Driver Side Part Number: 20995846
$171.84 MSRP: $250.18You Save: $78.34 (32%)Ships in 1-2 Business DaysProduct Specifications- Other Name: Lock-Front Side Door (W/O Handle); Door Latch Assembly; Door Lock; Lock, Front Side Door
- Position: Front Driver Side


Cadillac Lock Actuator, Rear Driver Side Part Number: 25876389
$161.56 MSRP: $237.28You Save: $75.72 (32%)Ships in 1-2 Business DaysProduct Specifications- Other Name: Latch Assembly-Rear Side Door; Door Lock Actuator Motor; Door Lock; Lock Assembly; Latch, Door Lock
- Position: Rear Driver Side
- Replaces: 20783857, 25945736, 25873488


Cadillac Lock Actuator, Front Passenger Side Part Number: 22862245
$195.23 MSRP: $291.88You Save: $96.65 (34%)Ships in 1-3 Business DaysProduct Specifications- Other Name: Lock, Front Side Door; Door Lock Actuator Motor; Door Lock Actuator; Door Lock; Lock Assembly
- Position: Front Passenger Side
- Replaces: 22791030, 20922216, 20786540


Cadillac Lock Actuator, Rear Driver Side Part Number: 22862032
$180.43 MSRP: $262.69You Save: $82.26 (32%)Ships in 1-2 Business DaysProduct Specifications- Other Name: Latch Assembly-Rear Side Door; Door Lock Actuator Motor; Door Lock; Lock Assembly; Latch, Door Lock
- Position: Rear Driver Side
- Replaces: 22785475

Cadillac Lock Actuator, Rear Passenger Side Part Number: 13579540
$137.16 MSRP: $205.06You Save: $67.90 (34%)Ships in 1-3 Business DaysProduct Specifications- Other Name: Lock, Rear Side Door; Door Lock Actuator Motor; Door Latch Assembly; Door Lock; Latch
- Position: Rear Passenger Side
- Replaces: 13503768

Cadillac Lock Actuator, Front Part Number: 13542864
$208.33 MSRP: $311.46You Save: $103.13 (34%)Ships in 1-3 Business DaysProduct Specifications- Other Name: Latch Assembly-Front Side Door; Door Lock Actuator Motor; Door Latch Assembly; Door Lock Actuator; Latch, Door Lock
- Position: Front
- Replaced by: 13558540

Cadillac Lock, Front Driver Side Part Number: 25843196
$123.90 MSRP: $185.24You Save: $61.34 (34%)Ships in 1-3 Business DaysProduct Specifications- Other Name: Lock, Front Side Door; Door Lock
- Position: Front Driver Side
- Replaces: 10373665, 12451631, 15900164, 10352115, 15253273, 25759054, 25773440, 15817041, 25766249

Cadillac Lock Actuator, Front Driver Side Part Number: 13579496
$120.43 MSRP: $180.05You Save: $59.62 (34%)Ships in 1-3 Business DaysProduct Specifications- Other Name: Lock, Front Side Door; Latch
- Position: Front Driver Side
- Replaces: 13503820

Cadillac Lock Actuator, Front Passenger Side Part Number: 20783845
$148.40 MSRP: $221.86You Save: $73.46 (34%)Ships in 1-3 Business DaysProduct Specifications- Other Name: Lock, Front Side Door; Door Lock Actuator Motor; Door Lock Actuator; Door Lock; Lock Assembly; Lock, Door Lock
- Position: Front Passenger Side
- Replaces: 22741764, 25945747
Cadillac Lock Actuator, Front Part Number: 13541718
$113.46 MSRP: $169.63You Save: $56.17 (34%)Ships in 1-3 Business DaysProduct Specifications- Other Name: Latch Assembly-Front Side Door; Door Lock Actuator Motor; Door Latch Assembly; Door Lock Actuator; Latch, Door Lock
- Position: Front
- Replaced by: 13542865

Cadillac Lock Cylinder, Rear Lower Part Number: 20935252
$132.72 MSRP: $194.92You Save: $62.20 (32%)Ships in 1-2 Business DaysProduct Specifications- Other Name: Latch Assembly-Rear Side Door Lower; Door Latch Assembly; Door Lock Cylinder; Trunk Latch; Door Lock; Lower Latch; Lock; Latch; Latch, Door Lock
- Position: Rear Lower
- Replaces: 15730667, 25784598, 20918764

Cadillac Lock Actuator, Front Driver Side Part Number: 13546488
$117.30 MSRP: $172.28You Save: $54.98 (32%)Ships in 1-3 Business DaysProduct Specifications- Other Name: Latch Assembly-Front Side Door; Latch Assembly; Lock Assembly; Lock; Latch; Latch, Front Side Door; Latch, Door Lock
- Position: Front Driver Side
- Replaces: 13590484, 13597036, 13598357, 13507155, 13587914, 13533616, 13592285, 13528332, 13592289, 13528310

Cadillac Lock Actuator, Front Passenger Side Part Number: 13533694
$137.12 MSRP: $205.01You Save: $67.89 (34%)Ships in 1-2 Business DaysProduct Specifications- Other Name: Latch Assembly-Front Side Door; Door Lock Actuator Motor; Door Latch Assembly; Door Lock Actuator; Door Lock; Latch Assembly; Lock Assembly; Lock; Latch, Door Lock
- Position: Front Passenger Side
- Replaced by: 13546507

Cadillac Lock Actuator, Rear Passenger Side Part Number: 13551768
$209.95 MSRP: $313.90You Save: $103.95 (34%)Ships in 1-2 Business DaysProduct Specifications- Other Name: Latch Assembly-Rear Side Door; Lock Assembly; Latch, Door Lock
- Position: Rear Passenger Side
- Replaced by: 13558548
| Page 1 of 16 |Next >
1-20 of 304 Results
Cadillac Door Lock
Want to cut long-term maintenance and repair costs? Choose OEM Door Lock. Those parts deliver top durability you can trust. On our site, you'll find a huge catalog of genuine Cadillac parts. Prices are unbeatable, so you can keep more in your pocket. Every OEM Cadillac Door Lock includes a manufacturer's warranty. You can also get an easy return policy that keeps buying risk free. Fast delivery, get your car on the road quickly. It's simple to search, compare, and order. Stop guessing about quality or fit. Order today and save with parts that last.
Cadillac Door Lock Parts Questions & Experts Answers
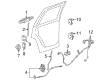
- Q: How to replace the rear door lock on Cadillac Catera?A:The starting point to install a new rear Door Lock demands first removing the door trim panel then the door water deflector. The replacement process starts by separating the inside Door Handle and completely detaching every rod from the lock assembly. Completely disconnect the Door Lock Actuator electrical connector and afterward use a screwdriver to uninstall the Door Lock screws to let the Door Lock free itself from the vehicle frame. Place the new Door Lock into position before fastening it with the Door Lock screws until they achieve a 8 n.m (71 lb in) torque setting. The installation process requires reattachment of Door Lock Actuator electrical connector after which you can reinstall all rods to the lock assembly and replace the inside Door Handle. You should reinstall the door water deflector followed by the door trim panel in its correct position.
- Q: How to Service and Repair a Door Lock on Cadillac XLR?A:The Door Lock replacement process begins by putting both seat and backrest in forward and backward angles while disconnecting the battery and removing the door sill trim followed by the b-pillar trim panel. You must remove the mastic cover at the Door Lock access hole followed by unfastening the b-pillar mounted Door Lock fasteners before pulling out the lock through the body access hole. Pull the electrical connector lock pivot point open before taking the connector off from the Door Lock. To take off the lock cover remove fasteners from the back of the housing while unseating cable sheaths until the cover becomes free. First loosen the cable ends when they reach a quarter turn from the lock-actuating lever before taking out the lock from the vehicle. When installing the replacement lock you need to first remove its rear cover then fit the cable ends into the lock-actuating lever before making a quarter rotation. Place the cable sheath inside the lock cover molded recess before fastening screws that need to be tightened to 2 n.m (19 lb in). Connect the electrical connector before finishing the installation through locking the connector over the Door Lock mechanism. Secure this lock into the b-pillar body hole while matching up the fastener holes then pass the fasteners through the cover plate until they reach the b-pillar Door Lock before tightening screws to 10 n.m (89 lb in). Studying the installation book for proper procedures and replacing the mastic cover to the Door Lock access hole before reconnection of the battery and evaluation of lock manual and electrical functionality. The installation concludes with placing the b-pillar trim panel along with the door sill cover then putting the seat in its previous position.


Related Cadillac Parts
 Cadillac Trunk Latch
 Cadillac Window Motor
 Cadillac Door Lock Actuator
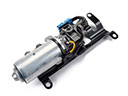 Cadillac Convertible Top Motor
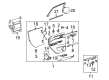
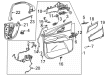
 Cadillac Door Armrest
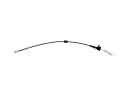 Cadillac Door Latch Cable
 Cadillac Door Lock Cylinder
 Cadillac Door Striker
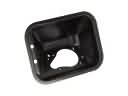 Cadillac Fuel Filler Housing
 Cadillac Liftgate Hinge
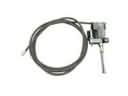 Cadillac Sunroof Cable
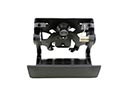 Cadillac Tailgate Handle