ChevyParts
My Garage
My Account
Cart
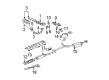
OEM Cadillac DTS Exhaust Manifold
Engine Exhaust Manifold- Select Vehicle by Model
- Select Vehicle by VIN
Select Vehicle by Model
orMake
Model
Year
Select Vehicle by VIN
For the most accurate results, select vehicle by your VIN (Vehicle Identification Number).
2 Exhaust Manifolds found

Cadillac DTS Exhaust Manifold, Driver Side Part Number: 12578360

Cadillac DTS Exhaust Manifold, Passenger Side Part Number: 12557767
Cadillac DTS Exhaust Manifold
Want to cut long-term maintenance and repair costs? Choose OEM Exhaust Manifold. Those parts deliver top durability you can trust. On our site, you'll find a huge catalog of genuine Cadillac DTS parts. Prices are unbeatable, so you can keep more in your pocket. Every OEM Cadillac DTS Exhaust Manifold includes a manufacturer's warranty. You can also get an easy return policy that keeps buying risk free. Fast delivery, get your car on the road quickly. It's simple to search, compare, and order. Stop guessing about quality or fit. Order today and save with parts that last.
In Cadillac DTS vehicles, the Exhaust Manifold plays the vital function of channelling hot exhaust gases coming from the engine towards the exhaust system to guarantee optimum engine performance with minimal emissions. Depending on the configuration of the engine, the manifold is located in different areas to eliminate intake reversion, this hampers air flow and reduces efficiency of the engine. Depending on the model of Cadillac DTS, the exhaust manifold can be made of cast iron or stainless steel that is the standard type or the headers that optimize the flow rate enhancing the performance of the automobile. Together with the utilization of headers, velocity of the exhaust gas is responsive for a more improved engine output. Exhaust manifold also plays an important role in the performance of a vehicle and therefore it must be replaced as soon as possible if it is damaged in Cadillac DTS.
Cadillac DTS Exhaust Manifold Parts Questions & Experts Answers
- Q: How to replace the right side exhaust manifold on Cadillac DTS?A:Starting to replace the right side Exhaust Manifold requires using steering column lock pin (J 42640) to set the steering column into the lock position. Support the vehicle with raised components and remove the rear Exhaust Manifold pipe together with the air check valve. The engine harness clips must be detached from the steering gear heat shield before the removal of the heat shield bolts results in the heat shield's departure. First unsnap and remove the intermediate shaft seal before you take out the pinch bolt that secures the intermediate shaft while removing it from the steering gear. Lowering the engine frame needs a screw-type jack to support its rear component allowing removal of four engine frame-to-body bolts. The Exhaust Manifold extraction requires removing the heated Oxygen Sensor (HO2S) along with the Exhaust Manifold nuts followed by extracting and discarding the old Exhaust Manifold Gasket. Start by mounting the new Exhaust Manifold Gasket onto the cylinder head studs then install the Exhaust Manifold before securing nuts to 25 n.m (18 lb ft). Coat the ho2s threads with anti-sieze compound (GM P/N 12377953 or equivalent) when installing the sensor while tightening it to 41 n.m (30 lb ft). Place the engine frame correctly into its position and replace the four rearward engine frame-to-body bolts while torquing them to 191 n.m (141 lb ft). Screw-type jacks should be removed while you reconnect the intermediate shaft to the steering gear followed by pinch bolt installation and tightening it to 45 n.m (33 lb ft). The steering gear heat shield and its bolts need to be reinstalled before final tightening at 9 n.m (80 lb in). To finalize the installation conclude by connecting the engine harness clips to the steering gear heat shield followed by installing the air check valve and rear Exhaust Manifold pipe then lowering the vehicle, extracting the steering column lock pin (J 42640) while connecting the engine harness electrical connector to the ho2s and adding the ho2s clip to the air valve hose bracket and securing the connector position assurance (CPA) retainer.

Related Cadillac DTS Parts
 Cadillac DTS Catalytic Converter
 Cadillac DTS Canister Purge Valves
 Cadillac DTS Diverter Valve
 Cadillac DTS EGR Filter
 Cadillac DTS EGR Vacuum Solenoid
 Cadillac DTS EGR Valve
 Cadillac DTS EGR Valve Gasket
 Cadillac DTS Exhaust Flange Gasket
 Cadillac DTS Exhaust Manifold Gasket
 Cadillac DTS Secondary Air Injection Check Valve
 Cadillac DTS Secondary Air Injection Pump
 Cadillac DTS Vapor Canister