ChevyParts
My Garage
My Account
Cart
OEM Cadillac Escalade ABS Control Module
Anti Lock Brake Control Module- Select Vehicle by Model
- Select Vehicle by VIN
Select Vehicle by Model
orMake
Model
Year
Select Vehicle by VIN
For the most accurate results, select vehicle by your VIN (Vehicle Identification Number).
34 ABS Control Modules found


Cadillac Escalade Control Module Part Number: 84634366
$281.25 MSRP: $504.48You Save: $223.23 (45%)

Cadillac Escalade Control Module Part Number: 84778360
$673.80 MSRP: $1214.07You Save: $540.27 (45%)


Cadillac Escalade Control Module Part Number: 23154722
$196.26 MSRP: $414.23You Save: $217.97 (53%)Ships in 1-2 Business Days

Cadillac Escalade Control Module Part Number: 19244883
$1556.56 MSRP: $2802.72You Save: $1246.16 (45%)Ships in 1-3 Business Days
Cadillac Escalade Pressure Valve Part Number: 25914986
$1926.64 MSRP: $2814.48You Save: $887.84 (32%)

Cadillac Escalade Control Module Part Number: 19244897
$761.07 MSRP: $1206.65You Save: $445.58 (37%)Ships in 1-2 Business Days
Cadillac Escalade Modulator Valve Part Number: 84609552
$457.36 MSRP: $785.52You Save: $328.16 (42%)


Cadillac Escalade Pressure Valve Part Number: 19122463


Cadillac Escalade Pressure Valve Part Number: 19149234


Cadillac Escalade Control Module Part Number: 12476000


Cadillac Escalade Control Module Part Number: 84078739


Cadillac Escalade Control Module Part Number: 25912635
$594.21 MSRP: $1066.86You Save: $472.65 (45%)

Cadillac Escalade Control Module Part Number: 19244884


Cadillac Escalade Pressure Valve Part Number: 88983913


Cadillac Escalade Control Module Part Number: 88936383
Cadillac Escalade Pressure Valve Part Number: 15269817
Cadillac Escalade Control Module Part Number: 19244907

Cadillac Escalade Control Module Part Number: 19244903

Cadillac Escalade Control Module Part Number: 12474925

Cadillac Escalade Pressure Valve Part Number: 19417210
| Page 1 of 2 |Next >
1-20 of 34 Results
Cadillac Escalade ABS Control Module
Want to cut long-term maintenance and repair costs? Choose OEM ABS Control Module. Those parts deliver top durability you can trust. On our site, you'll find a huge catalog of genuine Cadillac Escalade parts. Prices are unbeatable, so you can keep more in your pocket. Every OEM Cadillac Escalade ABS Control Module includes a manufacturer's warranty. You can also get an easy return policy that keeps buying risk free. Fast delivery, get your car on the road quickly. It's simple to search, compare, and order. Stop guessing about quality or fit. Order today and save with parts that last.
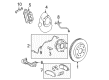
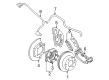
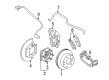
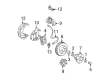
The Cadillac Escalade ABS Control Module is a critical part of the specific anti-lock braking device of a car that is famous for its dependability and capacity to improve the safety and effectiveness of vehicles. This sophisticated module has a critical task of avoiding wheel lock-up during aggressive braking while at the same time providing the Cadillac Escalade with the right grip levels on different types of terrains. ABS Control modules of the cars consist of wheel speed sensors, valves, a pump and an electronic control unit (ECU); which monitor and correct the braking force concerning the road conditions. Thus, utilizing the recent technology enhances braking system as well as, combines other functions like, electronic stability control, and traction control making the drive more enrich. Specific to Cadillac Escalade models, the ABS Control Module is built to adapt for both luxury and sport vehicle standards, designating its position as one of the best in the market. The Cadillac Escalade itself, a full-size luxury SUV, has gone through five generations and such features as 3D visualizer and self-driving possibility with hand-free control. Now, with all those powerful engines and high quality of the ride, Cadillac Escalade remains the yardstick for other luxury sport utility vehicles in the world. Thanks to the ABS Control Module, Cadillac Escalade has improved its reliability and offers the consumers only the beneficial features that help to enhance the safety and productivity of the car and strengthen Cadillac's position on the market of luxury vehicles.
Cadillac Escalade ABS Control Module Parts Questions & Experts Answers
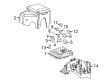
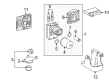
- Q: How to service and repair the ABS Control Module on Cadillac Escalade?A:It is important to first disconnect the negative Battery Cable when dealing with the service or repair of the ABS Control Module. Carefully undo the four t-25 torx screws (1) that attach the ABS Control Module to the bpmv so damage to each component is avoided. Pull the ABS Control Module upwards (2) slightly to get access to the electrical connectors and then unplug the four electrical connectors before finishing the removal of the ABS Control Module from the bpmv. Please don't reuse the previous mounting screws and never put rtv or any sealant on either the ABS Control Module gasket or its mating surfaces. Attach the ABS Control Module (2) to the bpmv (3) and link all the electrical connectors. Install each of the new t-25 torx screws (1) and make sure they're tightened to 5 nm (39 inch lbs.) in an x pattern. The end of your procedure includes securing the negative Battery Cable, calibrating tires with the scan tool and running another diagnostic system check.

Related Cadillac Escalade Parts
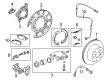
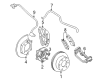
 Cadillac Escalade ABS Sensor
 Cadillac Escalade Brake Backing Plate
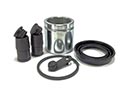 Cadillac Escalade Brake Caliper Repair Kit
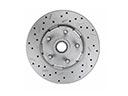 Cadillac Escalade Brake Disc
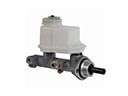 Cadillac Escalade Brake Master Cylinder
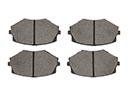 Cadillac Escalade Brake Pad
 Cadillac Escalade Brake Pedal
 Cadillac Escalade Hydraulic Hose
 Cadillac Escalade Parking Brake Cable
 Cadillac Escalade Parking Brake Shoe
 Cadillac Escalade Wheel Hub Bolt
 Cadillac Escalade Wheel Speed Sensor