ChevyParts
My Garage
My Account
Cart
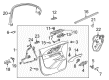
OEM Cadillac Escalade ESV Door Lock Switch
- Select Vehicle by Model
- Select Vehicle by VIN
Select Vehicle by Model
orMake
Model
Year
Select Vehicle by VIN
For the most accurate results, select vehicle by your VIN (Vehicle Identification Number).
26 Door Lock Switches found


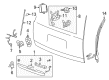
Cadillac Escalade ESV Release Switch Part Number: 15106857
$27.69 MSRP: $43.34You Save: $15.65 (37%)Ships in 1-2 Business Days

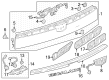
Cadillac Escalade ESV Release Switch, Rear Part Number: 23485764
$19.40 MSRP: $30.37You Save: $10.97 (37%)Ships in 1-2 Business Days


Cadillac Escalade ESV Release Switch Part Number: 13597496
$22.66 MSRP: $35.47You Save: $12.81 (37%)Ships in 1-2 Business Days


Cadillac Escalade ESV Lock Switch Part Number: 15077858
$20.39 MSRP: $31.70You Save: $11.31 (36%)
Cadillac Escalade ESV Lock Switch, Black, Passenger Side Part Number: 84504639
$15.27 MSRP: $49.76You Save: $34.49 (70%)Ships in 1-3 Business Days
Cadillac Escalade ESV Lock Switch, Jet Black, Driver Side Part Number: 84374123
$9.90 MSRP: $15.49You Save: $5.59 (37%)Ships in 1-3 Business Days
Cadillac Escalade ESV Window Switch, Passenger Side Part Number: 15186209
$85.12 MSRP: $133.33You Save: $48.21 (37%)Ships in 1-3 Business Days
Cadillac Escalade ESV Lock Switch, Jet Black, Passenger Side Part Number: 84374124
$10.42 MSRP: $16.30You Save: $5.88 (37%)Ships in 1-3 Business Days
Cadillac Escalade ESV Lock Switch, Driver Side Part Number: 84487011
$6.68 MSRP: $9.94You Save: $3.26 (33%)
Cadillac Escalade ESV Release Switch, Driver Side Part Number: 13534830
$18.45 MSRP: $28.86You Save: $10.41 (37%)
Cadillac Escalade ESV Switch Part Number: 22849598
$26.88 MSRP: $41.80You Save: $14.92 (36%)Cadillac Escalade ESV Lock Switch, Passenger Side Part Number: 84487013
$20.20 MSRP: $30.06You Save: $9.86 (33%)Ships in 1-3 Business DaysCadillac Escalade ESV Lock Switch, Black, Driver Side Part Number: 22988363
$13.70 MSRP: $21.43You Save: $7.73 (37%)Ships in 1-2 Business DaysCadillac Escalade ESV Lock Switch, Driver Side Part Number: 84374119
$8.80 MSRP: $13.10You Save: $4.30 (33%)Ships in 1-3 Business Days


Cadillac Escalade ESV Window Switch, Driver Side Part Number: 15883318
$152.16 MSRP: $227.45You Save: $75.29 (34%)


Cadillac Escalade ESV Window Switch Part Number: 15883323


Cadillac Escalade ESV Window Switch, Driver Side Part Number: 15883320
| Page 1 of 2 |Next >
1-20 of 26 Results
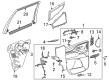
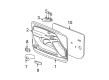
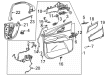
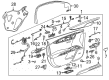
Cadillac Escalade ESV Door Lock Switch
Want to cut long-term maintenance and repair costs? Choose OEM Door Lock Switch. Those parts deliver top durability you can trust. On our site, you'll find a huge catalog of genuine Cadillac Escalade ESV parts. Prices are unbeatable, so you can keep more in your pocket. Every OEM Cadillac Escalade ESV Door Lock Switch includes a manufacturer's warranty. You can also get an easy return policy that keeps buying risk free. Fast delivery, get your car on the road quickly. It's simple to search, compare, and order. Stop guessing about quality or fit. Order today and save with parts that last.
Cadillac Escalade ESV Door Lock Switch Parts Questions & Experts Answers
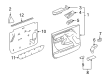
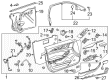
- Q: How to replace the Door Lock Switch and Power Window Switch for the passenger side on Cadillac Escalade ESV?A:The replacement process for the Door Lock and side window switch on the passenger side happens after complete removal of the front door trim panel. You must first remove the switch panel bezel securing screw from the frontdoor trim panel then separate the bezel from the door panel with a flat-bladed tool. Understand the retaining clips by using a wide plastic flat-bladed tool to start removing them from both edges of the door module before pulling out the door module from the switch panel bezel. Position the switch panel bezel with module back into the door trim panel after you set the module into switch panel bezel until it clicks. Fasten the switch panel bezel to the front door trim panel with screw while tightening the screw to 2 n.m (18 lb in). Program both tire pressure monitoring system and keyless entry system after you reinstall the front door trim panel. The door module programming requires additional steps if camper mirrors are installed on the vehicle.

Related Cadillac Escalade ESV Parts
 Cadillac Escalade ESV Air Bag Sensor
 Cadillac Escalade ESV Antenna Base
 Cadillac Escalade ESV Body Control Module
 Cadillac Escalade ESV Mirror Switch
 Cadillac Escalade ESV Occupant Detection Sensor
 Cadillac Escalade ESV Parking Assist Distance Sensor
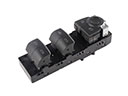 Cadillac Escalade ESV Power Window Switch
 Cadillac Escalade ESV Seat Heater Switch
 Cadillac Escalade ESV Seat Switch
 Cadillac Escalade ESV Window Channel
 Cadillac Escalade ESV Window Motor
 Cadillac Escalade ESV Window Regulator