ChevyParts
My Garage
My Account
Cart
OEM Cadillac Power Window Switch
Electric Window Switch- Select Vehicle by Model
- Select Vehicle by VIN
Select Vehicle by Model
orMake
Model
Year
Select Vehicle by VIN
For the most accurate results, select vehicle by your VIN (Vehicle Identification Number).
222 Power Window Switches found


Cadillac Window Switch, Driver Side Part Number: 19244656
$114.47 MSRP: $163.80You Save: $49.33 (31%)Product Specifications- Other Name: Switch, Door Lock & Side Window; Door Window Switch; Door Lock Switch; Lock Switch; Switch; Switch, Door And End Gate Electrical
- Position: Driver Side
- Replaces: 15151356


Cadillac Window Switch, Driver Side Part Number: 19244658
$122.46 MSRP: $175.24You Save: $52.78 (31%)Product Specifications- Other Name: Switch, Door Lock & Side Window; Control Switch; Switch; Switch, Door And End Gate Electrical
- Position: Driver Side
- Replaces: 15151360

Cadillac Window Switch, Blue, Driver Side Part Number: 25719212
$63.37 MSRP: $99.26You Save: $35.89 (37%)Ships in 1-3 Business DaysProduct Specifications- Other Name: Switch, Door Window
- Position: Driver Side
- Replaces: 25714328
Cadillac Window Switch, Driver Side Part Number: 25743667
$111.72 MSRP: $166.25You Save: $54.53 (33%)Ships in 1-3 Business DaysProduct Specifications- Other Name: Switch Assembly-Side Window (Master) *Wheat; Switch, Door Window
- Position: Driver Side

Cadillac Window Switch, Passenger Side Part Number: 15202854
$141.77 MSRP: $301.93You Save: $160.16 (54%)Product Specifications- Other Name: Switch, Door Lock & Side Window; Switch; Switch, Door And End Gate Electrical
- Position: Passenger Side
- Replaced by: 19115820

Cadillac SWITCH ASM-RR S/D WDO *JET BLACK Part Number: 09060226
$5.61 MSRP: $23.28You Save: $17.67 (76%)Product Specifications- Other Name: Switch, Door Window

Cadillac Lamp Switch Part Number: 22800523
$37.90 MSRP: $113.05You Save: $75.15 (67%)Ships in 1-2 Business DaysProduct Specifications- Other Name: Switch, Courtesy/Dome/Reading Lamp; Multi Purpose Switch; Headlamp Switch; Switch, Door Electric And Vacuum Locks; Switch, Quarter Window Regulator; Switch, Sun Roof Control
Cadillac Lamp Switch Part Number: 22800526
$36.79 MSRP: $107.02You Save: $70.23 (66%)Ships in 1-2 Business DaysProduct Specifications- Other Name: Switch, Courtesy/Dome/Reading Lamp; Switch, Door Electric And Vacuum Locks; Switch, Quarter Window Regulator; Switch, Sun Roof Control

Cadillac Window Switch Part Number: 9060220
$21.06 MSRP: $42.22You Save: $21.16 (51%)Ships in 1-3 Business DaysProduct Specifications- Other Name: Switch, Front Side Door Window; Switch, Door Window
- Position: Front

Cadillac Window Switch, Passenger Side Part Number: 15186209
$85.12 MSRP: $133.33You Save: $48.21 (37%)Ships in 1-3 Business DaysProduct Specifications- Other Name: Switch Assembly-Door Lock & Side Window; Switch
- Position: Passenger Side

Cadillac Window Release Switch Part Number: 15687025
Product Specifications- Other Name: Switch, Door And End Gate Electrical; Switch
- Position: Rear

Cadillac Window Switch, Wood Part Number: 10399190
Product Specifications- Other Name: Switch, Door And End Gate Electrical
- Position: Rear
- Replaces: 15113031
Cadillac Window Switch, Wood Part Number: 10399191
Product Specifications- Other Name: Switch, Door And End Gate Electrical
- Position: Rear
- Replaces: 15113032
Cadillac Window Switch, Black, Driver Side Part Number: 25743664
Product Specifications- Other Name: Switch Assembly-Side Window (Master) *Black; Switch, Door Window
- Position: Driver Side
Cadillac Window Switch, Black, Driver Side Part Number: 25719211
Product Specifications- Other Name: Switch Assembly, Side Window (Master) *Black; Switch, Door Window
- Position: Driver Side
- Replaces: 25714327
Cadillac Window Switch, Driver Side Part Number: 25719209
Product Specifications- Other Name: Switch Assembly-Side Window (Master) *Wheat; Switch, Door Window
- Position: Driver Side
- Replaces: 25714325
Cadillac Window Switch, Blue, Driver Side Part Number: 25743670
Product Specifications- Other Name: Switch Assembly-Side Window (Master) *Blue; Switch, Door Window
- Position: Driver Side

Cadillac Window Switch, Driver Side Part Number: 25668566
Product Specifications- Other Name: Switch Assembly, Side Window; Switch, Door Window
- Position: Driver Side
- Replaces: 03548213, 3548213

Cadillac Window Switch, Driver Side Part Number: 22810052
Product Specifications- Other Name: Switch Assembly-Door Lock & Side Window *Argent; Switch, Door Electric And Vacuum Locks; Switch, Door Window
- Position: Driver Side
- Replaces: 25970550

Cadillac Window Switch, Driver Side Part Number: 3532012
Product Specifications- Other Name: Switch Assembly-Side Window (Master); Switch, Door Window
- Position: Driver Side
| Page 1 of 12 |Next >
1-20 of 222 Results
Cadillac Power Window Switch
Want to cut long-term maintenance and repair costs? Choose OEM Power Window Switch. Those parts deliver top durability you can trust. On our site, you'll find a huge catalog of genuine Cadillac parts. Prices are unbeatable, so you can keep more in your pocket. Every OEM Cadillac Power Window Switch includes a manufacturer's warranty. You can also get an easy return policy that keeps buying risk free. Fast delivery, get your car on the road quickly. It's simple to search, compare, and order. Stop guessing about quality or fit. Order today and save with parts that last.
Cadillac Power Window Switch Parts Questions & Experts Answers
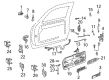
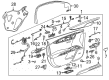
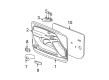
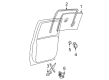
- Q: How to replace the power window switch in the rear door on Cadillac CTS?A:A flat bladed tool should be inserted under the front edge of the rear door switch until it disengages the retainer while pushing the tool firmly towards the switch. First disconnect the electrical connector and then lift up on the rear section of the switch plate to separate it from the door trim panel. A small flat bladed tool will help you disengage the side snap walls of the switch plate to remove the power window switch. To install the switch first connect its electrical connectors then insert it into the door trim panel while allowing the front portion to settle into the panel position. Complete switch installation requires a gentle yet uniform pressing action on the switch to activate the retainer.
- Q: How to replace the power window switch in the rear door on Cadillac SRX?A:A flat-bladed tool should be used to push firmly under the front of the rear door switch retainer while moving it towards the switch to unlock it. Pull the switch plate from the door panel by lifting its rear side first then detach the electrical connection. Apply a flat-bladed tool on both sides of the switch plate to release the snap walls which allows removal of the power window switch. Execute the installation procedure by first attaching electrical connectors before placing the switch within the door trim panel then lock the front of the switch to the door panel and use an even pressure on the switch to activate the retainer.
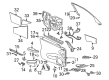
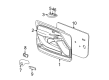
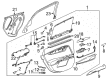
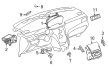
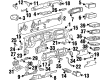
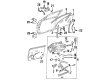
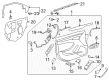
- Q: How to replace the left front power window switch on Cadillac XLR?A:Begin replacing the left front Power Window Switch only after turning the Ignition Switch to off position. The procedure starts with door trim panel removal before moving to backside retainer screws of upper trim panel. Then separate the upper trim from the door. You should start by taking out the inner energy absorber from the door panel before proceeding to detach the four retaining screws behind the armrest and one screw at its forward end. Cut the wire harness connection from the armrest and take out the armrest unit while using duct tape to shield the mirror and window and the applique to the door lock switch plate from damage. Uninstall the Power Window Switch assembly from the trim panel pocket then eliminate the wire harness connection. The Power Window Switch installation requires you to place it in position on the armrest switch plate applique before pushing to connect it. Connect the wire harness to the Power Window Switch assembly then return it to the pocket in the door trim panel before taking out protective tape materials. You must install the armrest by connecting its wire harness to the door assembly piece before attaching it to the door trim using four rear screws and one forward screw which should reach 10 n.m of torque (89 lb in). After installing the door panel inner energy absorber, proceed with attaching the upper trim while securing its retainers at the rear side of the panel and tightening both pieces to 10 n.m (89 lb in). Install the door trim panel as your last step.


Related Cadillac Parts
 Cadillac Antenna
 Cadillac Body Control Module
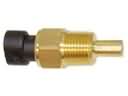 Cadillac Coolant Temperature Sensor
 Cadillac Automatic Transmission Shift Position Sensor Switch
 Cadillac Brake Light Switch
 Cadillac Dome Light Connector
 Cadillac Door Harness Connector
 Cadillac Door Lock Switch Connector
 Cadillac Headlight Relay
 Cadillac Igniter
 Cadillac Oil Pressure Gauge
 Cadillac Turn Signal Switch