ChevyParts
My Garage
My Account
Cart
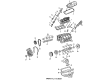
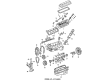
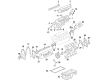
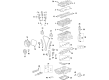
OEM Cadillac Pushrod
Valve Push Rod- Select Vehicle by Model
- Select Vehicle by VIN
Select Vehicle by Model
orMake
Model
Year
Select Vehicle by VIN
For the most accurate results, select vehicle by your VIN (Vehicle Identification Number).
9 Pushrods found


Cadillac Push Rods Part Number: 476525
$17.46 MSRP: $18.97You Save: $1.51 (8%)Ships in 1-2 Business DaysProduct Specifications- Other Name: Rod Assembly-Valve Push; Pushrod; Rod, Engine Valve Push Rod; Rod, Engine Valve Push


Cadillac Push Rods Part Number: 10241740
$15.16 MSRP: $23.75You Save: $8.59 (37%)Ships in 1-3 Business DaysProduct Specifications- Other Name: Rod, Engine Valve Push Rod; Pushrod


Cadillac Push Rods Part Number: 10238852
$18.77 MSRP: $30.90You Save: $12.13 (40%)Ships in 1-2 Business DaysProduct Specifications- Other Name: Rod, Valve Push; Pushrod; Rod, Engine Valve Push Rod


Cadillac Push Rods Part Number: 12619828
$3.87 MSRP: $9.12You Save: $5.25 (58%)Ships in 1-2 Business DaysProduct Specifications- Other Name: Rod, Engine Valve Push Rod; Pushrod

Cadillac Push Rods Part Number: 1618805
$6.40 MSRP: $8.42You Save: $2.02 (24%)Ships in 1-2 Business DaysProduct Specifications- Other Name: Rod Assembly; Pushrod; Rod, Engine Valve Push Rod

Cadillac Push Rods Part Number: 1487602
$13.11Product Specifications- Other Name: Rod; Pushrod; Rod, Engine Valve Push Rod; Rod, Engine Valve Push

Cadillac Push Rods Part Number: 10046173
$12.10 MSRP: $19.20You Save: $7.10 (37%)Ships in 1-3 Business DaysProduct Specifications- Other Name: Rod, Valve Push; Pushrod; Rod, Engine Valve Push Rod

Cadillac Push Rods Part Number: 1644842
Product Specifications- Other Name: Rod Assembly; Pushrod; Rod, Engine Valve Push Rod

Cadillac Push Rods Part Number: 14018769
Product Specifications- Other Name: Rod, Engine Valve Push Rod; Pushrod
Cadillac Pushrod
Want to cut long-term maintenance and repair costs? Choose OEM Pushrod. Those parts deliver top durability you can trust. On our site, you'll find a huge catalog of genuine Cadillac parts. Prices are unbeatable, so you can keep more in your pocket. Every OEM Cadillac Pushrod includes a manufacturer's warranty. You can also get an easy return policy that keeps buying risk free. Fast delivery, get your car on the road quickly. It's simple to search, compare, and order. Stop guessing about quality or fit. Order today and save with parts that last.
Cadillac Pushrod Parts Questions & Experts Answers
- Q: How to replace the pushrod and valve rocker arm on Cadillac Escalade?A:Start by removing the valve Rocker Arm cover to place all valve rocker arms pushrods and pivot support on a rack for future reinstallation according to their original locations. You must begin by removing the valve Rocker Arm bolt together with the valve rocker arms and the valve Rocker Arm pivot support as well as the pushrods. Before using the valve rocker arms and pushrods a second time you must clean them while inspecting all components to properly reinstall them where they originally belonged. Clean engine oil serves to lubricate both valve rocker arms and pushrods while flange lubrication needs to be applied to the bolts of the valve Rocker Arm. Begin by installing the valve Rocker Arm pivot support as the pushrods should properly enter the valve lifter sockets before addition of the pushrods which need proper seating within the Rocker Arm ends before the Rocker Arm bolts get tightened. After installing the rocker arms and bolts proceed to rotate the Crankshaft until the number one Piston reaches top dead center (TDC) of compression stroke positioning the cylinder number one rocker arms off lobe lift and the Crankshaft sprocket key at the 1:30 position. The engine needs to remain in the number one firing position to tighten bolt 1, 2, 7, 8 exhaust Rocker Arm bolts to 30 nm (22 ft. Lbs.) and bolt 1, 3, 4, 5 intake bolts to 30 nm (22 ft. Lbs.). Tighten valve Rocker Arm bolts leading to cylinders 3-6 and 7-8 exhaust to specifications of 30 nm while tightening bolts of cylinders 2-5 and 7-8 intake to 30 nm after the Crankshaft completes a 360-degree rotation. Complete the valve Rocker Arm cover installation as the last step.
- Q: How to replace the pushrod and valve rocker arm on Cadillac Escalade EXT?A:A rack will serve to keep the original positions of valley rocker arms and pushrods while you disassemble their components. To begin, remove the Rocker Arm cover while placing the rocker arms along with pushrods and pivot support into the rack. After Rocker Arm bolt uninstallation comes the removal of rocker arms and Rocker Arm pivot support followed by taking out the pushrods. Clean all rocker arms before inspecting them together with their pushrods. Engine oil lubrication should be applied to both the rocker arms and pushrods during installation and the flange of Rocker Arm bolts must receive attention for lubrication as well. Position the Rocker Arm pivot support before both ends of the pushrods and valve lifter sockets reach their fitting position but leave the Rocker Arm bolts untightened. During the procedure the motor needs to be positioned at top dead center (TDC) for compression stroke where the number one Piston rests while the Rocker Arm lobes remain inactive and the Crankshaft sprocket points at 1:30 mark. The current engine position requires torquing Exhaust Valve bolts for cylinders 1, 2, 7, 8 to 30 nm (22 ft. Lbs.) simultaneous with Intake Valve bolts for cylinders 1, 3, 4, 5 at 30 nm (22 ft. Lbs.). After turning the Crankshaft fully by 360 degrees tighten Rocker Arm bolts of cylinders 3, 4, 5 and 6 exhaust valves to 30 nm (22 ft. Lbs.) while cylinder 2, 6, 7 and 8 intake valves should be torqued to 30 nm (22 ft. Lbs.). Install the Rocker Arm cover as the last step.

Related Cadillac Parts
 Cadillac Oil Pan
 Cadillac Balance Shaft Gear
 Cadillac Camshaft Bearing
 Cadillac Coolant Filter
 Cadillac Crankshaft Thrust Washer Set
 Cadillac Engine Mount
 Cadillac Intake Valve
 Cadillac Lash Adjuster
 Cadillac Motor And Transmission Mount
 Cadillac Oil Filler Cap
 Cadillac Piston Ring
 Cadillac Timing Chain Tensioner