ChevyParts
My Garage
My Account
Cart
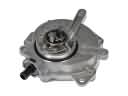
OEM Cadillac Motor And Transmission Mount
Motor and Trans Mount- Select Vehicle by Model
- Select Vehicle by VIN
Select Vehicle by Model
orMake
Model
Year
Select Vehicle by VIN
For the most accurate results, select vehicle by your VIN (Vehicle Identification Number).
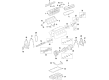
287 Motor And Transmission Mounts found


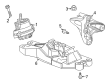
Cadillac Motor Mount Part Number: 15234751
$211.85 MSRP: $360.67You Save: $148.82 (42%)Ships in 1-2 Business DaysProduct Specifications- Other Name: Mount Assembly-Engine; Engine Mount Bracket; Front Mount; Mount, Engine Mount Dampening


Cadillac Transmission Mount Part Number: 22996706
$127.96 MSRP: $201.33You Save: $73.37 (37%)Ships in 1-3 Business DaysProduct Specifications- Other Name: Mount, Transmission Mounting; Transfer Case Mount


Cadillac Motor Mount Part Number: 23274001
$87.55 MSRP: $150.37You Save: $62.82 (42%)Ships in 1-2 Business DaysProduct Specifications- Other Name: Mount, Engine Mounting; Engine Mount Bracket; Mount; Mount, Engine Mount Dampening
- Replaces: 22862289, 23234874, 23255012


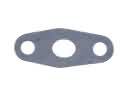
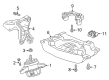
Cadillac Insulator Part Number: 20824598
$65.91 MSRP: $112.21You Save: $46.30 (42%)Ships in 1-2 Business DaysProduct Specifications- Other Name: Mount, Transmission Mounting; Motor Mount


Cadillac Motor Mount, Driver Side Part Number: 22957033
$152.82 MSRP: $260.18You Save: $107.36 (42%)Ships in 1-2 Business DaysProduct Specifications- Other Name: Mount, Engine Mounting; Engine Mount Bracket; Front Mount
- Position: Driver Side


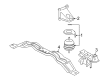
Cadillac Transmission Mount, Rear Part Number: 15930131
$96.51 MSRP: $195.45You Save: $98.94 (51%)Ships in 1-2 Business DaysProduct Specifications- Other Name: Mount-Transmission Rear; Transfer Case Mount; Engine Mount; Mount, Transmission Mounting
- Position: Rear
- Replaces: 15861892, 10388704

Cadillac Transmission Mount Part Number: 23365775
$111.49 MSRP: $183.63You Save: $72.14 (40%)Ships in 1-2 Business DaysProduct Specifications- Other Name: Mount, Transmission Mounting; Transfer Case Mount

Cadillac Transmission Mount Part Number: 84119719
$158.56 MSRP: $272.31You Save: $113.75 (42%)Ships in 1-2 Business DaysProduct Specifications- Other Name: Mount, Transmission Mounting; Transfer Case Mount
- Replaces: 20897882
Cadillac Transmission Mount Part Number: 84119715
$218.05 MSRP: $343.09You Save: $125.04 (37%)Ships in 1-3 Business DaysProduct Specifications- Other Name: Mount, Transmission Mounting; Transfer Case Mount
Cadillac Motor Mount Part Number: 84041454
$221.27 MSRP: $348.16You Save: $126.89 (37%)Ships in 1-2 Business DaysProduct Specifications- Other Name: Mount, Engine Mounting; Engine Mount Bracket; Mount; Mount, Engine Mount Dampening
- Replaces: 23255011, 23234873, 22862287

Cadillac Motor Mount, Driver Side Part Number: 23340396
$60.18 MSRP: $102.45You Save: $42.27 (42%)Ships in 1-2 Business DaysProduct Specifications- Other Name: Mount, Engine Mounting; Engine Mount Bracket; Mount; Mount, Engine Mount Dampening
- Position: Driver Side

Cadillac Transmission Mount Part Number: 84119724
$182.40 MSRP: $287.00You Save: $104.60 (37%)Ships in 1-3 Business DaysProduct Specifications- Other Name: Mount, Transmission Mounting; Transfer Case Mount
- Replaces: 23104543

Cadillac Motor Mount, Driver Side Part Number: 84468648
$85.20 MSRP: $140.31You Save: $55.11 (40%)Ships in 1-2 Business DaysProduct Specifications- Other Name: Mount Assembly-Engine; Engine Mount Bracket; Transfer Case Mount; Transmission Mount; Mount; Mount, Engine Mounting
- Position: Driver Side

Cadillac Transmission Mount Part Number: 84357861
$33.97 MSRP: $53.22You Save: $19.25 (37%)Ships in 1-3 Business DaysProduct Specifications- Other Name: Mount, Transmission Mounting; Transfer Case Mount

Cadillac Transmission Mount Part Number: 84798147
$122.62 MSRP: $192.89You Save: $70.27 (37%)Ships in 1-3 Business DaysProduct Specifications- Other Name: Mount, Transmission Mounting; Mount

Cadillac Transmission Mount Part Number: 25756630
$51.79 MSRP: $138.01You Save: $86.22 (63%)Ships in 1-2 Business DaysProduct Specifications- Other Name: Mount, Transmission Mounting; Transfer Case Mount
- Position: Rear
Cadillac Motor Mount, Passenger Side Part Number: 23340397
$60.18 MSRP: $102.45You Save: $42.27 (42%)Ships in 1-2 Business DaysProduct Specifications- Other Name: Mount, Engine Mounting; Engine Mount Bracket; Mount
- Position: Passenger Side

Cadillac Mount Bracket Part Number: 23303186
$31.74 MSRP: $49.73You Save: $17.99 (37%)Ships in 1-3 Business DaysProduct Specifications- Other Name: Bracket-Transmission Mount; Engine Mount Bracket; Transfer Case Mount; Motor Mount; Transmission Mount Bracket; Bracket, Transmission Mounting Support; Bracket, Transmission Mounting; Transmission Mount


Cadillac Motor Mount, Passenger Side Part Number: 25971087
Product Specifications- Other Name: Mount; Engine Mount Bracket; Mount, Engine Mounting
- Position: Passenger Side
- Replaces: 10360741, 15212625, 15880913


Cadillac Transmission Mount, Rear Part Number: 20858540
$117.62 MSRP: $185.08You Save: $67.46 (37%)Product Specifications- Other Name: Mount-Transmission Rear; Transfer Case Mount; Mount, Transmission Mounting
- Position: Rear
| Page 1 of 15 |Next >
1-20 of 287 Results
Cadillac Motor And Transmission Mount
Want to cut long-term maintenance and repair costs? Choose OEM Motor And Transmission Mount. Those parts deliver top durability you can trust. On our site, you'll find a huge catalog of genuine Cadillac parts. Prices are unbeatable, so you can keep more in your pocket. Every OEM Cadillac Motor And Transmission Mount includes a manufacturer's warranty. You can also get an easy return policy that keeps buying risk free. Fast delivery, get your car on the road quickly. It's simple to search, compare, and order. Stop guessing about quality or fit. Order today and save with parts that last.
Cadillac Motor And Transmission Mount Parts Questions & Experts Answers
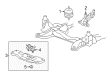
- Q: How to Replace the Rear Motor and Transmission Mount on a Rear-Wheel Drive on Cadillac CTS?A:Starting a rear-wheel drive transmission rear mount replacement requires vehicle lifting combined with supporting its weight. Next, remove the exhaust system. Place suitable blocking between a transmission support and its jack before you remove body mounting bolts from the transmission support and transmission mounting bolts from the transmission support. The first step is removing the transmission mount from your vehicle. When installing the transmission mount place it directly on the vehicle while making sure to follow the provided fastener instructions. Secure the transmission through its support bolts then tighten them until they reach 60 N.m (44 lb ft). Position the transmission mount before screwing it to body mounting bolts while using 60 N.m (44 lb ft) of torque. Before you can continue, remove the transmission support then install the exhaust system followed by lowering the vehicle.
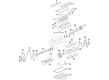
- Q: How to replace the rear Motor and Transmission Mount on an AWD on Cadillac SRX?A:To replace the transmission rear mount on awd vehicle first lift and support vehicle. Take out the propeller shaft, and if there is an lf1, remove the right Catalytic Converter. Use an appropriate jack to hold the transaxle and relieve the weight off the mount and remove the transaxle mount to frame fasteners (3, 4). Finally, come out with the transaxle mount through bolt and take the transaxle mount from vehicle. Unfasten the transaxle bracket to Transfer Case fasteners, and, removing the bracket from the vehicle. In the case of installation, suspend the transaxle bracket to the transaxle and hand start the transaxle mount bracket to Transfer Case bolts. Tighten the Transfer Case bracket bolts to 100 nm (74 lb ft). Mount the transaxle mount to the frame, and appropriate mounting of the longer transaxle mount to the frame contact bolt and tighten to 62nm (46lbft) followed by shorter transaxle mount to frame contact providing 100 nm (74lb ft). Install the through bolt and torque to 100 nm (74 lb ft), then remove the support of the transaxle. Install the propeller shaft and on its removal, the right Catalytic Converter. Finally, lower the vehicle.
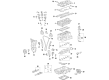
- Q: How to replace the Motor and Transmission Mount on Cadillac XLR?A:Start with disconnecting the negative Battery Cable before securely raising the vehicle for transmission mount replacement. Remove the rear tire and wheel assemblies while also taking out the rear Shock Absorber lower mounting bolts together with the transaxle mount to Rear Crossmember nuts. Set up the j 42055 transmission support fixture (J 42055) on a transmission jack before securing it tightly to the transmission. Secure the transmission jack under the rear suspension crossmember so you can take out the retaining nuts with hand tools only. Carefully drop the Rear Crossmember 37 mm (1.5 inches) while removing the mount-to-differential bolts leading to the replacement part. The procedure begins with new transaxle mount installation followed by tightening transaxle mount to differential bolts at 50 nm (37 ft. Lbs.). When raising the rear suspension crossmember, carefully install the transaxle mount studs into the slots while tightening the new mounting nuts with hand tools up to 110 nm (81 ft. Lbs.). Take out the transmission jack that was mounted on the rear suspension crossmember before gently removing j 42055 and the transmission jack. Install the transaxle mount to rear suspension crossmember nuts, tightening them to 50 nm (37 ft. Lbs.)tighten the rear Shock Absorber lower mounting bolts to 220 nm (162 ft. Lbs.). Reinstall the rear wheel and tire units afterward the vehicle descent process completes while also reconnecting and tightening the negative cable bolt to 15 nm (11 ft. Lbs.). Finally, program the transmitters.