ChevyParts
My Garage
My Account
Cart
OEM Cadillac Cam Gear
Camshaft Gear- Select Vehicle by Model
- Select Vehicle by VIN
Select Vehicle by Model
orMake
Model
Year
Select Vehicle by VIN
For the most accurate results, select vehicle by your VIN (Vehicle Identification Number).
67 Cam Gears found


Cadillac Camshaft Gear Part Number: 12602699
$266.27 MSRP: $418.96You Save: $152.69 (37%)Ships in 1-3 Business DaysProduct Specifications- Other Name: Actuator, Engine Camshaft; Variable Valve Timing Sprocket; Cam Gear; Actuator


Cadillac Camshaft Gear, Passenger Side Part Number: 12597414
$84.46 MSRP: $132.30You Save: $47.84 (37%)Ships in 1-3 Business DaysProduct Specifications- Other Name: Sprocket, Camshaft; Variable Valve Timing Sprocket; Cam Gear; Intermediate Gear; Sprocket, Engine Camshaft
- Position: Passenger Side


Cadillac Actuator Part Number: 12662599
$168.06 MSRP: $264.44You Save: $96.38 (37%)Ships in 1-3 Business DaysProduct Specifications- Other Name: Actuator, Engine Camshaft


Cadillac Camshaft Gear, Driver Side Part Number: 12597413
$84.46 MSRP: $132.30You Save: $47.84 (37%)Ships in 1-3 Business DaysProduct Specifications- Other Name: Sprocket, Camshaft; Variable Valve Timing Sprocket; Cam Gear; Intermediate Gear; Sprocket, Engine Camshaft
- Position: Driver Side


Cadillac Camshaft Gear Part Number: 12585994
$173.94 MSRP: $296.13You Save: $122.19 (42%)Ships in 1-2 Business DaysProduct Specifications- Other Name: Actuator, Engine Camshaft; Variable Valve Timing Sprocket; Cam Gear; Actuator

Cadillac Camshaft Gear Part Number: 55512053
$54.25 MSRP: $84.98You Save: $30.73 (37%)Ships in 1-3 Business DaysProduct Specifications- Other Name: Sprocket Assembly-Camshaft Intake (W/ Camshaft Position A; Actuator; Sprocket, Engine Camshaft
- Replaces: 55509050
Cadillac Camshaft Gear Part Number: 12691898
$62.13 MSRP: $105.77You Save: $43.64 (42%)Ships in 1-2 Business DaysProduct Specifications- Other Name: Actuator-Camshaft Position Intake; Actuator; Actuator, Engine Camshaft
- Replaces: 12687323
Cadillac Actuator Part Number: 55515838
$42.41 MSRP: $72.21You Save: $29.80 (42%)Ships in 1-3 Business DaysProduct Specifications- Other Name: Actuator, Camshaft Lobe Position; Actuator, Engine Camshaft
- Replaces: 55509044, 55509747

Cadillac Actuator Part Number: 12666063
$76.83 MSRP: $120.35You Save: $43.52 (37%)Ships in 1-3 Business DaysProduct Specifications- Other Name: Actuator Assembly-Camshaft Position Exhaust; Actuator, Engine Camshaft

Cadillac Actuator Part Number: 12567417
$69.05 MSRP: $96.92You Save: $27.87 (29%)Ships in 1-2 Business DaysProduct Specifications- Other Name: Actuator, Camshaft Position; Actuator, Engine Camshaft

Cadillac Camshaft Gear Part Number: 55489218
$6.10 MSRP: $9.56You Save: $3.46 (37%)Ships in 1-3 Business DaysProduct Specifications- Other Name: Sprocket, Engine Camshaft; Variable Valve Timing Sprocket; Cam Gear
Cadillac Actuator Part Number: 12682501
$125.88 MSRP: $198.08You Save: $72.20 (37%)Ships in 1-3 Business DaysProduct Specifications- Other Name: Actuator, Engine Camshaft
Cadillac Camshaft Gear Part Number: 55512051
$69.54 MSRP: $108.91You Save: $39.37 (37%)Ships in 1-3 Business DaysProduct Specifications- Other Name: Sprocket Assembly-Camshaft Exhaust (W/Camshaft Position AC; Actuator; Sprocket, Engine Camshaft
- Replaces: 55509051

Cadillac Actuator Part Number: 12684805
$120.56 MSRP: $205.24You Save: $84.68 (42%)Ships in 1-2 Business DaysProduct Specifications- Other Name: Actuator, Engine Camshaft
- Replaces: 12661007
Cadillac Actuator Part Number: 25203205
$132.61 MSRP: $227.75You Save: $95.14 (42%)Ships in 1-2 Business DaysProduct Specifications- Other Name: Actuator, Engine Camshaft
- Replaces: 12627114
Cadillac Actuator Part Number: 25203207
$132.31 MSRP: $227.24You Save: $94.93 (42%)Ships in 1-3 Business DaysProduct Specifications- Other Name: Actuator, Engine Camshaft
- Replaces: 12638661

Cadillac Actuator Part Number: 55570268
$111.59 MSRP: $174.79You Save: $63.20 (37%)Product Specifications- Other Name: Sprocket, Engine Camshaft
Cadillac Actuator Part Number: 25203206
$132.61 MSRP: $227.75You Save: $95.14 (42%)Ships in 1-2 Business DaysProduct Specifications- Other Name: Actuator, Engine Camshaft
- Replaces: 12627115
Cadillac Actuator Part Number: 12581500
$34.68 MSRP: $54.31You Save: $19.63 (37%)Product Specifications- Other Name: Actuator, Engine Camshaft

Cadillac Actuator Part Number: 12581498
$35.20 MSRP: $55.13You Save: $19.93 (37%)Product Specifications- Other Name: Actuator, Engine Camshaft
| Page 1 of 4 |Next >
1-20 of 67 Results
Cadillac Cam Gear
Want to cut long-term maintenance and repair costs? Choose OEM Cam Gear. Those parts deliver top durability you can trust. On our site, you'll find a huge catalog of genuine Cadillac parts. Prices are unbeatable, so you can keep more in your pocket. Every OEM Cadillac Cam Gear includes a manufacturer's warranty. You can also get an easy return policy that keeps buying risk free. Fast delivery, get your car on the road quickly. It's simple to search, compare, and order. Stop guessing about quality or fit. Order today and save with parts that last.
Cadillac Cam Gear Parts Questions & Experts Answers
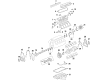
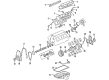
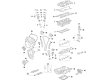
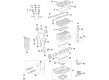
- Q: How to replace the Cam Gear on Cadillac CTS?A:The first step for camshaft drive sprocket replacement starts with Timing Belt removal. The crank hub torx® socket (J42098) permits users to turn the Crankshaft counterclockwise until it reaches 60 degrees before top dead center (BTDC) when identified by the index mark on the oil pump cover while preventing piston-valve contact. The next step entails removing the camshaft drive sprocket bolt while the drive sprockets maintain their position through the Timing Belt alignment kit (J42069-1 and J42069-2) before discarding the existing bolt. First remove the j42069-1 along with j42069-2 then proceed to uninstall the camshaft drive sprocket. The installation process requires the Crankshaft to maintain a 60 degrees btdc position. The camshaft drive sprocket numbered slots should match camshaft pins exactly before checking that the drive sprocket reference mark faces the rear Timing Belt cover notch. Insert the newly provided camshaft drive sprocket bolt while making needed adjustments to the camshaft drive sprockets to achieve proper reference mark position with notches. Use the j42069-1 or j42069-2 tools to suspend the camshaft drive sprocket together with camshaft before torquing the bolt to 50 nm (37 ft. Lbs.). First adjust the Crankshaft gear bolt 60 degrees through the torque/angle meter (J36660-A) before setting it to a further 15-degree angle. Place the Crankshaft at top dead center position using the crank hub torx® socket (J42098) then reinstall the Timing Belt.
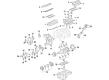
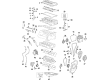
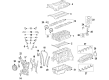
- Q: How to replace the Cam Gear and timing chain sprockets on Cadillac Escalade?A:The first step in Timing Chain and sprocket replacement includes taking out the Oil Pump before rotating the Crankshaft to match its marks with those on the cam and crank sprockets. After removing the Timing Chain, never turn the Crankshaft assembly to avoid piston assembly or valve damage. The first step includes removing camshaft sprocket bolts then proceeding with the removal of camshaft sprocket and Timing Chain. Utilizing the j8433 (Two Jaw Puller) as well as j41816-2 (Crankshaft End Protector) and j41558 (Crankshaft Sprocket Remover) will help you remove the Crankshaft sprocket followed by the removal of the Crankshaft sprocket key depending on requirements. Time the chain and its sprockets for any necessary cleaning or inspection process. Begin installation by inserting the key into the Crankshaft keyway and gradually push it forward until the key rests in both ends. Install the Crankshaft sprocket frontward on the Crankshaft with precise alignment of the key from the Crankshaft to the sprocket keyway before completing the installation using the j41665 (Crankshaft Balancer and Sprocket Installer). Rotate the Crankshaft sprocket so its alignment mark points to 12 o'clock while the camshaft sprocket locating pin should align with the sprocket alignment hole and the sprocket teeth should effectively engage the Timing Chain. Place the camshaft sprocket together with Timing Chain before adjusting either camshaft or Crankshaft sprockets to align their marks properly. The installation process ends by inserting the camshaft sprocket bolts then tightening them to 35 nm until they reach 26 ft. Lbs (torque) of resistance and reinstalling the Oil Pump.
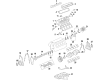
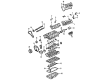
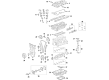
- Q: How to replace the Cam Gear for Bank 2 (Left) Exhaust on Cadillac XLR?A:Remove both parts of the left exhaust Camshaft position actuator to install its replacement. Pull the actuator forward to free its Camshaft alignment pin then remove the secondary Timing Chain before taking out the actuator from its position. You will insert the Camshaft alignment pin hole in the actuator backplate at its corresponding position. Match the actuator timing gears with the secondary Timing Chain by placing the actuator's front timing mark on the paint mark of a chain link. Apply the actuator over its Camshaft pin and place it on the Camshaft. Install the left exhaust Camshaft position actuator oil control valve afterward.


