ChevyParts
My Garage
My Account
Cart
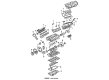
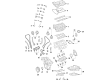
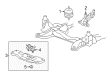
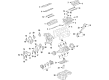
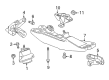
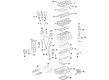
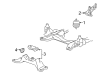
OEM Cadillac Engine Mount
Engine Motor Mount- Select Vehicle by Model
- Select Vehicle by VIN
Select Vehicle by Model
orMake
Model
Year
Select Vehicle by VIN
For the most accurate results, select vehicle by your VIN (Vehicle Identification Number).
234 Engine Mounts found


Cadillac Motor Mount Part Number: 23274000
$90.22 MSRP: $154.96You Save: $64.74 (42%)Ships in 1-2 Business DaysProduct Specifications- Other Name: Mount, Engine Mounting; Engine Mount Bracket; Mount; Mount, Engine Mount Dampening
- Replaces: 23255009, 22965574


Cadillac Motor Mount Part Number: 23274001
$87.55 MSRP: $150.37You Save: $62.82 (42%)Ships in 1-2 Business DaysProduct Specifications- Other Name: Mount, Engine Mounting; Engine Mount Bracket; Mount; Mount, Engine Mount Dampening
- Replaces: 22862289, 23234874, 23255012


Cadillac Mount Bracket, Passenger Side Part Number: 22862294
$87.88 MSRP: $176.44You Save: $88.56 (51%)Ships in 1-3 Business DaysProduct Specifications- Other Name: Bracket, Engine Mounting; Engine Mount Bracket; Motor Mount
- Position: Passenger Side


Cadillac Motor Mount Part Number: 15234751
$211.85 MSRP: $360.67You Save: $148.82 (42%)Ships in 1-2 Business DaysProduct Specifications- Other Name: Mount Assembly-Engine; Engine Mount Bracket; Front Mount; Mount, Engine Mount Dampening


Cadillac Lower Mount Part Number: 25759455
$78.80 MSRP: $134.16You Save: $55.36 (42%)Ships in 1-2 Business DaysProduct Specifications- Other Name: Mount, Engine Mounting; Engine Mount Bracket; Motor Mount; Mount; Mount, Engine Mount Dampening
- Position: Front
- Replaces: 25700266, 25700267
Cadillac Motor Mount Part Number: 84041454
$221.27 MSRP: $348.16You Save: $126.89 (37%)Ships in 1-2 Business DaysProduct Specifications- Other Name: Mount, Engine Mounting; Engine Mount Bracket; Mount; Mount, Engine Mount Dampening
- Replaces: 23255011, 23234873, 22862287
Cadillac Motor Mount, Driver Side Part Number: 23273999
$68.87 MSRP: $118.29You Save: $49.42 (42%)Ships in 1-2 Business DaysProduct Specifications- Other Name: Mount, Engine Mounting; Engine Mount Bracket; Mount; Mount, Engine Mount Dampening
- Position: Driver Side

Cadillac Motor Mount Part Number: 23340398
$84.88 MSRP: $132.96You Save: $48.08 (37%)Ships in 1-3 Business DaysProduct Specifications- Other Name: Mount, Engine Mounting; Engine Mount Bracket; Mount; Mount, Engine Mount Dampening

Cadillac Mount Bracket, Passenger Side Part Number: 15854018
$84.63 MSRP: $169.90You Save: $85.27 (51%)Ships in 1-2 Business DaysProduct Specifications- Other Name: Bracket, Engine Mounting; Engine Mount Bracket; Motor Mount
- Position: Passenger Side

Cadillac Motor Mount, Passenger Side Part Number: 23340397
$60.18 MSRP: $102.45You Save: $42.27 (42%)Ships in 1-2 Business DaysProduct Specifications- Other Name: Mount, Engine Mounting; Engine Mount Bracket; Mount
- Position: Passenger Side

Cadillac Motor Mount Part Number: 84041452
$94.94 MSRP: $163.05You Save: $68.11 (42%)Ships in 1-2 Business DaysProduct Specifications- Other Name: Mount, Engine Mounting; Engine Mount Bracket; Mount; Mount, Engine Mount Dampening
- Replaces: 22890312, 22965572, 23303051, 23234869, 23340390


Cadillac Mount Bracket, Driver Side Part Number: 25767813
$56.97 MSRP: $72.52You Save: $15.55 (22%)Ships in 1-2 Business DaysProduct Specifications- Other Name: Bracket, Engine Mounting; Engine Mount Bracket; Motor Mount
- Position: Driver Side
Cadillac Mount Bracket, Passenger Side Part Number: 25740814
$15.38 MSRP: $94.30You Save: $78.92 (84%)Ships in 1-2 Business DaysProduct Specifications- Other Name: Bracket, Engine Mounting; Engine Mount Bracket; Motor Mount
- Position: Passenger Side

Cadillac Mount Bracket, Driver Side Part Number: 23104518
$95.87 MSRP: $150.13You Save: $54.26 (37%)Product Specifications- Other Name: Bracket, Engine Mounting; Engine Mount Bracket; Motor Mount
- Position: Driver Side

Cadillac Motor Mount, Passenger Side Part Number: 1634359
$143.18Ships in 1-2 Business DaysProduct Specifications- Other Name: Mount, Engine; Engine Mount Bracket; Mount; Mount, Engine Mounting
- Position: Passenger Side

Cadillac Motor Mount Part Number: 25778692
$119.63 MSRP: $188.22You Save: $68.59 (37%)Product Specifications- Other Name: Mount Assembly-Engine; Engine Mount Bracket; Rear Mount; Mount, Engine Mount Dampening

Cadillac Mount Bracket, Passenger Side Part Number: 25737319
Product Specifications- Other Name: Bracket, Engine Mounting; Engine Mount Bracket; Motor Mount
- Position: Passenger Side

Cadillac Motor Mount, Driver Side Part Number: 23340399
Product Specifications- Other Name: Mount, Engine Mounting; Engine Mount Bracket; Side Mount; Mount; Mount, Engine Mount Dampening
- Position: Driver Side
- Replaces: 23273997


Cadillac Mount Bracket, Passenger Side Part Number: 25905221
$96.84 MSRP: $151.69You Save: $54.85 (37%)Product Specifications- Other Name: Bracket, Engine Mounting; Engine Mount Bracket; Motor Mount; Mount
- Position: Passenger Side
- Replaces: 15234760

Cadillac Mount Bracket, Driver Side Part Number: 25905220
$119.75 MSRP: $188.42You Save: $68.67 (37%)Product Specifications- Other Name: Bracket, Engine Mounting; Engine Mount Bracket; Motor Mount
- Position: Driver Side
- Replaces: 15234759
| Page 1 of 12 |Next >
1-20 of 234 Results
Cadillac Engine Mount
Want to cut long-term maintenance and repair costs? Choose OEM Engine Mount. Those parts deliver top durability you can trust. On our site, you'll find a huge catalog of genuine Cadillac parts. Prices are unbeatable, so you can keep more in your pocket. Every OEM Cadillac Engine Mount includes a manufacturer's warranty. You can also get an easy return policy that keeps buying risk free. Fast delivery, get your car on the road quickly. It's simple to search, compare, and order. Stop guessing about quality or fit. Order today and save with parts that last.
Cadillac Engine Mount Parts Questions & Experts Answers
- Q: How to replace the left engine mount (1500 w/RPO LY2) on Cadillac Escalade?A:The first step for left Engine Mount replacement (1500 w/RPO LY2) requires removal of the air cleaner outlet duct. Before continuing the repair it is necessary to remove the front drive axle when your vehicle has four-wheel drive. First lower the vehicle and afterward remove the generator bracket. The next step requires removal of the Engine Mount to frame bolts and a vehicle lift to halfway height. You should remove the left wheelhouse liner while taking care not to support the engine from either the crankshaft balancer or Oil Pan. To extract the Engine Mount to engine bolts install a screw-type adjustable jack under the engine block tab and access the bolts through the wheelhouse opening. The adjustable jack must be used to elevate the engine just enough to take out the Engine Mount. Install the Engine Mount to its position on the motor before placing it through the wheelhouse opening to put the engine bolts in place. Tighten the bolts to 50 nm (37 lb ft). Lift down the engine until the mount touches the frame flat, then take away the jack. Then install the wheelhouse liner before lowering the automobile while you set the Engine Mount frame bolts into place with a torque of 65 nm (48 lb ft). Start by tightening the center bolt first. Reinstall the generator bracket while performing the front drive axle installation when required. The procedure ends by lowering the vehicle to install the air cleaner outlet duct.
- Q: How to replace the right side engine mount on an AWD on Cadillac CTS?A:The first step to replace the right side Engine Mount of an awd vehicle is disconnecting the battery ground cable. The cross vehicle brace together with the exhaust system must be removed first. The repairing sequence begins with taking out the upper Engine Mount retaining nut followed by the lower Engine Mount retaining nuts. Place a screw jack alongside a wood block below the Oil Pan to support the engine while you note down the initial mount position for removal. The engine should rise to a level sufficient for taking out the Engine Mount from the vehicle. The installation process begins with correct positioning of the Engine Mount. After that, install it and lower the engine through the screw jack procedure. Unfasten the screw jack and block of wood while installing and tightening the upper Engine Mount retaining nut to 80 nm (59 lb ft). Seal the right and left lower Engine Mount retaining nuts with an 80 nm torque (59 lb ft). Reinstall the exhaust system followed by the cross vehicle brace and then connect the battery ground cable.
- Q: How to replace the left engine mount on Cadillac XLR?A:The left Engine Mount replacement process begins by taking out the front suspension crossmember followed by unscrewing the Engine Mount-to-Engine Mount bracket nut before removing the Engine Mount from the Engine Mount bracket. The second step involves removing the Engine Mount heat shield from the assembly while maintaining the correct position of its locating dowel. Begin with mounting the heat shield onto the Engine Mount then position it so the locating dowel fits its intended spot correctly. Place the Engine Mount onto the mount bracket before installing the Engine Mount-to-bracket nut while torquing it to 58 nm (43 ft. Lbs.). Reinstall the front suspension crossmember as the last step.