ChevyParts
My Garage
My Account
Cart
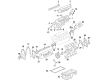
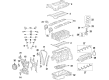
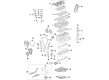
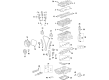
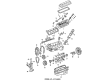
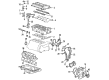
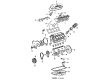
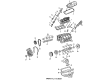
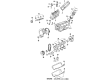
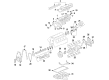
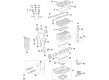
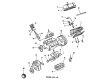
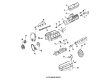
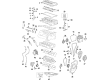
OEM Cadillac Rocker Arm
Engine Rocker Arm- Select Vehicle by Model
- Select Vehicle by VIN
Select Vehicle by Model
orMake
Model
Year
Select Vehicle by VIN
For the most accurate results, select vehicle by your VIN (Vehicle Identification Number).
16 Rocker Arms found


Cadillac Rocker Arms Part Number: 10214664
$14.44 MSRP: $23.79You Save: $9.35 (40%)Ships in 1-2 Business DaysProduct Specifications- Other Name: Arm, Valve Rocker; Rocker Arm
- Replaced by: 12681275


Cadillac Rocker Arms Part Number: 9129211
$4.59 MSRP: $7.21You Save: $2.62 (37%)Ships in 1-3 Business DaysProduct Specifications- Other Name: Cam Follower A Schlepphebel Z; Rocker Arm; Arm, Engine Valve Adjusting


Cadillac Rocker Arms Part Number: 24100294
$5.35 MSRP: $8.39You Save: $3.04 (37%)Ships in 1-3 Business DaysProduct Specifications- Other Name: Arm, Valve Rocker; Arm, Engine Valve Rocker


Cadillac Rocker Arms Part Number: 12619829
$15.74 MSRP: $25.93You Save: $10.19 (40%)Ships in 1-2 Business DaysProduct Specifications- Other Name: Arm Assembly-Valve Rocker; Rocker Arm; Arm, Engine Valve Rocker


Cadillac Rocker Arms Part Number: 10089648
$27.98 MSRP: $43.85You Save: $15.87 (37%)Ships in 1-2 Business DaysProduct Specifications- Other Name: Arm Kit, Valve Rocker; Rocker Arm; Arm Kit, Engine Valve Adjusting & Rocker; Ball, Engine Valve Adjusting.
- Replaces: 12528897

Cadillac Rocker Arms, Green Line Part Number: 12565203
$22.32 MSRP: $36.74You Save: $14.42 (40%)Ships in 1-3 Business DaysProduct Specifications- Other Name: Arm, Valve Rocker; Rocker Arm
- Replaced by: 12693909

Cadillac Rocker Arms Part Number: 1618802
$8.95 MSRP: $19.53You Save: $10.58 (55%)Ships in 1-2 Business DaysProduct Specifications- Other Name: Arm; Rocker Arm; Arm, Engine Valve Rocker

Cadillac Rocker Arms Part Number: 14002446
$13.11 MSRP: $15.11You Save: $2.00 (14%)Product Specifications- Other Name: Arm Kit, Valve Rocker; Rocker Arm; Arm Kit, Engine Valve Rocker; Arm, Engine Valve Rocker Arm; Arm, Engine Valve Rocker

Cadillac Rocker Arms Part Number: 10054525
$13.11 MSRP: $14.84You Save: $1.73 (12%)Product Specifications- Other Name: Arm Kit, Valve Rocker; Rocker Arm; Arm Kit, Engine Valve Rocker

Cadillac Rocker Arms Part Number: 12696105
$13.64 MSRP: $22.47You Save: $8.83 (40%)Ships in 1-2 Business DaysProduct Specifications- Other Name: Arm Assembly-Intake Valve Rocker; Rocker Arm; Arm, Engine Valve Rocker
- Replaces: 12569167, 12669995
Cadillac Rocker Arms Part Number: 12693909
$15.28 MSRP: $36.74You Save: $21.46 (59%)Ships in 1-3 Business DaysProduct Specifications- Other Name: Arm Assembly-Valve Rocker; Arm, Engine Valve Rocker
- Replaces: 12565203, 24100004, 12656486


Cadillac Rocker Arms Part Number: 12666601
$34.16 MSRP: $58.67You Save: $24.51 (42%)Ships in 1-2 Business DaysProduct Specifications- Other Name: Arm, Engine Valve Rocker; Rocker Arm
Cadillac Rocker Arms Part Number: 12654646
$4.94 MSRP: $7.74You Save: $2.80 (37%)Ships in 1-3 Business DaysProduct Specifications- Other Name: Arm Assembly-Valve Rocker; Rocker Arm; Arm, Engine Valve Rocker

Cadillac Rocker Arms Part Number: 22505583
Product Specifications- Other Name: Arm, Engine Valve Rocker; Rocker Arm
Cadillac Rocker Arms Part Number: 1616818
Product Specifications- Other Name: Arm; Rocker Arm; Arm, Engine Valve Rocker
Cadillac Rocker Arms Part Number: 12701225
$2.77 MSRP: $4.34You Save: $1.57 (37%)Product Specifications- Other Name: Arm Assembly-Valve Rocker; Rocker Arm; Arm, Engine Valve Rocker
- Replaces: 12663276
Cadillac Rocker Arm Parts Questions & Experts Answers
- Q: How to replace the left valve rocker arm on Cadillac XLR?A: You must begin left valve Rocker Arm replacement by removing the left camshafts with each follower kept in its original position against its stationary hydraulic Lash Adjuster (SHLA) and native assembly spot. Leave the left Cylinder Head before cleaning and inspecting its rocker arms. During installation apply the specified lubricant from sealers adhesives and lubricants part number to the roller pivot pocket of each Camshaft follower as well as its valve slot area. To achieve proper valve tip contact with the Camshaft lobe it is essential that the follower sits directly on the valve tip. The followers need to be placed back in their original positions when doing a repeat usage. The next step involves placing the Camshaft followers on both valve tips and shla. The shla should have the rounded follower head and the flat end should be on the valve tip. Finish by fitting the left camshafts.
- Q: How to replace the valve rocker arm on the right side on Cadillac CTS?A: The procedure to replace right side valve rocker arms starts with following the Camshaft replacement - left side instructions to completely remove the applicable camshafts. After following the valve Rocker Arm removal - right side procedure you must take out the rocker arms before moving further. Perform cleaning and inspection of camshafts and rocker arms and execute replacements based on the Camshaft cleaning and inspection and valve lifters cleaning and inspection guidelines. The right-side valve Rocker Arm installation includes first installing the rockers and following it up with Camshaft installation according to valve Rocker Arm installation - right side instructions.
- Q: How to Service and Repair the Rocker Arm Assembly on a Cadillac Escalade?A: The Rocker Arm cover needs removal at the beginning step when replacing the valve Rocker Arm and push rods. Cylinder numbers run in the sequence 1, 8, 7, 2, 6, 5, 4, 3 in engine firing order and cylinders 1, 3, 5, and 7 belong to the left bank. Move Spark Plug number one from cylinder one before placing the rack with rocker arms pivot support and pushrods where you will reinstall them according to their original locations. Start by unbolted the Rocker Arm bolts then remove the rocker arms and Rocker Arm pivot support with the pushrods. The necessary inspection and cleaning procedures should be performed on rocker arms and pushrods. To install the device you must first apply clean engine oil both to the rocker arms and pushrods and then lubricate the flange on the Rocker Arm bolts. Place the pushrods into their proper location in the valve lifter sockets before placing the pushrod in the rocker arms and checking for correct placement while avoiding bolt tightening at this time. Keep to engine firing sequence when installing rocker arms together with their bolts. Run the Crankshaft to position the number one Piston at the top dead center of compression stroke while confirming the rocker arms of the number one cylinder remain off the lobe lift. Tupon the exhaust valves of cylinders 1, 2, 7 and 8 tighten the Rocker Arm bolts to 30 n.m (22 lb ft) while on cylinders 1, 3, 4 and 5 intake valves tighten the bolts to 30 n.m (22 lb ft). After rotating the Crankshaft 360 degrees complete the bolt tightening for exhaust valves in rocks 3, 4, 5 and 6 and the bolt tightening for intake valves in rocks 2, 6, 7 and 8 to 30 n.m (22 lb ft). Reinstall both the number one Spark Plug along with the Rocker Arm cover.


Related Cadillac Parts
 Cadillac Head Gasket
 Cadillac Timing Chain
 Cadillac Balance Shaft Bearing Set
 Cadillac Camshaft Bearing
 Cadillac Engine Mount Bracket
 Cadillac Oil Drain Plug Gasket
 Cadillac Oil Pan Gasket
 Cadillac Piston Ring
 Cadillac Timing Belt Idler Pulley
 Cadillac Timing Belt Tensioner
 Cadillac Valve Cover Gasket
 Cadillac Valve Stem Oil Seal