ChevyParts
My Garage
My Account
Cart
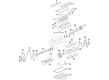
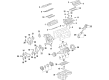
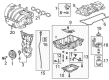
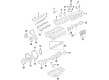
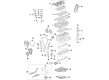
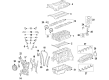
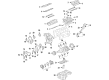
OEM Cadillac Oil Pan
Oil Drain Pan- Select Vehicle by Model
- Select Vehicle by VIN
Select Vehicle by Model
orMake
Model
Year
Select Vehicle by VIN
For the most accurate results, select vehicle by your VIN (Vehicle Identification Number).
87 Oil Pans found


Cadillac Oil Pan Part Number: 12639931
$1753.79 MSRP: $2771.91You Save: $1018.12 (37%)Product Specifications- Other Name: Pan, Engine Oil
- Replaced by: 12732265

Cadillac Oil Pan Part Number: 12657496
$44.76 MSRP: $67.09You Save: $22.33 (34%)Ships in 1-2 Business DaysProduct Specifications- Other Name: Pan, Engine Oil


Cadillac Oil Pan Part Number: 12693973
$248.63 MSRP: $391.13You Save: $142.50 (37%)Ships in 1-3 Business DaysProduct Specifications- Other Name: Pan, Engine Oil; Upper Oil Pan
- Replaces: 12671426, 12677474, 12679236


Cadillac Oil Pan Part Number: 12673902
$25.65 MSRP: $40.18You Save: $14.53 (37%)Ships in 1-3 Business DaysProduct Specifications- Other Name: Pan, Engine Oil; Lower Oil Pan
- Position: Lower
- Replaces: 12666876


Cadillac Oil Pan Part Number: 12643620
$59.86 MSRP: $93.77You Save: $33.91 (37%)Ships in 1-3 Business DaysProduct Specifications- Other Name: Pan, Engine Oil; Lower Oil Pan
- Position: Lower

Cadillac Oil Pan Part Number: 12688962
$226.68 MSRP: $356.67You Save: $129.99 (37%)Ships in 1-3 Business DaysProduct Specifications- Other Name: Pan, Engine Oil; Upper Oil Pan
- Replaces: 12679348, 12671423


Cadillac Oil Pan Part Number: 12612258
$206.54 MSRP: $324.99You Save: $118.45 (37%)Ships in 1-3 Business DaysProduct Specifications- Other Name: Pan, Engine Oil
- Replaces: 12603137
Cadillac Oil Pan Part Number: 12671425
$245.38 MSRP: $386.09You Save: $140.71 (37%)Ships in 1-3 Business DaysProduct Specifications- Other Name: Pan, Engine Oil; Upper Oil Pan
- Replaced by: 12693506

Cadillac Lower Oil Pan Part Number: 12642187
$48.64 MSRP: $76.17You Save: $27.53 (37%)Ships in 1-3 Business DaysProduct Specifications- Other Name: Pan, Engine Oil; Oil Pan
- Position: Lower

Cadillac Oil Pan Part Number: 12651559
$226.61 MSRP: $356.56You Save: $129.95 (37%)Ships in 1-3 Business DaysProduct Specifications- Other Name: Pan, Engine Oil

Cadillac Oil Pan Part Number: 12603135
$408.09 MSRP: $642.10You Save: $234.01 (37%)Ships in 1-3 Business DaysProduct Specifications- Other Name: Pan, Engine Oil

Cadillac Oil Pan Part Number: 12679238
$247.78 MSRP: $389.78You Save: $142.00 (37%)Ships in 1-3 Business DaysProduct Specifications- Other Name: Pan, Engine Oil; Upper Oil Pan
- Replaced by: 12693972
Cadillac Oil Pan Part Number: 12716570
$352.88 MSRP: $555.23You Save: $202.35 (37%)Ships in 1-2 Business DaysProduct Specifications- Other Name: Pan Assembly-Oil (W/Engine Oil Level Sensor); Pan, Engine Oil
- Replaces: 12656995

Cadillac Oil Pan Part Number: 12717171
$32.74 MSRP: $51.27You Save: $18.53 (37%)Ships in 1-3 Business DaysProduct Specifications- Other Name: Pan, Engine Oil
- Position: Lower
- Replaces: 55511564

Cadillac Oil Pan Part Number: 55573108
$701.75 MSRP: $1109.15You Save: $407.40 (37%)Ships in 1-3 Business DaysProduct Specifications- Other Name: Pan, Engine Oil
- Replaces: 55568940


Cadillac Oil Pan Part Number: 12700106
$731.98 MSRP: $1156.66You Save: $424.68 (37%)Ships in 1-3 Business DaysProduct Specifications- Other Name: Pan, Engine Oil
- Replaces: 12693651


Cadillac Oil Pan Part Number: 12666372
$221.76 MSRP: $348.80You Save: $127.04 (37%)Ships in 1-3 Business DaysProduct Specifications- Other Name: Pan, Engine Oil


Cadillac Oil Pan Part Number: 12648929
$236.75 MSRP: $372.36You Save: $135.61 (37%)Ships in 1-3 Business DaysProduct Specifications- Other Name: Pan, Engine Oil
- Replaces: 12636677, 12596502, 12641017

Cadillac Oil Pan Part Number: 12658512
$109.72 MSRP: $171.86You Save: $62.14 (37%)Ships in 1-3 Business DaysProduct Specifications- Other Name: Pan, Engine Oil; Upper Oil Pan
- Position: Upper
- Replaces: 12639937

Cadillac Oil Pan Part Number: 12670438
$312.67 MSRP: $491.97You Save: $179.30 (37%)Product Specifications- Other Name: Pan Assembly-Oil (W/Engine Oil Level Sensor); Pan, Engine Oil
- Replaces: 12653541, 12656111
| Page 1 of 5 |Next >
1-20 of 87 Results
Cadillac Oil Pan
Choose OEM Oil Pan, you're making the optimal decision for superior quality and perfect performance. You can feel confident because each component goes through stringent quality checks. Every part is carefully built to comply with Cadillac's factory specifications. You'll enjoy a smooth, worry-free installation that fits just right. At ChevyPartsGiant.com, you'll find it easy to get top-quality OEM Cadillac Oil Pan. You can shop at highly competitive prices and protect your budget. All our genuine Cadillac parts include a dependable manufacturer's warranty. You'll also appreciate our straightforward return policy and swift delivery services for extra convenience.
Cadillac Oil Pan Parts and Q&A
- Q: How to replace the oil pan on Cadillac CTS?A:The procedure starts by taking off the engine front cover before removing the power steering hose retainer from the A/C Compressor bracket followed by intermediate Steering Shaft disconnection. Afterwards disconnect the lower nuts from the Engine Mount while preserving the a/c pipes and hoses connection. Following the removal of this step you must relocate the A/C Compressor bracket bolts to the side before draining the engine oil and eliminating the transmission oil cooler pipe retainer found on the engine's right side. The engine support fixture installation requires tightened wing nuts to achieve sufficient clearance for the Oil Pan before you remove the drainage process can begin. Disassembly and cleaning and analysis of the Oil Pan should be done when required. Install the Oil Pan following assembly then position it into its slot before lowering the engine and connecting frame mounts through engine support fixture wing nut loosening. Reinstall the transmission oil cooler pipe retainer after filling the engine with new oil before installing the A/C Compressor bracket and A/C Compressor. When finished installing you should begin by adding Engine Mount lower nuts then reconnect the intermediate Steering Shaft followed by attaching the power steering hose retainer to the A/C Compressor bracket before reinstalling the engine front cover.
- Q: How to replace the oil pan on 4WD on Cadillac Escalade?A:To change the Oil Pan of the 4wd vehicles, first, jack up and support the vehicle. For 1500 series, unfasten the Oil Pan skid plate bolts and skid plate, where available. For 2500 series, loosen the two rear Oil Pan skid plate bolts and remove the 2 front bolts and the skid plate if equipped. Next you will take off the front differential carrier, unbolt and hang the steering rack downward, next you will put a suitable Oil Pan Drain Plug under the Oil Pan Drain Plug and take off the Oil Pan Drain Plug (430), so that the oil can drain out entirely. Replace the Drain Plug and tighten it to 25 nm (18 lb ft). Put the drain pan under the Oil Filter (437) and remove the Oil Filter allowing it to drain before re-installing it, and tighten to 30 nm (22 lb ft). Remove the right and left side transmission cover bolts and cover, followed by the removal of crossbar bolts/nuts and crossbar for both series. The involved work involves disjoining the engine harness electrical connector from the oil level sensor, and the a/c compressor bracket bolts; which are to be undone before you undo the Oil Pan bolts and the Oil Pan itself. If you are repurposing the Oil Pan, remove the old pan gasket rivets if needed, remove the old gasket and the old rivets. For installation, apply a new Oil Pan Gasket to the Oil Pan, apply a 5 mm (0.20 in) bead of sealant, 20 mm (0.80 in) long, to the engine block on the front and rear cover gasket tabs, and then install the Oil Pan and the remain of Oil Pan bolts, tighten m6 bolts 12 nm (106 lb in) and m8 bolts 25 nm (18 lb ft). Install 2 lower trans bolts and tighten them to a torque of 50 nm (37 lb ft), then install the a/c compressor bracket bolts and tighten it to a torque of 50 nm (37 lb ft). Connect the engine harness electrical connection to the oil level sensor get the threads of the crossbar bolts clean using denatured alcohol apply thread lock, gm p/n 12345493 (Canadian P/N1053488) or the equivalent and install the crossbar with bolts/nuts and zero head torque 120nm 21lbft on 2500 series, 100nm74lbft on 1500 series. Install the left side transmission cover bolt and bolt this down to 12 nm (106 lb in), then install the right side transmission cover bolt and tighten to 12 nm (106 lb in). If using the old Oil Pan, drain the old Oil Filter and replace with new Oil Filter (437), lubricating the seal with clean engine oil and applying 30 nm (22 lb ft) torque. Finally, install and tighten the Oil Pan Drain Plug (430) to 25 nm (18 lb ft), reinstall the front differential carrier with raising the steering rack and install the bolts tightening left side up to 200 nm (148 lb ft), and the right up to 100 nm (74 lb ft). For 2500 series place the Oil Pan skid plate you have to tighten 2 rear bolts and 2 front bolts if it is available tightening it to 28 nm (21 lb ft); for 1500 series, position the skid plate and install the bolts if equipped and tighten to 28 nm (21lb ft). Drop the vehicle, put oil in the engine as new oil, start the engine to check for leaks.


Related Cadillac Parts
 Cadillac Oil Filter
 Cadillac Balance Shaft Bearing Set
 Cadillac Balance Shaft Gear
 Cadillac Cam Gear
 Cadillac Crankshaft Seal
 Cadillac Dipstick Tube
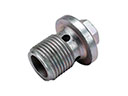 Cadillac Drain Plug
 Cadillac Engine Mount
 Cadillac Exhaust Valve
 Cadillac Motor And Transmission Mount
 Cadillac Oil Filler Cap
 Cadillac Valve Stem Oil Seal