ChevyParts
My Garage
My Account
Cart
OEM Cadillac XLR Oil Pan
Oil Drain Pan- Select Vehicle by Model
- Select Vehicle by VIN
Select Vehicle by Model
orMake
Model
Year
Select Vehicle by VIN
For the most accurate results, select vehicle by your VIN (Vehicle Identification Number).
2 Oil Pans found


Cadillac XLR Oil Pan Part Number: 12612257

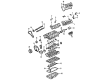
Cadillac XLR Oil Pan Part Number: 12612259
Cadillac XLR Oil Pan
Want to cut long-term maintenance and repair costs? Choose OEM Oil Pan. Those parts deliver top durability you can trust. On our site, you'll find a huge catalog of genuine Cadillac XLR parts. Prices are unbeatable, so you can keep more in your pocket. Every OEM Cadillac XLR Oil Pan includes a manufacturer's warranty. You can also get an easy return policy that keeps buying risk free. Fast delivery, get your car on the road quickly. It's simple to search, compare, and order. Stop guessing about quality or fit. Order today and save with parts that last.
The Oil Pan is an important part that speaks volume of the Cadillac XLR which is a luxury roadster that has gained much fame due to its engineering and fluid design. Actually, the oil pan holds engine oil for the circulation in the lubrication system, thus playing an important role in the functioning of an automobile engine. Constructed for high performance, owing to aggressive driving, Oil Pan is made out of cast aluminum and promises Durability in addition to low weight which is also a measure to improve Cadillac XLR's performance. This makes it possible for the excellence of each model that was made between the year 2003 and 2009 to enjoy the optimal containment of oil and most importantly proper lubrication that is very important for the safety of the engine. The Oil Pan eliminates the challenge of oil moving around the engine while in motion adding to the efficiency and reliability of the car. Also, the incorporation of the oil pan as part of the Cadillac XLR exotic amenities like Magnetic Ride Control adaptive suspension and the V8 Northstar engine pushed the driving experience into a new level. The Oil Pan is among the optimal in automotive industry due to its quality and high performance of the product, which makes it represent the Cadillac's prestige of quality products. Lastly, evaluating Oil Pan, it can be stated that it is not merely a part of the car; it is a symbol of Cadillac's intent and capability in delivering the components of a car that are as innovative and distinctive as the car itself.
Cadillac XLR Oil Pan Parts and Q&A
- Q: How to Properly Service and Replace the Oil Pan on Cadillac XLR?A:Replacing the Oil Pan requires front suspension crossmember removal and draining the engine oil before removing the engine Oil Filter to empty the fluid contents. Disconnection of automatic transmission fluid cooler lines should be followed by removal of the engine oil level sensor electrical connector before extracting the oil level sensor and securing all Oil Pan bolts for easy removal of the Oil Pan. Begin by cleaning the Oil Pan before applying a new Oil Pan gasket to the oil manifold plate and setting the Oil Pan into position against the crankcase with a 0.50 mm (0.020 inch) space forward from the engine block's rear face. Following Oil Pan retaining bolt installation, use a torque tool to secure them at 25 nm (18 ft. Lbs.). The oil Drain Plug installation requires 25 nm (18 ft. Lbs.) of torque. Fasten the engine oil level sensor into place with 20 nm (15 ft. Lbs.) before you connect the electrical connector to the sensor and install the automatic transmission fluid cooler lines. After tightening the new engine Oil Filter to 30 nm (22 ft. Lbs.) you should install the Oil Pan Drain Plug with 25 nm (18 ft. Lbs.) torque. Place the front suspension crossmember back into position before filling the crankcase with proper engine oil grade and quantity while checking transmission fluid level and testing the engine for any leaking areas.

Related Cadillac XLR Parts
 Cadillac XLR Camshaft
 Cadillac XLR Coolant Filter
 Cadillac XLR Crankshaft Seal
 Cadillac XLR Cylinder Head
 Cadillac XLR Dipstick Tube
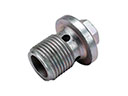 Cadillac XLR Drain Plug
 Cadillac XLR Engine Mount
 Cadillac XLR Intake Valve
 Cadillac XLR Oil Pan Baffle
 Cadillac XLR Rod Bearing
 Cadillac XLR Timing Chain
 Cadillac XLR Variable Timing Sprocket