ChevyParts
My Garage
My Account
Cart
OEM 2008 Cadillac XLR Oil Pan
Oil Drain Pan- Select Vehicle by Model
- Select Vehicle by VIN
Select Vehicle by Model
orMake
Model
Year
Select Vehicle by VIN
For the most accurate results, select vehicle by your VIN (Vehicle Identification Number).
2 Oil Pans found


2008 Cadillac XLR Oil Pan Part Number: 12612257
Product Specifications- Other Name: Pan, Engine Oil
- Replaces: 12567514
- Item Weight: 11.10 Pounds
- Item Dimensions: 25.9 x 12.5 x 9.0 inches
- Condition: New
- Fitment Type: Direct Replacement
- SKU: 12612257
- Warranty: This genuine part is guaranteed by GM's factory warranty.

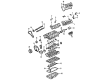
2008 Cadillac XLR Oil Pan Part Number: 12612259
Product Specifications- Other Name: Pan, Engine Oil
- Item Weight: 11.10 Pounds
- Item Dimensions: 26.5 x 15.3 x 5.6 inches
- Condition: New
- Fitment Type: Direct Replacement
- SKU: 12612259
- Warranty: This genuine part is guaranteed by GM's factory warranty.
2008 Cadillac XLR Oil Pan
With a comprehensive array of OEM 2008 Cadillac XLR Oil Pan, from fuel pumps to door handles, our website is a one-stop-shop for your needs. All our genuine 2008 Cadillac XLR Oil Pan are backed by the manufacturer's warranty and are offered at competitive prices in the market. Rest assured, you can shop with complete confidence.
2008 Cadillac XLR Oil Pan Parts and Q&A
- Q: How to replace the oil pan on 2008 Cadillac XLR?A: You must start your Oil Pan replacement process by removing the front suspension crossmember. Start by draining engine oil then remove the engine Oil Filter while it drains to completion. The engine oil level sensor electrical connector needs disconnection followed by automatic transmission fluid cooler line mounting clip removal. Begin by removing the oil level sensor before removing all bolts from the Oil Pan alongside the pan itself. Drill out the Oil Pan Gasket rivets before discarding the old gasket and cleaning and inspecting the Oil Pan. Clear all gasket surfaces from oil residues and foreign matter before installing. Place the new Oil Pan Gasket directly onto the lower crankcase with its front edge positioned precisely 0.50 mm (0.020 in) ahead of the engine block's rear surface. Maintain a smooth installation. Follow the proper bolt order during installation of the Oil Pan. Torque all bolts first to 15 n.m (11 lb ft) then to 25 n.m (18 lb ft) in the final tightening sequence. Fasten the oil drain plug with 25 n.m (18 lb ft) of turning torque. After installing the oil level sensor into the Oil Pan, connect its electrical connector and apply 20 n.m (15 lb ft) of torque. Complete the automatic transmission fluid cooler line mounting clips before installing a new engine Oil Filter and tightening it to 30 n.m (22 lb ft). Final step is to reinstall the front suspension crossmember. You should use the standard engine oil quantity and grade before starting the engine to verify any fluid leaks from the system.
Related 2008 Cadillac XLR Parts
 2008 Cadillac XLR Camshaft
 2008 Cadillac XLR Coolant Filter
 2008 Cadillac XLR Crankshaft Seal
 2008 Cadillac XLR Cylinder Head
 2008 Cadillac XLR Dipstick Tube
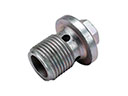 2008 Cadillac XLR Drain Plug
 2008 Cadillac XLR Engine Mount
 2008 Cadillac XLR Intake Valve
 2008 Cadillac XLR Oil Pan Baffle
 2008 Cadillac XLR Rod Bearing
 2008 Cadillac XLR Timing Chain
 2008 Cadillac XLR Variable Timing Sprocket