Make sure this part fits

GM 12603135
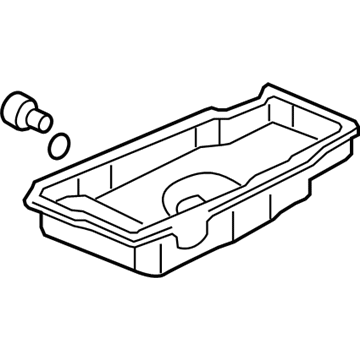
Oil Pan

2006-2011 GM

Customer Questions & Expert Answers (10)
GM 12603135 Oil Pan
  • Part Description
    Pan, Engine Oil
  • Manufacturer
    General Motors
Make sure this part fits
$408.09 MSRP: $642.10
You Save: $234.01 (37%)
Ships in 1-3 Business Days
1
ADD TO CART
  • Vehicle Fitment

    Year Make Model Trim Engine
    2006-2011 Buick LucerneCXL, CXS, Super8 Cyl 4.6 L GAS
    2007-2011 Cadillac DTSBase, Livery, Luxury, Platinum, Premium8 Cyl 4.6 L GAS
    Warning: California's Proposition 65
  • Customer Questions & Expert Answers

    Q:
    Is this 12603135 designed for my car? Posted by ChevyPartsGiant Specialist
    A:
    Please Select Your Vehicle model to see if part number 12603135 is suitable before ordering.
    Posted by ChevyPartsGiant Specialist
    Q:
    How to replace the oil pan on Buick Lucerne? Posted by Customer
    A:
    Begin by disconnecting the negative cable from the battery during Oil Pan replacement work. The first step is to detach the engine mount struts before installing the engine support fixture. Begin by draining the crankcase after removing the Oil Pan Drain Plug and the Catalytic Converter. Reinstall this Drain Plug. Begin with the removal of right front tire then move on to the front wheelhouse liner after that. Keep the accessory Drive Belt and oil filter adapter free then use a tool to remove the Starter. Detach the A/C Compressor while removing its nut and bolt before setting it apart. Untangle the oil level sensor electrical wire then remove all engine harness fasteners from the Oil Pan and transaxle brace. Disassemble the front transaxle brace through removal of its engine bolts and brace component while loosening the transaxle mount lower nuts. The technician should detach the rear transaxle brace to engine/Oil Pan bolts then lower the vehicle. With the help of the engine support fixture lift the engine into position so technicians can remove the right side Oil Pan side bolts using j 39505 followed by left side Oil Pan side bolts and Oil Pan bolts to detach the Oil Pan and its gasket. All surfaces including Oil Pan rail need cleaning before proceeding with installation. Before assembly apply sealer to the front cover/block mating surfaces as well as the crankshaft rear main bearing cap and then install a fresh Oil Pan Gasket to the engine position. Begin by tightening the Oil Pan bolts to 25 nm (18 lb ft) then focus on the left side Oil Pan side bolts. Before tightening the right side Oil Pan bolts to 50 nm (37 lb ft) at a 50-degree torque angle, use the j 39505 tool. Install engine mount bracket bolts at 50 nm (37 lb ft) torque and let the vehicle and engine settle before lower the vehicle. From the raised vehicle position install rear transaxle brace to engine/Oil Pan bolts which require a torque of 63 nm (46 lb ft). Proceed with front transaxle brace installation and engine brace bolts with matching torque to 63 nm (46 lb ft). Install the engine harness clips while reattaching the oil level sensor electrical connector. Position the A/C Compressor before installing its nut and bolt which needs tightening to 50 nm (37 lb ft). After installing the A/C Compressor rear bolt secure it to 50 nm (37 lb ft) torque specifications. Then complete the installation with the Starter and the oil filter adapter. Replace the accessory Drive Belt followed by installing the front wheelhouse liner and right front tire and wheel. Completion of the installation process involves securing the Catalytic Converter followed by lowering the vehicle. Then remove the engine support fixture, install the engine mount struts while filling the crankcase with new engine oil and reconnecting the negative Battery Cable.
    Posted by ChevyPartsGiant Specialist
    Q:
    How to replace the oil pan on Cadillac DTS? Posted by Customer
    A:
    The first step to replace the Oil Pan is to drain the engine oil. Next, take out the front exhaust manifold pipe, disconnect the engine harness electrical connector from the oil level sensor. Loosen the Oil Pan bolts then lift the Oil Pan off of its mounting surface or discard the Oil Pan Gasket. Clean and inspect the Oil Pan, if needed. For installation, fill up the Oil Pan seal groove with continuous rtv sealant with a height reached more than 3mm (0.118 in) above Oil Pan sealing surface. To serve as a prevention of shifting, fix one en 46109 (Engine Front Cover Installation Guide Pins) in the bolt hole at the lower crankcase on either its side. Place the Oil Pan to lower crankcase and use fingers to start the Oil Pan bolts. First, it is advisable to tighten the bolts to 8 nm (71 lb in) and then finally to 12 nm (106 lb in). Connect the engine harness electrical connector back to the oil level sensor and reinstall the front exhaust manifold pipe and fill the engine with oil.
    Posted by ChevyPartsGiant Specialist
    Q:
    What covers need to be removed before taking out the oil pan for the 2006 Buick Lucerne? Posted by Customer
    A:
    Remove the front torque converter cover bolt and the front torque converter cover, followed by the rear torque converter cover bolts and the rear torque converter cover.
    Posted by ChevyPartsGiant Specialist
    See expert answers on similar Oil Pan
    Q:
    What needs to be disconnected next for the 2008 Buick Lucerne? Posted by Customer
    A:
    Disconnect the engine harness electrical connector from the oil level sensor.
    Posted by ChevyPartsGiant Specialist
    See expert answers on similar Oil Pan
    Q:
    How should RTV sealer be applied during installation for the 2007 Buick Lucerne? Posted by Customer
    A:
    Apply a continuous bead of RTV sealer 6.35 mm (0.25 in) thick, ensuring it fills the groove in the oil pan, and add additional sealer at the four locations for proper sealing.
    Posted by ChevyPartsGiant Specialist
    See expert answers on similar Oil Pan
    Q:
    What is the torque specification for the oil pan bolts for the 2010 Buick Lucerne? Posted by Customer
    A:
    Install the oil pan bolts and tighten to 25 Nm (18 lb ft), followed by the left side oil pan side bolts.
    Posted by ChevyPartsGiant Specialist
    See expert answers on similar Oil Pan
    Q:
    What is used to prevent shifting during installation for the 2007 Cadillac DTS? Posted by Customer
    A:
    Install one EN 46109 Engine Front Cover Installation Guide Pin (EN 46109) into the bolt hole on each side of the lower crankcase.
    Posted by ChevyPartsGiant Specialist
    See expert answers on similar Oil Pan
    Q:
    How should the oil pan seal groove be prepared for installation for the 2008 Cadillac DTS? Posted by Customer
    A:
    Fill the oil pan seal groove with a continuous bead of RTV sealant, ensuring it is higher than the oil pan sealing surface by 3 mm (0.118 in).
    Posted by ChevyPartsGiant Specialist
    See expert answers on similar Oil Pan
    Q:
    How should the oil pan be positioned for installation for the 2010 Cadillac DTS? Posted by Customer
    A:
    Position the oil pan to the lower crankcase and finger start the oil pan bolts.
    Posted by ChevyPartsGiant Specialist
    See expert answers on similar Oil Pan
    If you have any questions about this product, please don't hesitate to ask us. We will be happy to help you!

OEM GM Oil Pan 12603135 Designed for Proper Fit and Performance

Original OEM GM parts deliver superior quality and meet all performance standards needed for optimal automotive operation. The authentic part identified by 12603135 Oil Pan is available in the market under the name GM Oil Pan. This genuine product has a full warranty coverage from the manufacturer available at all authorized GM dealers throughout the United States. This part 12603135 Oil Pan fits certain Cadillac DTS models, as well as Buick Lucerne models.
The original GM component designated by manufacturer part number 12603135 maintains top performance when functioning as the Pan, Engine Oil unit. The component 12603135 is constructed from durable material and its dimensions span 28.2 x 13.5 x 11.3 inches while weighing 10.20 Pounds. The Direct Replacement component is ready in New condition to ensure full compatibility with your vehicle system. The part 12603135 has available replacement options. GM manufacturer provides a warranty that ensures reliable operation of this product. The Shipping Policy and Return Policy pages outline complete details regarding shipping procedures and return processes.
If you want to save money in the long run on maintenance and repairs, you should choose OEM products because they're of the top level of durability. Are you on the quest of finding GM parts, our site is worth a visit. We stock an endless selection of high-quality GM components including things like ignition coils all the way through to fan shrouds and all at prices that can not be matched. You have nothing to worry about because all our OEM parts are covered with a manufacturer warranty, which guarantees superior quality and value.