ChevyParts
My Garage
My Account
Cart
OEM Cadillac XLR Rack And Pinion
Steering Rack And Pinion- Select Vehicle by Model
- Select Vehicle by VIN
Select Vehicle by Model
orMake
Model
Year
Select Vehicle by VIN
For the most accurate results, select vehicle by your VIN (Vehicle Identification Number).
3 Rack And Pinions found

Cadillac XLR Steering Gear Part Number: 19330432
Cadillac XLR Steering Gear Part Number: 19330445
Cadillac XLR Steering Gear Part Number: 19330426
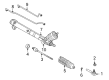
Cadillac XLR Rack And Pinion
Want to cut long-term maintenance and repair costs? Choose OEM Rack And Pinion. Those parts deliver top durability you can trust. On our site, you'll find a huge catalog of genuine Cadillac XLR parts. Prices are unbeatable, so you can keep more in your pocket. Every OEM Cadillac XLR Rack And Pinion includes a manufacturer's warranty. You can also get an easy return policy that keeps buying risk free. Fast delivery, get your car on the road quickly. It's simple to search, compare, and order. Stop guessing about quality or fit. Order today and save with parts that last.
The Rack And Pinion system is an essential system that defines the brand's dependable and high-performance intention. This high-tech steering system helps turn the stearing wheel from left to right that subsequently turns the front wheels left and right to deliver a great ride in different Cadillac XLR models. As it is expected for a part on a Cadillac, the Cadillac XLR Rack And Pinon involve hydraulic mechanisms in the power assistance, which makes the Cadillac XLR one of the easiest and most efficient luxury roadsters out on the market. The elements featuring the fluid-filled cylinder and piston of the mentioned system not only increase the efficiency of the car, but also serve as root for the enhanced safety of the vehicle due to proper handling. Damage and changes in performance can arise in certain areas like the fluid leaks or worn gears and so Rack And Pinion needs care so that these complications do not occur and can be serviced for a long time. The Cadillac XLR itself manufactured between 2003 and 2009 has fabulous features such as Magnetic Ride Control and a powerful V8 Northstar engine that augment the steering which is made by the Rack And Pinion system. The Rack And Pinion is unique and has impressive performance for their specific class which are the factors that make it stand out playing a vital role as a determinant for Cadillac's category in the market of luxury automobiles and vehicles for performance.
Cadillac XLR Rack And Pinion Parts Questions & Experts Answers
- Q: How to Replace the Front Rack and Pinion on Cadillac XLR?A:You should begin this repair by hoisting the car and using support equipment before uninstalling both wheels and tires. Sever the tie rod ends from Steering Knuckles and disconnect the intermediate shaft connecting to the Rack And Pinion. After removing the stabilizer shaft you must disconnect the power steering pressure and return hoses connected to the Rack And Pinion. Move both the power steering line hold-downs from the crossmember and also detach the brake pressure modulator valve (BPMV) bracket. Gently loosen the two rear crossmember mounting nuts (10 mm) with hand tools yet leave them in place. Separate the height sensor arm from the Control Arm while you position a utility stand to support the crossmember's front section. The j 33432-a leaf spring compressor allows you to compress the coil spring which provides enough clearance for gear removal from the crossmember. Disassemble the lower shock mounting bolts and the left front brake caliper brake pipe bracket from the crossmember and the right front brake pipe plastic hold-down. By removing the Rack And Pinion mounting bolts and nuts workers should be able to shift the Rack And Pinion through the left wheelhouse opening around the brake lines. To install the Rack And Pinion place it through the left wheelhouse opening and install the mounting bolts alongside nuts before tightening the nuts to 100 nm (74 ft. Lbs.). Put back the lower shock mounting bolts before you elevate the crossmember with a utility stand then remove the j 33432-a. Tighten all crossmember mounting nuts to 110 nm (81 ft. Lbs.) using only hand tools. Following brake pipe bracket installation on the left front brake caliper and right front brake pipe plastic hold-down attachment reinstallation comes brake bpmv bracket installment. Secure both ends of the power steering pressure hose to the Rack And Pinion but torque the fittings to 27 nm (20 ft. Lbs.) and do the same for the power steering return hose (27 Nm, or 29 ft. Lbs.). Fasten power steering hold-downs between crossmember and stabilizer shaft. Rejoin intermediate shaft to Rack And Pinion. Secure the height sensor arm to the Control Arm while also connecting the tie rod ends to steering knuckles. The process ends with wheel and tire installation followed by vehicle lowering and power steering bleeding and front wheel toe adjustment.

Related Cadillac XLR Parts
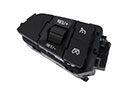 Cadillac XLR Cruise Control Switch
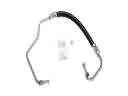 Cadillac XLR Hydraulic Hose
 Cadillac XLR Power Steering Hose
 Cadillac XLR Power Steering Pump
 Cadillac XLR Power Steering Reservoir
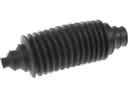 Cadillac XLR Rack and Pinion Boot
 Cadillac XLR Steering Column Cover
 Cadillac XLR Steering Gearbox
 Cadillac XLR Steering Shaft
 Cadillac XLR Steering Wheel
 Cadillac XLR Tie Rod
 Cadillac XLR Upper Steering Column Bearing