ChevyParts
My Garage
My Account
Cart
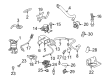
OEM Chevrolet Camaro Fuel Pressure Regulator
Fuel Tank Pressure Regulator- Select Vehicle by Model
- Select Vehicle by VIN
Select Vehicle by Model
orMake
Model
Year
Select Vehicle by VIN
For the most accurate results, select vehicle by your VIN (Vehicle Identification Number).
6 Fuel Pressure Regulators found


Chevrolet Camaro Fuel Pressure Regulator Part Number: 19245530
$92.92 MSRP: $188.72You Save: $95.80 (51%)Ships in 1-3 Business Days
Chevrolet Camaro Fuel Pressure Regulator Part Number: 89017530
$47.86 MSRP: $89.90You Save: $42.04 (47%)Ships in 1-2 Business Days


Chevrolet Camaro Fuel Pressure Regulator Part Number: 17112281


Chevrolet Camaro Fuel Pressure Regulator Part Number: 17091947

Chevrolet Camaro Fuel Pressure Regulator Part Number: 17091410

Chevrolet Camaro Fuel Pressure Regulator Part Number: 17112399
Chevrolet Camaro Fuel Pressure Regulator
Want to cut long-term maintenance and repair costs? Choose OEM Fuel Pressure Regulator. Those parts deliver top durability you can trust. On our site, you'll find a huge catalog of genuine Chevrolet Camaro parts. Prices are unbeatable, so you can keep more in your pocket. Every OEM Chevrolet Camaro Fuel Pressure Regulator includes a manufacturer's warranty. You can also get an easy return policy that keeps buying risk free. Fast delivery, get your car on the road quickly. It's simple to search, compare, and order. Stop guessing about quality or fit. Order today and save with parts that last.
The Chevrolet Camaro Fuel Pressure Regulator is an important unit that accurately improves competencies and factor of Chevrolet Camaro cars. As expected from any high quality regulator this Fuel Pressure Regulator is very reliable and very effective in maintaining fuel pressure in the fuel injection system, which is important for achieving good fuel atomization and hence good performance of the engine. The Fuel Pressure Regulator help to ensure that the correct amount of fuel is allowed to flow through the engine depending on the state of the engine, hence correct flow of fuel eliminates complications such as rough working of the engine and high emission. Designed to fit any Chevrolet Camaro year, with V6, or V8 engine, this regulator is the key component that mediates between power and efficiency. Specifically, the Chevrolet Camaro presents tremendous horsepower and torque, and the Fuel Pressure Regulator, that is accurate and precise, positively affects the car's safety and capabilities. Those are as follows Some of the common feedback mechanism that include the spring- loaded diaphragm make Fuel Pressure Regulator stand out in the market special features of the Fuel Pressure Regulator include the following; In operation, this Fuel Pressure Regulator is sure to deliver consistent and reliable results. Given that the Chevrolet Camaro can go from 0-60 mph in only 5.5 secs, it's critical to have a Fuel Pressure Regulator to provide the performance that followers deserve. In summary, the Chevrolet Camaro Fuel Pressure Regulator can be highlighted as a critical component that contributes to the car's improved functionality, which is why it is considered a reliable car among Camaro enthusiasts.
Chevrolet Camaro Fuel Pressure Regulator Parts and Q&A
- Q: How to replace the fuel pressure regulator on Chevrolet Camaro?A:The replacement of the Fuel Pressure Regulator begins with draining the fuel pressure. Before beginning the operation remove the Fuel Rail then clean all dirt remaining on the Fuel Pressure Regulator retaining ring. The first step entails removing the snap ring while catching spilled fuel using a shop towel before lifting and twisting the Fuel Pressure Regulator to separate it from the Fuel Pressure Regulator housing. First remove the pressure regulator small o-ring and then the pressure regulator filter screen before taking off the pressure regulator large o-ring and finally the pressure regulator o-ring back up. Place protective material around the Fuel Pressure Regulator housing in order to stop contamination. Use compressed air neither to clean nor test the Fuel Pressure Regulator during installation and maintain the pressure regulator out of solvent baths. Place new o-rings on the Fuel Pressure Regulator before applying clean engine oil for light oiling and installing pressure regulator o-ring back up followed by pressure regulator large o-ring and pressure regulator filter screen and finally pressure regulator small o-ring . Return the Fuel Pressure Regulator into the Fuel Pressure Regulator housing and fasten it with the snap ring. Check for fuel leaks after reinstalling the Fuel Rail by first turning on the ignition for 2 seconds, then waiting for 10 seconds with the ignition off followed by another 2-second on cycle.

Related Chevrolet Camaro Parts
 Chevrolet Camaro Fuel Injector
 Chevrolet Camaro Air Intake Coupling
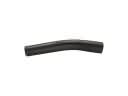 Chevrolet Camaro Fuel Filler Hose
 Chevrolet Camaro Fuel Injector O-Ring
 Chevrolet Camaro Fuel Pressure Sensor
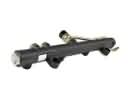 Chevrolet Camaro Fuel Rail
 Chevrolet Camaro Fuel Tank Sending Unit
 Chevrolet Camaro Idle Control Valve
 Chevrolet Camaro Intake Manifold Gasket
 Chevrolet Camaro Throttle Body
 Chevrolet Camaro Throttle Cable
 Chevrolet Camaro Vapor Pressure Sensor