ChevyParts
My Garage
My Account
Cart
OEM Chevrolet Camaro Slip Yoke
Transmission Slip Yoke- Select Vehicle by Model
- Select Vehicle by VIN
Select Vehicle by Model
orMake
Model
Year
Select Vehicle by VIN
For the most accurate results, select vehicle by your VIN (Vehicle Identification Number).
4 Slip Yokes found


Chevrolet Camaro Slip Yoke, Front Part Number: 7812557
$134.58 MSRP: $229.13You Save: $94.55 (42%)Ships in 1-2 Business Days
Chevrolet Camaro Companion Flange Part Number: 12479332
$128.73 MSRP: $210.72You Save: $81.99 (39%)
Chevrolet Camaro Slip Yoke Part Number: 26039762

Chevrolet Camaro Companion Flange Part Number: 10033586
Chevrolet Camaro Slip Yoke
Want to cut long-term maintenance and repair costs? Choose OEM Slip Yoke. Those parts deliver top durability you can trust. On our site, you'll find a huge catalog of genuine Chevrolet Camaro parts. Prices are unbeatable, so you can keep more in your pocket. Every OEM Chevrolet Camaro Slip Yoke includes a manufacturer's warranty. You can also get an easy return policy that keeps buying risk free. Fast delivery, get your car on the road quickly. It's simple to search, compare, and order. Stop guessing about quality or fit. Order today and save with parts that last.
The Chevrolet Camaro Slip Yoke serves as the critical element that joins the driveshaft with the transmission and transfer case thus vitalizing both performance and reliability of the vehicle. Smooth transmission results from the Slip Yoke design because it features internal splines that let the Chevrolet Camaro axle smoothly move with suspension dynamics to produce optimal efficiency while ensuring safety during vehicle operation. A wide range of Camaro models can use this component to optimize their driving experience through speed management and torsional vibration stabilization during high-performance driving dynamics. The Chevrolet Camaro Slip Yoke endures powerful V6 and V8 engine demands thereby supporting excellent acceleration and handling capabilities of the vehicle. The longevity of this part remains vital because prolonged usage produces metal wear that eventually leads to problems like noisy clunks and leaking fluid which reduce the Camaro drive system efficiency. Yps Yoke operates efficiently with multiple U-joint types which enhances its entire operational capacity. In the automotive market the Chevrolet car Slip Yoke specifically shines because of its reliability features together with its incredible performance while providing essential driving safety. The Chevrolet model Slip Yoke represents the company's dedication to innovation by proving its significance as an essential component for those who love driving Camaros.
Chevrolet Camaro Slip Yoke Parts and Q&A
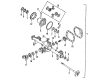
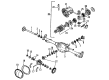
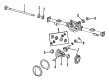
- Q: What tools are needed to service and repair the drive/propeller shaft for Slip Yoke and Universal Joint replacement on Chevrolet Camaro?A:Bot u-joint bearing separator (J 9522-3) and u-joint bearing spacer remover (J 9522-5) function as the needed tools for drive/propeller shaft service which focuses on universal joint and slip and yoke substitution. Keep the propeller shaft at a horizontal position while also refraining from placing tubing inside a vise for protection against harm. Universal joints need replacement with external snap rings while complete universal joint service kits must be used with one pregreased spider along with four service bearing caps equipped with seals, one needle roller bearing and delrin round washers, delrin flat washers, grease, and four retainer rings. To disassemble the propeller shaft align it with the press base plate then use the u-joint bearing separator (J 9522-3) for removing the lower bearing cap from the yoke ear while also needing the u-joint bearing spacer remover (J 9522-5). The technician should clean the yoke thoroughly then check the integrity of all seals before rebuilding the system. Place the bearing caps in correct trunnion position before using the press to install and seat the retainer rings by lightly striking the yoke when needed. Examine the procedure one more time on the dimension opposite the universal joint for full assembly completion.


