ChevyParts
My Garage
My Account
Cart
OEM Chevrolet Camaro Tie Rod End
Steering Rod End- Select Vehicle by Model
- Select Vehicle by VIN
Select Vehicle by Model
orMake
Model
Year
Select Vehicle by VIN
For the most accurate results, select vehicle by your VIN (Vehicle Identification Number).
7 Tie Rod Ends found


Chevrolet Camaro Outer Tie Rod, Driver Side Part Number: 22961953
$90.12 MSRP: $154.77You Save: $64.65 (42%)Ships in 1-2 Business Days

Chevrolet Camaro Outer Tie Rod Part Number: 92241266
$59.54 MSRP: $101.37You Save: $41.83 (42%)Ships in 1-2 Business Days


Chevrolet Camaro Inner Tie Rod Part Number: 92227430
$41.52 MSRP: $71.29You Save: $29.77 (42%)Ships in 1-3 Business Days
Chevrolet Camaro Outer Tie Rod, Passenger Side Part Number: 22961958
$90.12 MSRP: $154.77You Save: $64.65 (42%)Ships in 1-2 Business Days
Chevrolet Camaro Outer Tie Rod Part Number: 84494628
$43.83 MSRP: $106.95You Save: $63.12 (60%)Ships in 1-3 Business Days


Chevrolet Camaro Tie Rod, Outer Part Number: 21011027

Chevrolet Camaro Outer Tie Rod Part Number: 7837614
Chevrolet Camaro Tie Rod End
Want to cut long-term maintenance and repair costs? Choose OEM Tie Rod End. Those parts deliver top durability you can trust. On our site, you'll find a huge catalog of genuine Chevrolet Camaro parts. Prices are unbeatable, so you can keep more in your pocket. Every OEM Chevrolet Camaro Tie Rod End includes a manufacturer's warranty. You can also get an easy return policy that keeps buying risk free. Fast delivery, get your car on the road quickly. It's simple to search, compare, and order. Stop guessing about quality or fit. Order today and save with parts that last.
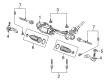
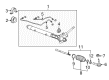
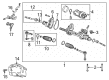
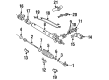
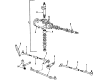
On Chevrolet Camaro, the Tie Rod End is an important component which links the steering rack to the steering knuckles. This link is crucial for achieving and sustaining car stability and as a result control over the vehicle direction. The Tie Rod End consists of two components: the inner tie rod end and the outer tie rod end, both of them are very essential tool for easy steering. In the years of designing Chevrolet Camaro models, several types of Tie Rod End were used depending on the design changes and the changes in performance characteristics. The role of such seats is to provide comfort for drivers and passengers, however, the characteristic might be modified concerning the construction materials or certain attributes affecting sturdiness and sensitivity.
Chevrolet Camaro Tie Rod End Parts and Q&A
- Q: How to replace the outer tie rod end and inner tie rod assembly on Chevrolet Camaro?A:Begin outer Tie Rod End replacement by removing the cotter pin followed by the hex slotted nut on the outer tie rod assembly . The assembly of the Steering Knuckle requires the universal steering linkage puller (J24319-01) for removing the outer tie rod assembly while the jam nut is loosened on the inner tie rod assembly . Detach the outer tie rod assembly from the inner tie rod assembly as the next step. Before tightening the jam nut , hook up the outer tie rod assembly to the inner tie rod so you can proceed by fitting the outer tie rod assembly to the Steering Knuckle using the hex slotted nut on the outer tie rod stud. Install the hex slotted nut by applying 47 nm (35 ft.lbs.) torque while positioning the cotter pin hole for a final 70 nm (52 ft.lbs.) torque or up to 1/6 additional turn. Never back off the nut before inserting the cotter pin. After inserting the cotter pin through the tie rod stud hole, check that the Rack and Pinion Boot stays untwisted during toe adjustment before making inner tie rod adjustments according to manufacturer guidelines. Complete the adjustment with a hex jam nut torque of 68 nm (50 ft. Lbs.). Begin inner tie rod replacement by removing the Rack and Pinion Boot while maintaining rack alignment to prevent damage. The shock dampener needs detachment from the inner tie rod assembly before sliding it backward onto the rack. Unscrew the rack assembly from the inner tie rod assembly by applying wrenches to the flats of the rack assembly and the inner tie rod housing . Turn the housing counter clockwise to break the connection. First wipe away loctite (R) residue from the rack's threads and inner tie rod threads and then guide the shock dampener back to the rack's front face. Use loctite (R) 262 (or equivalent) to lubricate inner tie rod threads before attaching the inner tie rod to the rack. Use a wrench on the rack's flats along with a torque wrench to tighten the inner tie rod housing to 100 nm (74 ft. Lbs.). Fit the shock dampener over the inner tie rod assembly until it reaches the lowest point then continue with Rack and Pinion Boot reinstallation.

Related Chevrolet Camaro Parts
 Chevrolet Camaro Steering Wheel
 Chevrolet Camaro Center Link
 Chevrolet Camaro Drag Link
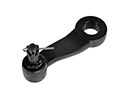 Chevrolet Camaro Pitman Arm
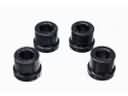 Chevrolet Camaro Rack & Pinion Bushing
 Chevrolet Camaro Rack And Pinion
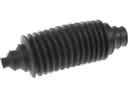 Chevrolet Camaro Rack and Pinion Boot
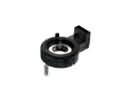 Chevrolet Camaro Steering Angle Sensor
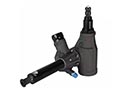 Chevrolet Camaro Steering Gearbox
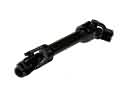 Chevrolet Camaro Steering Shaft
 Chevrolet Camaro Tie Rod
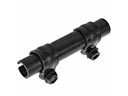 Chevrolet Camaro Tie Rod Adjusting Sleeve