ChevyParts
My Garage
My Account
Cart
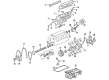
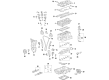
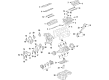
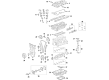
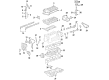
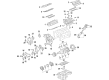
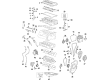
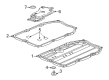
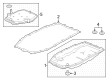
OEM Chevrolet Colorado Oil Pan
Oil Drain Pan- Select Vehicle by Model
- Select Vehicle by VIN
Select Vehicle by Model
orMake
Model
Year
Select Vehicle by VIN
For the most accurate results, select vehicle by your VIN (Vehicle Identification Number).
22 Oil Pans found


Chevrolet Colorado Oil Pan Part Number: 12628375
$103.40 MSRP: $161.91You Save: $58.51 (37%)

Chevrolet Colorado Oil Pan Part Number: 12624621
$173.87 MSRP: $273.58You Save: $99.71 (37%)


Chevrolet Colorado Oil Pan Part Number: 12676340
$28.47 MSRP: $46.87You Save: $18.40 (40%)Ships in 1-2 Business Days
Chevrolet Colorado Oil Pan Part Number: 12666372
$221.76 MSRP: $348.80You Save: $127.04 (37%)Ships in 1-3 Business Days
Chevrolet Colorado Oil Pan Part Number: 12676337
$109.77 MSRP: $171.90You Save: $62.13 (37%)
Chevrolet Colorado Oil Pan Part Number: 12580241
$259.50 MSRP: $352.23You Save: $92.73 (27%)
Chevrolet Colorado Oil Pan Part Number: 12667040
$326.21 MSRP: $555.36You Save: $229.15 (42%)Ships in 1-2 Business Days
Chevrolet Colorado Oil Pan Part Number: 12726914
$43.22 MSRP: $74.22You Save: $31.00 (42%)Ships in 1-2 Business DaysChevrolet Colorado Oil Pan Part Number: 25202730
$109.77 MSRP: $171.90You Save: $62.13 (37%)Ships in 1-3 Business Days
Chevrolet Colorado Oil Pan Part Number: 12732388
$67.00 MSRP: $104.92You Save: $37.92 (37%)Ships in 1-2 Business Days
Chevrolet Colorado Oil Pan Part Number: 24045034
$40.90 MSRP: $69.63You Save: $28.73 (42%)Ships in 1-2 Business Days

Chevrolet Colorado Lower Oil Pan Part Number: 12673401
$24.79 MSRP: $38.81You Save: $14.02 (37%)Ships in 1-2 Business Days
Chevrolet Colorado Oil Pan Part Number: 12643691
$147.61 MSRP: $232.26You Save: $84.65 (37%)
Chevrolet Colorado Oil Pan Part Number: 24045041
$41.05 MSRP: $64.30You Save: $23.25 (37%)Ships in 1-2 Business Days
Chevrolet Colorado Oil Pan, Upper Part Number: 24589120
$233.48 MSRP: $367.28You Save: $133.80 (37%)Chevrolet Colorado Oil Pan Part Number: 25202729
$147.88 MSRP: $232.64You Save: $84.76 (37%)Ships in 1-3 Business DaysChevrolet Colorado Oil Pan Part Number: 12632803
$163.57 MSRP: $257.38You Save: $93.81 (37%)Ships in 1-3 Business DaysChevrolet Colorado Oil Pan Part Number: 12716566
$170.33 MSRP: $268.00You Save: $97.67 (37%)Ships in 1-3 Business Days


Chevrolet Colorado Oil Pan Part Number: 12600499
$217.54 MSRP: $342.28You Save: $124.74 (37%)Chevrolet Colorado Oil Pan Part Number: 12600498
| Page 1 of 2 |Next >
1-20 of 22 Results
Chevrolet Colorado Oil Pan
Want to cut long-term maintenance and repair costs? Choose OEM Oil Pan. Those parts deliver top durability you can trust. On our site, you'll find a huge catalog of genuine Chevrolet Colorado parts. Prices are unbeatable, so you can keep more in your pocket. Every OEM Chevrolet Colorado Oil Pan includes a manufacturer's warranty. You can also get an easy return policy that keeps buying risk free. Fast delivery, get your car on the road quickly. It's simple to search, compare, and order. Stop guessing about quality or fit. Order today and save with parts that last.
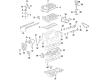
The Oil Pan should be understood as an engine oil storage tank in Chevrolet Colorado and plays a significant role to supply the lubricant to the components of the engine as well as the control of their temperature. The Oil Pan is a wet sump, the oil is drawn to it through a pickup tube with help of the oil pump, the oil is distributed all over the engine and then it goes back into the Oil Pan. This design is crucial in the performance of the engine at desirable levels of efficiency. Conventional Chevrolet Colorado Oil Pans were commonly produced using stamped steel while today's new generation engines have switched to cast aluminum for internal lubrication. The basic function of the item has not changed, however, the shift to enhanced materials is in accordance with the progressive engineering demands experienced in Chevrolet Colorado cars, as well as providing dependable lubrication under multiple operation conditions.
Chevrolet Colorado Oil Pan Parts Questions & Experts Answers
- Q: How to replace the oil pan on Chevrolet Colorado?A:The oil level indicator and tube needs removal before you can proceed with taking out the engine protection shield. Clearing the Oil Pan requires draining the engine oil and taking out several components. For rwd, remove the crossmember; the differential carrier assembly requires stable pinion yoke maintenance and downward motion at this point so remove the front propeller shaft and differential carrier assembly bushing to frame bolts. Begin by removing three components: the service slot plug, the transmission fuel hose/pipe bracket securing nuts, and the four lower transmission mounting bolts from the Oil Pan. To access the power steering gear you must first remove the mounting bolts then pull it downward. First disconnect the engine wiring harness retainers from the Oil Pan followed by removing the Oil Pan bolts. Tighten two bolts into the threaded holes at the rear of the Oil Pan to operate as jack screws before removing both the Oil Pan and the two bolts from their positions. Check and clean both the Oil Pan and the engine block sealing contact surfaces. Use a 5.5 mm (0.22 inch) bead of sealer gm p/n 12378521 (Canadian P/N 88901148) in the marked areas of the Oil Pan while ensuring the sealer does not come into contact with the oil pump pipe and screen assembly. Place the Oil Pan on the engine block while making sure the rear Oil Pan surface matches the rear block surface. Tighten all side bolts of the Oil Pan to 25 nm (18 ft. Lbs.) while ending bolts require a torque of 10 nm (89 inch lbs.). Ensure Oil Pan alignment through transmission check. After mounting the power steering gear to the frame assembly you should install its mounting bolts. Complete the wiring harness retainers connection to the Oil Pan. Secure the four lower transmission mounting bolts with 50 nm torque settings before bolting the transmission fuel hose/pipe bracket to its position. Apply 20 nm torque settings for this bracket assembly also. The installation requires the service slot plug together with crossmember for rwd or differential carrier assembly positioning on the frame followed by frame bolt installation of the differential carrier assembly bushing. Torque all frame bolts to 152 nm (112 ft. Lbs.) prior to front propeller shaft mounting. Complete the installation by installing the shield, filling the engine with oil and adding the level indicator and its tube.

Related Chevrolet Colorado Parts
 Chevrolet Colorado Oil Pump
 Chevrolet Colorado Crankshaft Pulley
 Chevrolet Colorado Crankshaft Thrust Washer Set
 Chevrolet Colorado Dipstick
 Chevrolet Colorado Dipstick Tube
 Chevrolet Colorado Exhaust Valve
 Chevrolet Colorado Intake Valve
 Chevrolet Colorado Oil Drain Plug Gasket
 Chevrolet Colorado Oil Filler Cap
 Chevrolet Colorado Piston Ring
 Chevrolet Colorado Rocker Shaft Spring Kit
 Chevrolet Colorado Variable Timing Sprocket