ChevyParts
My Garage
My Account
Cart
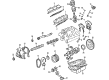
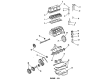
OEM Chevrolet Lumina Piston
Engine Pistons- Select Vehicle by Model
- Select Vehicle by VIN
Select Vehicle by Model
orMake
Model
Year
Select Vehicle by VIN
For the most accurate results, select vehicle by your VIN (Vehicle Identification Number).
8 Pistons found

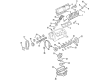
Chevrolet Lumina Piston Part Number: 12564008
$28.08 MSRP: $43.98You Save: $15.90 (37%)Ships in 1-2 Business Days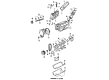
Chevrolet Lumina Piston Part Number: 24505806
$60.70 MSRP: $121.88You Save: $61.18 (51%)
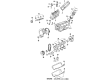
Chevrolet Lumina Pistons Part Number: 10070183
Chevrolet Lumina Piston Part Number: 24508726

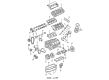
Chevrolet Lumina Piston Part Number: 24505686

Chevrolet Lumina Pistons Part Number: 19299371

Chevrolet Lumina Pistons Part Number: 10112444

Chevrolet Lumina Piston Part Number: 10101711
Chevrolet Lumina Piston
Want to cut long-term maintenance and repair costs? Choose OEM Piston. Those parts deliver top durability you can trust. On our site, you'll find a huge catalog of genuine Chevrolet Lumina parts. Prices are unbeatable, so you can keep more in your pocket. Every OEM Chevrolet Lumina Piston includes a manufacturer's warranty. You can also get an easy return policy that keeps buying risk free. Fast delivery, get your car on the road quickly. It's simple to search, compare, and order. Stop guessing about quality or fit. Order today and save with parts that last.
The Piston is one of the critical components that have contributed to the general reputation of Chevrolet Lumina as a reliable economic car that has the potential of giving out competitive performance in the internal combustion engine. This vital component transmits the energy of combustion power into the energy that is required for the motion of the Chevrolet Lumina in as optimal way as possible. Lumina pistons are made from lightweight aluminum alloys capable of endurance under pressure and heat; it has provisions for cooling scoops and completely sealant piston rings. The trends in pistons that have been utilized across the Lumina models have included the use of the trunk and the slipper pistons, which have known to improve on the general performance since they have been developed to allow for the maximum weight and efficiency especially when it comes to high speed. The Chevrolet Lumina which was manufactured between 1989 and 2013 is known for its strength and versatility; its piston design plays a special and a very useful role in the strengthen and elastic mechanics of the car. This demonstrates that the Lumina Piston is compatible with multiple Lumina models is a clear indication of where the piston lies in ensuring the vehicle's standards are attained. Also, such novelties of the Lumina model as a Turbo-Hydramatic 125 transmission and the improved suspension look as more advantages which contribute to an improved driving experience. In the automotive market, this piston is amazing not only in engineering but in aspects of durability and reliability that are significant to the car's lifespan hence playing a key role in the Chevrolet Lumina Piston that is vital to the Chevrolet history.
Chevrolet Lumina Piston Parts Questions & Experts Answers
- Q: How to replace the piston, rod bearing in an engine on Chevrolet Lumina?A:The first step for replacing piston and connecting rod and bearing begins with removing the cylinder heads. Insert the Crankshaft into the bottom of piston travel then set a cloth above the piston while leveraging the cylinder bore ridge reamer (J24270) to eliminate the Piston Ring ridge. Rotate the Crankshaft until the piston reaches its uppermost point after which you should remove the material including the cloth and support the vehicle. You should now detach the Oil Pan and Oil Pump as well as removing the Crankshaft oil deflector. Set the Crankshaft at bottom dead center (BDC) position for the rod assembly service while applying matchmarks to connecting rod and caps. The removal of connecting rod nuts will open the path for connecting rod cap and lower connecting rod bearing extraction. Secure thread protectors onto the Crankshaft journal for prevention of damage. Follow up installation of the connecting rod bolt guide set (J5239) by pushing the piston and rod assembly through the cylinder before lowering the vehicle. Clean the engine block top with oil before removing its piston and connecting rod assembly and upper bearing components and connecting rod bearings for examination. Use honing followed by hot water detergent cleaning then dry it with a clean cloth before adding new engine oil for cylinder bore cleaning. Narrow down installation steps by applying new engine oil onto the piston rings and bearing surfaces and cylinder bore and piston. Then implement the j5239. Use the Piston Ring compressor (J8037) to stretch the rings before installation which should have their stamped arrows facing toward the front of the engine. The j5239 and j8037 should help install the piston in its bore by using a wooden hammer handle to tap lightly while keeping the j8037 against the engine block until all rings enter the cylinder bore. The technician should support the vehicle again while installing the upper connecting rod bearing and apply fresh engine oil before lowering the piston and rod assembly to the Crankshaft through the use of the j5239. The procedure requires you to first remove the j5239, insert the lower connecting rod bearing into the connecting rod cap which you should then coat with new engine oil before installation. To achieve a proper installation use the electronic torque angle meter (J36660-A) for an additional 75-degree rotation on the connecting rod nuts which should initially be tightened to 20 nm (15 ft. Lbs.). Check for binding in the connecting rod before measuring connecting rod clearance as you confirm all bearings are present along with light parallel rod tapping against the crankpin. As the final step install the Crankshaft oil deflector together with the Oil Pump and the Oil Pan before lowering the vehicle to install the Cylinder Head(s).

Related Chevrolet Lumina Parts
 Chevrolet Lumina Cam Gear
 Chevrolet Lumina Camshaft Bearing
 Chevrolet Lumina Crankshaft Seal
 Chevrolet Lumina Crankshaft Thrust Washer Set
 Chevrolet Lumina Engine Mount Bracket
 Chevrolet Lumina Harmonic Balancer
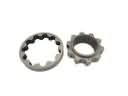 Chevrolet Lumina Oil Pump Rotor Set
 Chevrolet Lumina Piston Ring
 Chevrolet Lumina Timing Belt
 Chevrolet Lumina Timing Cover Gasket
 Chevrolet Lumina Valve Cover Gasket
 Chevrolet Lumina Valve Stem Oil Seal