ChevyParts
My Garage
My Account
Cart
OEM Chevrolet Malibu Relay
Wire Relay- Select Vehicle by Model
- Select Vehicle by VIN
Select Vehicle by Model
orMake
Model
Year
Select Vehicle by VIN
For the most accurate results, select vehicle by your VIN (Vehicle Identification Number).
12 Relays found


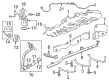
Chevrolet Malibu Fuel Pump Relay, Black Part Number: 19116962
$8.18 MSRP: $15.36You Save: $7.18 (47%)Ships in 1-2 Business Days


Chevrolet Malibu Fuel Pump Relay, Black Part Number: 13503103
$5.21 MSRP: $11.29You Save: $6.08 (54%)Ships in 1-2 Business Days


Chevrolet Malibu Fuel Pump Relay, Gray; Green Part Number: 13503102
$7.74 MSRP: $16.90You Save: $9.16 (55%)Ships in 1-2 Business Days

Chevrolet Malibu Fuel Pump Relay, Black Part Number: 13500126
$11.65 MSRP: $21.88You Save: $10.23 (47%)Ships in 1-3 Business Days


Chevrolet Malibu Circuit Breaker Part Number: 13500114
$10.16 MSRP: $20.88You Save: $10.72 (52%)Ships in 1-2 Business Days


Chevrolet Malibu Relay Part Number: 13500112
$36.20 MSRP: $78.36You Save: $42.16 (54%)Ships in 1-2 Business Days


Chevrolet Malibu Relay Part Number: 13422668
$35.05 MSRP: $65.82You Save: $30.77 (47%)Ships in 1-2 Business Days
Chevrolet Malibu Relay Part Number: 13455281
$4.31 MSRP: $9.41You Save: $5.10 (55%)
Chevrolet Malibu Relay Part Number: 24284374
$356.97 MSRP: $561.68You Save: $204.71 (37%)Ships in 1-3 Business Days
Chevrolet Malibu Relay, Black Part Number: 13598349
$12.95 MSRP: $24.32You Save: $11.37 (47%)Ships in 1-2 Business Days
Chevrolet Malibu Relay, Gray Part Number: 13468935
$6.11 MSRP: $11.48You Save: $5.37 (47%)Ships in 1-2 Business Days
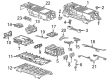
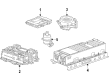
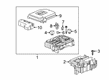
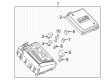
Chevrolet Malibu Relay Box Part Number: 22983311
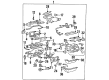
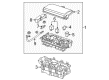
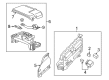
Chevrolet Malibu Relay
Want to cut long-term maintenance and repair costs? Choose OEM Relay. Those parts deliver top durability you can trust. On our site, you'll find a huge catalog of genuine Chevrolet Malibu parts. Prices are unbeatable, so you can keep more in your pocket. Every OEM Chevrolet Malibu Relay includes a manufacturer's warranty. You can also get an easy return policy that keeps buying risk free. Fast delivery, get your car on the road quickly. It's simple to search, compare, and order. Stop guessing about quality or fit. Order today and save with parts that last.
Chevrolet Malibu Relay Parts Questions & Experts Answers
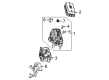
- Q: How to replace the Power Distribution Relay on Chevrolet Malibu?A:The first step for replacing the Power Distribution Relay involves finding the relay then unfastening all screw connectors that stabilize it along with any connector position assurance (CPA) devices or secondary lock components. The user should exercise special care when disconnecting the relay from the wiring harness particularly if fasteners or tape are used for attachment. You should disconnect the relay from its position on the wire harness connector. The installation process starts with attaching the relay to wire harness connector and following by adding secondary locks and CPA devices and ending with original fastening devices or tape.

Related Chevrolet Malibu Parts
 Chevrolet Malibu Fuse Box
 Chevrolet Malibu Ignition Switch
 Chevrolet Malibu Brake Light Switch
 Chevrolet Malibu Fuel Pump Relay
 Chevrolet Malibu Instrument Cluster
 Chevrolet Malibu Speedometer
 Chevrolet Malibu Body Control Module
 Chevrolet Malibu ABS Control Module
 Chevrolet Malibu ABS Wheel Speed Sensor Connector
 Chevrolet Malibu Door Lock Switch
 Chevrolet Malibu Hazard Warning Switch
 Chevrolet Malibu Horn