ChevyParts
My Garage
My Account
Cart
OEM Chevrolet Metro Evaporator
A/C Evaporator Core- Select Vehicle by Model
- Select Vehicle by VIN
Select Vehicle by Model
orMake
Model
Year
Select Vehicle by VIN
For the most accurate results, select vehicle by your VIN (Vehicle Identification Number).
2 Evaporators found

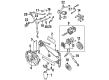
Chevrolet Metro Evaporator Core Part Number: 91171580
Chevrolet Metro Evaporator Assembly Part Number: 91171579
Chevrolet Metro Evaporator
Our website offers an extensive catalog of genuine Chevrolet Metro Evaporator at unbeatable prices. Every OEM Chevrolet Metro Evaporator comes with a manufacturer's warranty, an easy return policy, and rapid delivery service. Don't miss out on this great opportunity!
Chevrolet Metro Evaporator Parts Questions & Experts Answers
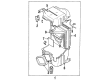
- Q: How to replace the evaporator core on Chevrolet Metro?A: The first step requires refrigerant removal for recovery before disabling the supplemental inflatable restraint (SIR) system. The worker should then disconnect the negative Battery Cable. The first step requires the removal of the blower case and subsequent disconnection of power from the a/c compressor control module and the refrigerant temperature sensor. The next step requires removal of Evaporator case pipes that link to both the refrigerant inlet and outlet as well as separation of the drain hose. Two mounting bolts and one nut along with the Evaporator case need to be removed first. Unhook the two lower releases securing the a/c compressor control module before pulling it upward to break its attachment with the Evaporator case. After releasing the retaining clips workers should separate the two Evaporator case (1,3) halves before removing the core. The new Evaporator core must go inside the Evaporator case before securing the upper half and lower half through retaining clips while reinserting the a/c compressor control module. Hook the Evaporator case into position on the vehicle by using both mounting bolts and the nut for attachment. First reconnect the drain hose with the refrigerant inlet and outlet pipes to the Evaporator case then connect the electrical connectors to the a/c compressor control module and the a/c Evaporator temperature sensor. Reinstallation of the blower case is necessary after enabling sir and reinstalling the negative Battery Cable and performing an evacuation and recharge of the a/c system before checking for refrigerant leaks.
Related Chevrolet Metro Parts
 Chevrolet Metro A/C Accumulator
 Chevrolet Metro A/C Clutch
 Chevrolet Metro A/C Compressor
 Chevrolet Metro A/C Compressor Cut-Out Switches
 Chevrolet Metro A/C Condenser
 Chevrolet Metro A/C Expansion Valve
 Chevrolet Metro A/C Hose
 Chevrolet Metro A/C Orifice Tube
 Chevrolet Metro A/C Switch
 Chevrolet Metro Blower Control Switches
 Chevrolet Metro HVAC Pressure Switch
 Chevrolet Metro Heater Control Valve