ChevyParts
My Garage
My Account
Cart
OEM Chevrolet Metro A/C Condenser
Air Conditioning Condenser- Select Vehicle by Model
- Select Vehicle by VIN
Select Vehicle by Model
orMake
Model
Year
Select Vehicle by VIN
For the most accurate results, select vehicle by your VIN (Vehicle Identification Number).
1 A/C Condenser found

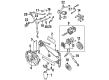
Chevrolet Metro Condenser Part Number: 91174026
Chevrolet Metro A/C Condenser
Want to cut long-term maintenance and repair costs? Choose OEM A/C Condenser. Those parts deliver top durability you can trust. On our site, you'll find a huge catalog of genuine Chevrolet Metro parts. Prices are unbeatable, so you can keep more in your pocket. Every OEM Chevrolet Metro A/C Condenser includes a manufacturer's warranty. You can also get an easy return policy that keeps buying risk free. Fast delivery, get your car on the road quickly. It's simple to search, compare, and order. Stop guessing about quality or fit. Order today and save with parts that last.
The A/C Condenser is in fact an operational component as a heat exchanger to cool the gaseous refrigerant then turn it to liquid form in Chevrolet Metro vehicles. Usually including circuits of tubes, being found in above the engine room infront of the radiator the A/C Condenser have the main function of enhancing heat evacuation. Depending on the Metro model or the specific time period, there could be differences in the types or styles of A/C Condenser used; however, irrespective of those differences, the main focus for all of them stays the same- to help change the refrigerant from gas to a liquid state for the car's A/C to work as intended.
Chevrolet Metro A/C Condenser Parts and Q&A
- Q: How to install a new A/C Condenser in a refrigeration system on Chevrolet Metro?A:Prior to installing a new condenser, add 20-30 ml (0.7-1 fl oz) oil to the refrigeration system. Disconnect the supplemental inflatable restraint (SIR) system then drain the refrigerant and remove the Battery Cable. Begin your installation by removing the front Bumper followed by disconnecting the Hood Latch cable and moving the Hood Latch assembly out from its position. Disconnect the sir forward discriminating sensor electrical connector as well as the condenser fan electrical connector and both Horn electrical connections. The vehicle needs 1 bolt and Horn removed for fitting the receiver-dryer outlet-to-evaporator inlet pipe. First, remove a single nut along with discharge hose from condenser and maintain a sequence of unfastening six screws while removing radiator center brace. The condenser needs removal from the vehicle after you detach the 2 mounting bolts but keep the refrigerant system openings sealed with caps to stop moisture and dirt entry. Start by removing the 2 bolts along with the 2 screws that hold the condenser fan in place. Then detach the fan from its mounting position. You should secure the condenser fan onto the condenser by tightening both 2 bolts and 2 screws. Fasten the condenser to the radiator support through the installation of both bolt assemblies. The radiator center brace receives six screws for installation before the condenser fan connects to it using one bolt. Attach the condenser discharge hose with one handtightened nut to achieve 9.8 n.m (86.74 lb in) torque. The outlet-to-evaporator inlet pipe fitting of the receiver or dryer requires Horn installation using one bolt for attachment before connecting the Horn electrical connectors. Join the electrical connector of the condenser cooling fan to its sir forward discriminating sensor as well as the electrical connector. Place the Hood Latch cable followed by the front Bumper installation and reconnect the negative Battery Cable. Remove and recharge the air conditioning system before operating it and examining it for refrigerant leaks. Finally, enable the sir system.

Related Chevrolet Metro Parts
 Chevrolet Metro A/C Accumulator
 Chevrolet Metro A/C Clutch
 Chevrolet Metro A/C Compressor
 Chevrolet Metro A/C Compressor Cut-Out Switches
 Chevrolet Metro A/C Expansion Valve
 Chevrolet Metro A/C Hose
 Chevrolet Metro A/C Idler Pulley
 Chevrolet Metro A/C Orifice Tube
 Chevrolet Metro A/C Switch
 Chevrolet Metro Blower Control Switches
 Chevrolet Metro Evaporator
 Chevrolet Metro HVAC Pressure Switch