ChevyParts
My Garage
My Account
Cart
OEM Chevrolet S10 Radiator Cap
Cooling Radiator Cap- Select Vehicle by Model
- Select Vehicle by VIN
Select Vehicle by Model
orMake
Model
Year
Select Vehicle by VIN
For the most accurate results, select vehicle by your VIN (Vehicle Identification Number).
5 Radiator Caps found


Chevrolet S10 Radiator Cap Part Number: 15982188
$11.60 MSRP: $21.78You Save: $10.18 (47%)Ships in 1-2 Business Days


Chevrolet S10 Radiator Cap Part Number: 15075565
$12.68 MSRP: $23.82You Save: $11.14 (47%)Ships in 1-3 Business Days

Chevrolet S10 Radiator Cap, Black Part Number: 10409635
$12.08 MSRP: $21.59You Save: $9.51 (45%)Ships in 1-2 Business Days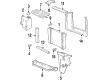
Chevrolet S10 Radiator Cap Part Number: 6410785
$12.08 MSRP: $21.59You Save: $9.51 (45%)Ships in 1-3 Business Days


Chevrolet S10 Reservoir Cap Part Number: 15630112
Chevrolet S10 Radiator Cap
Want to cut long-term maintenance and repair costs? Choose OEM Radiator Cap. Those parts deliver top durability you can trust. On our site, you'll find a huge catalog of genuine Chevrolet S10 parts. Prices are unbeatable, so you can keep more in your pocket. Every OEM Chevrolet S10 Radiator Cap includes a manufacturer's warranty. You can also get an easy return policy that keeps buying risk free. Fast delivery, get your car on the road quickly. It's simple to search, compare, and order. Stop guessing about quality or fit. Order today and save with parts that last.
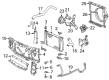
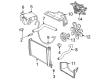
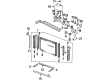
The Chevrolet S10 Radiator Cap maintains the pressure in the coolant at all times to ensure that the engine remains cool and efficient making the chevy Radiator Cap a minor component with a massive effect. Chevrolet S10 attracts loyal drivers with a diverse engine family that includes fuel efficient four cylinders to powerful V6 engines, agile rear wheel drive maneuverability, and small size to sail through the streets of the city with a large cargo bed. Chevrolet engineers incorporated front disc brakes and rear drum brakes that are optionally anti lock controlled, manual or automatic transmission of choice and steel frame construction that allows the S10 to handle both hard work and the daily work. A lot of owners of Chevrolet S10 support their claims by stating that the truck is very durable in case they maintain it in time. Equally tough, the S10 Radiator Cap incorporates a measured spring and a solid gasket to maintain a pressure of coolant in the system, elevate the boiling point of the coolant, direct surplus fluid to the overflow tank and re-direct it back after the temperatures fall, all of which prevents boil over and excessive heat. A well functioning Radiator Cap is thus a first line of defense against the expensive engine damage and also the owners like the fact that the cap fits on the filler neck and is thus easily checked during normal servicing. In order to fit a Radiator Cap, it is essential to make the engine cool and wrap the old cap with a cloth, slowly loosen the old cap, check and clean the neck, press and twist the new cap until it is locked, and finally start the engine and inspect the leaks.
Related Chevrolet S10 Parts
 Chevrolet S10 Radiator
 Chevrolet S10 Coolant Reservoir
 Chevrolet S10 Fan Shroud
 Chevrolet S10 Radiator Hose
 Chevrolet S10 Thermostat Housing
 Chevrolet S10 Water Pump
 Chevrolet S10 Coolant Reservoir Cap
 Chevrolet S10 Cooling Fan Bracket
 Chevrolet S10 Cooling Fan Clutch
 Chevrolet S10 Cooling Hose
 Chevrolet S10 Crossmember Bushing
 Chevrolet S10 Thermostat Gasket