ChevyParts
My Garage
My Account
Cart
OEM Chevrolet Silverado 1500 Torsion Bar
Suspension Torsion Bar- Select Vehicle by Model
- Select Vehicle by VIN
Select Vehicle by Model
orMake
Model
Year
Select Vehicle by VIN
For the most accurate results, select vehicle by your VIN (Vehicle Identification Number).
10 Torsion Bars found


Chevrolet Silverado 1500 Torsion Bar, Front Driver Side Part Number: 19330060
$312.71 MSRP: $492.03You Save: $179.32 (37%)
Chevrolet Silverado 1500 Torsion Bar, Front Passenger Side Part Number: 19330059
$312.71 MSRP: $492.03You Save: $179.32 (37%)Ships in 1-3 Business Days


Chevrolet Silverado 1500 Torsion Bar, Front Driver Side Part Number: 19330058
$312.77 MSRP: $492.12You Save: $179.35 (37%)

Chevrolet Silverado 1500 Torsion Bar, Front Passenger Side Part Number: 19330057
$312.77 MSRP: $492.12You Save: $179.35 (37%)

Chevrolet Silverado 1500 Torsion Bar, Front Part Number: 15048312
$257.64 MSRP: $405.40You Save: $147.76 (37%)Ships in 1-3 Business Days


Chevrolet Silverado 1500 Torsion Bar, Front Passenger Side Part Number: 19332946
$257.82 MSRP: $405.67You Save: $147.85 (37%)
Chevrolet Silverado 1500 Torsion Bar, Front Driver Side Part Number: 19332945
$257.82 MSRP: $405.67You Save: $147.85 (37%)Chevrolet Silverado 1500 Torsion Bar, Front Part Number: 19332931

Chevrolet Silverado 1500 Torsion Bar
Want to cut long-term maintenance and repair costs? Choose OEM Torsion Bar. Those parts deliver top durability you can trust. On our site, you'll find a huge catalog of genuine Chevrolet Silverado 1500 parts. Prices are unbeatable, so you can keep more in your pocket. Every OEM Chevrolet Silverado 1500 Torsion Bar includes a manufacturer's warranty. You can also get an easy return policy that keeps buying risk free. Fast delivery, get your car on the road quickly. It's simple to search, compare, and order. Stop guessing about quality or fit. Order today and save with parts that last.
Chevrolet Silverado 1500 Torsion Bar Parts Questions & Experts Answers
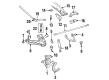
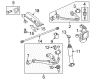
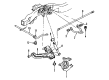
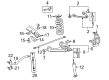
- Q: How to replace the torsion bar and support assembly (Link Style) on Chevrolet Silverado 1500?A:The ascent and backing bearing up the vehicle by the frame on the web using a fitting hoist, cost of living off the front suspension. Carry the torsion bars with caution so that they do not harm the coating and cause early failure. Mount the j 36202 (Torsion Bar Unloading/Loading Tool) on the adjustment arm and support assembly, and turn the adjustment arm until the load is taken off the adjustment bolt and adjuster nut, recording the number of revolutions in removing the adjustment bolt. Unscrew the j 36202 with the help of adjustment bolt and the adjustment nut from the support assembly , allowing the Torsion Bar to unload. Move the Torsion Bar forward to pull off the adjustment arm from the support assembly , then take out the upper link mounting bolt and nut from the link and the Torsion Bar support assembly. Do not forget that the left and right torsion bars cannot be exchanged or used interchangeably. For installation, place the Torsion Bar in the lower Control Arm and aid assembly, ensuring to do according to fastener cautions. Put in the upper link mounting nut and bolt in to the link making sure that the nut is secured with 95 nm (70 lb ft) of effort. Next, make an installation of the adjustment arm into the support assembly followed by the adjuster bolt and adjustment nut. Slide the Torsion Bar rearward until it is fully installed into the adjustment arm and use the j 36202 to apply tension on the adjustment arm using the tension in order to install the Torsion Bar. Level the reference marks and then ensure that you turn the adjuster bolt the same number of times it was tightened to make the adjustment. Then, take out j 36202 from the support assembly, remove the safety stand, set the vehicle to a lower position, and record z height.

Related Chevrolet Silverado 1500 Parts
 Chevrolet Silverado 1500 Alignment Bolt
 Chevrolet Silverado 1500 Ball Joint
 Chevrolet Silverado 1500 Coil Spring Insulator
 Chevrolet Silverado 1500 Coil Springs
 Chevrolet Silverado 1500 Control Arm
 Chevrolet Silverado 1500 Control Arm Bolt
 Chevrolet Silverado 1500 Control Arm Bushing
 Chevrolet Silverado 1500 Shock and Strut Boot
 Chevrolet Silverado 1500 Spindle Nut
 Chevrolet Silverado 1500 Steering Knuckle
 Chevrolet Silverado 1500 Sway Bar Bushing
 Chevrolet Silverado 1500 Sway Bar Kit