ChevyParts
My Garage
My Account
Cart
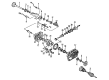
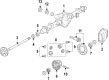
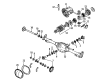
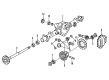
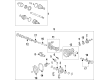
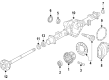
OEM Chevrolet Silverado 1500 Universal Joint
U-Joint- Select Vehicle by Model
- Select Vehicle by VIN
Select Vehicle by Model
orMake
Model
Year
Select Vehicle by VIN
For the most accurate results, select vehicle by your VIN (Vehicle Identification Number).
9 Universal Joints found


Chevrolet Silverado 1500 Universal Joints Part Number: 23104840
$36.45 MSRP: $88.98You Save: $52.53 (60%)

Chevrolet Silverado 1500 Universal Joints Part Number: 94772179
$163.83 MSRP: $273.43You Save: $109.60 (41%)Ships in 1-3 Business Days


Chevrolet Silverado 1500 Universal Joints Part Number: 89059111
$163.83 MSRP: $273.43You Save: $109.60 (41%)Ships in 1-2 Business Days


Chevrolet Silverado 1500 Universal Joints Part Number: 89040245
$107.41 MSRP: $180.82You Save: $73.41 (41%)Ships in 1-2 Business Days
Chevrolet Silverado 1500 Universal Joints Part Number: 89040243
$112.32 MSRP: $189.10You Save: $76.78 (41%)Ships in 1-2 Business Days


Chevrolet Silverado 1500 Universal Joints Part Number: 88964413
$196.62 MSRP: $328.19You Save: $131.57 (41%)Ships in 1-2 Business Days


Chevrolet Silverado 1500 Universal Joints Part Number: 19121436
$130.13 MSRP: $308.44You Save: $178.31 (58%)Ships in 1-2 Business Days
Chevrolet Silverado 1500 Universal Joints Part Number: 84712242
$124.76 MSRP: $212.40You Save: $87.64 (42%)Ships in 1 Business Day
Chevrolet Silverado 1500 Universal Joints Part Number: 84555910
$46.37 MSRP: $72.63You Save: $26.26 (37%)Ships in 1-3 Business Days
Chevrolet Silverado 1500 Universal Joint
Want to cut long-term maintenance and repair costs? Choose OEM Universal Joint. Those parts deliver top durability you can trust. On our site, you'll find a huge catalog of genuine Chevrolet Silverado 1500 parts. Prices are unbeatable, so you can keep more in your pocket. Every OEM Chevrolet Silverado 1500 Universal Joint includes a manufacturer's warranty. You can also get an easy return policy that keeps buying risk free. Fast delivery, get your car on the road quickly. It's simple to search, compare, and order. Stop guessing about quality or fit. Order today and save with parts that last.
Chevrolet Silverado 1500 Universal Joint Parts Questions & Experts Answers
- Q: How to replace a universal joint on Chevrolet Silverado 1500?A:When working on a Universal Joint start by holding the propeller shaft still in a horizontal position using one yoke clamp to prevent damage to the Slip Yoke sealing surface. Mild yoke tapping lets the Universal Joint retaining ring relax before pliers can fully uninstall it. By holding the propeller shaft and using help position it level in place then attach a socket that fits properly with the opposite side of j-9522-3 (U-Joint Bearing Separator). Use the j-9522-3 tool to take out universal bearings from yoke until it stops. Put j-9522-5 tool on the joint afterward and apply both tools through press to pull out stubborn bearings. Apply this step again to disassemble the remaining side of the propeller shaft. Since the Slip Yoke requires replacement at the same time we replace the Universal Joint. Suppress the Slip Yoke retaining ring and take out the yoke before you pull the universal bearing out of the yoke with the j-9522-3 and j-9522-5 tools. After you get the bearing out you can free the spider from the yoke. Use proper tools to wash both parts until they are completely clean. Install the universal bearings in the yoke on the propeller shaft until one Universal Joint spider seats before pressing it to match the surface of the yoke. Put on one retaining ring and do the same steps for the opposite bearing. Test if the Universal Joint moves without friction before gently striking the yoke. Place remaining universal bearings on the driveshaft then fasten them with electrical tape before final vehicle installation. Insert the universal spider into the Slip Yoke then put in the universal bearings and push them fully down until they fit securely. Drive bearings into each Slip Yoke at equal depth then put on the retaining rings. Repeat this process for the second bearing. Place the end of the propeller shaft inside the Slip Yoke while putting the universal spider inside its bearing and pushing it into place through the yoke. Set the retaining ring afterward. Keep rotating the propeller shaft while testing the movement of the Universal Joint through both bearings. Lightly tap the parts if needed to achieve a free movement.

Related Chevrolet Silverado 1500 Parts
 Chevrolet Silverado 1500 Differential
 Chevrolet Silverado 1500 Differential Bearing
 Chevrolet Silverado 1500 Differential Cover
 Chevrolet Silverado 1500 Differential Seal
 Chevrolet Silverado 1500 Driveshaft Yokes
 Chevrolet Silverado 1500 Pinion Bearing
 Chevrolet Silverado 1500 Pinion Washer
 Chevrolet Silverado 1500 Slip Yoke
 Chevrolet Silverado 1500 Wheel Seal