ChevyParts
My Garage
My Account
Cart
OEM Chevrolet Tahoe Oil Pan
Oil Drain Pan- Select Vehicle by Model
- Select Vehicle by VIN
Select Vehicle by Model
orMake
Model
Year
Select Vehicle by VIN
For the most accurate results, select vehicle by your VIN (Vehicle Identification Number).
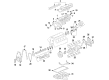
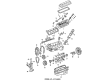
15 Oil Pans found


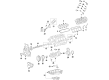
Chevrolet Tahoe Lower Engine Oil Pan Part Number: 12669909
$48.94 MSRP: $83.30You Save: $34.36 (42%)Ships in 1-2 Business Days


Chevrolet Tahoe Oil Pan Part Number: 12640746
$225.02 MSRP: $383.11You Save: $158.09 (42%)Ships in 1-2 Business Days


Chevrolet Tahoe Oil Pan Part Number: 12609074
$216.08 MSRP: $367.87You Save: $151.79 (42%)Ships in 1-2 Business Days

Chevrolet Tahoe Oil Pan Part Number: 12557558
$175.72 MSRP: $301.79You Save: $126.07 (42%)Ships in 1-3 Business Days

Chevrolet Tahoe Oil Pan Part Number: 55506665
$55.76 MSRP: $87.32You Save: $31.56 (37%)

Chevrolet Tahoe Oil Pan Part Number: 12707243
$182.12 MSRP: $286.56You Save: $104.44 (37%)
Chevrolet Tahoe Oil Pan Part Number: 24045035
$37.63 MSRP: $64.61You Save: $26.98 (42%)Ships in 1-2 Business Days
Chevrolet Tahoe Oil Pan Part Number: 24043538
$52.66 MSRP: $89.64You Save: $36.98 (42%)
Chevrolet Tahoe Oil Pan Part Number: 12684605
$221.78 MSRP: $348.96You Save: $127.18 (37%)Ships in 1-3 Business Days
Chevrolet Tahoe Oil Pan Part Number: 12619011
$139.55 MSRP: $219.58You Save: $80.03 (37%)Ships in 1-3 Business Days
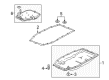
Chevrolet Tahoe Oil Pan Part Number: 12579273
$313.43 MSRP: $538.29You Save: $224.86 (42%)Ships in 1-2 Business Days
Chevrolet Tahoe Oil Pan Part Number: 23502600

Chevrolet Tahoe Oil Pan Part Number: 8679931
Chevrolet Tahoe Oil Pan Part Number: 12563902
Chevrolet Tahoe Oil Pan Part Number: 12640747
$214.41 MSRP: $337.22You Save: $122.81 (37%)
Chevrolet Tahoe Oil Pan
Want to cut long-term maintenance and repair costs? Choose OEM Oil Pan. Those parts deliver top durability you can trust. On our site, you'll find a huge catalog of genuine Chevrolet Tahoe parts. Prices are unbeatable, so you can keep more in your pocket. Every OEM Chevrolet Tahoe Oil Pan includes a manufacturer's warranty. You can also get an easy return policy that keeps buying risk free. Fast delivery, get your car on the road quickly. It's simple to search, compare, and order. Stop guessing about quality or fit. Order today and save with parts that last.
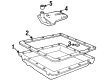
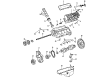
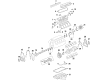
Chevrolet Tahoe Oil Pan is part of the engine lubrication system responsible for the required oil volume that engine needs for lubrication. Located at the lower end of the engine; the oil pan is vulnerable to being impacted by road elements which if one is subdued can lead to leaking off of oil. When changing the oil, the drain plug on the oil pan is removed effectively and replaced if need be. The oil pan known as the sump is the chamber where the oil is stored ready to be drawn upon to adequately lubricate the engines moving parts. In some high-performance vehicles such as; racing motorcycles and piston aircraft engines, a "dry sump" system is applied and used to deal with the shortages of oil by applying scavenge pumps and a swirl tank which separates the oil from the air.
Chevrolet Tahoe Oil Pan Parts and Q&A
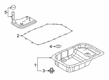
- Q: How to remove and reinstall the oil pan on Chevrolet Tahoe?A:First off remove the left and right closeout covers and bolts and oil level sensor if needed, then remove the Oil Pan. Next, remove Oil Pan by unscrewing Oil Pan bolts and take Oil Pan out carefully, so that no foreign material enter the oil passes and avoid damaging the sealing surface. If necessary, drill out Oil Pan Gasket retaining rivets and remove the gasket, disposed of with the rivets. In the case that the Oil Pan baffle had been removed, insert it and tighten the baffle bolts to 12 nm (106 lb in). Apply a 5 mm (0.2 in) bead of sealant gm p/n 12378521 (Canadian P/N 88901148) to the engine block on tab portions of front and rear cover gaskets which enter the Oil Pan. Accurate the relinquished kinds of the oil gallery passages with the Oil Pan Gasket afterward pre-assemble the gasket to the pan and impose the Oil Pan, gasket, and bolts to the engine cornerstone, and bolt the bolts with your fingers tight. Use a straight edge to make sure that the rear of the engine block and the Oil Pan are flush before tightening the bolts of the Oil Pan-to-block, Oil Pan-to-front cover, bolts at 25 nm (18 lb ft), and the Oil Pan-to-rear cover bolts at 12 nm (106 lb in). Check the alignment of the Oil Pan and engine block, which needs not more than 0,1 mm (0,004 in) gap. If aligning is off-remove Oil Pan-again repeat the process. Lastly, fix the oil level sensor with the help of a wrench, using torque of 13 nm (115 lb in).
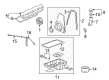
- Q: How to replace the oil pan on Chevrolet Tahoe?A:The procedure starts with disconnecting the negative Battery Cable when replacing the Oil Pan. A front Differential removal becomes necessary for cars equipped with four-wheel drive systems. Initial steps require the removal of the underbody shield combined with its matching Oil Pan shield then proceed to the cross brace according to installation requirements. First drain all engine oil then remove the engine Oil Filter. First disconnect the negative Battery Cable before removing the lower transmission-to-Oil Pan bolts and separating the oil level sensor electrical connector and removing the two front wiring harness retainer bolts and engine wiring harness retainer bolts from the engine Oil Pan. Clear the engine oil cooler pipe to Oil Pan bolt and the transmission oil cooler pipe retainer and bolt from the Oil Pan. Start by removing the Starter motor and left closeout cover bolt and emission control canister. Following this, take out the engine Oil Pan. While building your new assembly place a 5 mm (0.20 inch) bead of gm p/n 12378190 or equivalent sealant on the engine block and both front and rear cover gasket tabs that extend into the Oil Pan surface. Apply gm's p/n 12378190 or equivalent sealant to the engine block and Oil Pan tabs. Then assemble the gasket to the pan before mounting it to the engine block by hand-tightening the bolts until they reach their recommended torque specifications. Next secure the two lower bellhousing bolts with just enough force to place the Oil Pan in its proper position. Tighten all Oil Pan-to-block bolts to 25 n.m (18 lb ft). Use 25 n.m (18 lb ft) torque on the Oil Pan-to-Oil Pan front cover bolts while tightening the Oil Pan-to-rear cover bolts to 12 n.m (106 lb in). Complete the process by tightening the bellhousing bolts to 50 n.m (37 lb ft). Install the left closeout cover along with its bolt through proper torque application to 9 n.m (80 lb in) resistance. Afterward install the Starter motor followed by the transmission oil cooler pipe retainer and its bolt to the Oil Pan before installing the engine oil cooler pipe to Oil Pan bolt after which tighten the engine oil cooler pipe nut to 10 n.m (89 lb in). Fasten the engine wiring harness retainer bolts to the engine Oil Pan then connect the oil level sensor electrical connector and install and tighten the transmission to Oil Pan bolts at 55 n.m (41 lb ft). A four-wheel drive configuration requires reinstalling the front Differential before reinstalling the underbody shield on the vehicle. Lower the vehicle and fill the engine with oil then install the engine Oil Filter before reconnecting the battery's negative cable.


Related Chevrolet Tahoe Parts
 Chevrolet Tahoe Cylinder Head
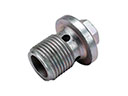 Chevrolet Tahoe Drain Plug
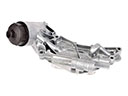 Chevrolet Tahoe Oil Cooler
 Chevrolet Tahoe Piston
 Chevrolet Tahoe Rod Bearing
 Chevrolet Tahoe Timing Belt
 Chevrolet Tahoe Timing Belt Tensioner
 Chevrolet Tahoe Timing Chain Guide
 Chevrolet Tahoe Timing Chain Tensioner
 Chevrolet Tahoe Valve Cover Gasket
 Chevrolet Tahoe Valve Cover Grommet
 Chevrolet Tahoe Variable Timing Sprocket