ChevyParts
My Garage
My Account
Cart
OEM GMC Acadia CV Joint
CV Joint Axle- Select Vehicle by Model
- Select Vehicle by VIN
Select Vehicle by Model
orMake
Model
Year
Select Vehicle by VIN
For the most accurate results, select vehicle by your VIN (Vehicle Identification Number).
10 CV Joints found

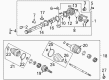
GMC Acadia Inner Joint, Rear Part Number: 22783790
$156.51 MSRP: $248.49You Save: $91.98 (38%)Ships in 1-2 Business Days
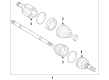
GMC Acadia Outer CV Joint, Rear Part Number: 22783789
$126.08 MSRP: $224.52You Save: $98.44 (44%)Ships in 1-2 Business Days
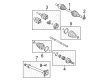
GMC Acadia Inner CV Joint Part Number: 84666185
$79.35 MSRP: $124.29You Save: $44.94 (37%)Ships in 1-3 Business DaysGMC Acadia Inner CV Joint, Front Part Number: 84666178
$103.44 MSRP: $161.30You Save: $57.86 (36%)Ships in 1-2 Business Days
GMC Acadia Inner CV Joint, Front Passenger Side Part Number: 15855632
$189.93 MSRP: $312.89You Save: $122.96 (40%)Ships in 1-2 Business DaysGMC Acadia Inner CV Joint, Front Driver Side Part Number: 15855622
$217.88 MSRP: $345.92You Save: $128.04 (38%)Ships in 1-2 Business Days
GMC Acadia Inner CV Joint, Front Part Number: 84666183

GMC Acadia Inner CV Joint, Front Part Number: 84446590
GMC Acadia Outer CV Joint, Rear Part Number: 15855634

GMC Acadia Outer CV Joint, Front Part Number: 15855621
GMC Acadia CV Joint
Our website offers an extensive catalog of genuine GMC Acadia CV Joint at unbeatable prices. Every OEM GMC Acadia CV Joint comes with a manufacturer's warranty, an easy return policy, and rapid delivery service. Don't miss out on this great opportunity!
GMC Acadia CV Joint Parts Questions & Experts Answers
- Q: What tools are required to service and repair the CV Joint boot for the rear wheel drive shaft outer joint and seal replacement on GMC Acadia?A: A set of tools needs to be procured for constant velocity joint boot service and repair of rear wheel drive shaft outer joint and seal replacement including j 35566 drive axle seal clamp pliers alongside j 42572 drive shaft seal clamp pliers. The technical equipment includes j 35566 drive axle seal clamp pliers and j 42572 drive shaft seal clamp pliers. First use side cutters to remove and discard the small seal clamp attached to the wheel drive shaft bar making sure to prevent damage to the wheel drive shaft trilobal tripot bushing. Use side cutters to remove the large seal clamp from the tripot joint then discard it. Seal the wheel drive shaft outboard by separating it from the trilobal tripot bushing then move the seal outwards along the wheel drive shaft bar. Maintain the 60-degree offset relationship between tripot spiders by accurately marking their bar position before disassembly. Remove the housing and wheel drive shaft bar and then remove the tripot joint spider. A brass drift tool equipped with a hammer gently touching the tripot spider face will compress the wheel drive shaft bar retaining ring before extracting both the tripot spider and its barrel retaining ring. Check all components of the wheel drive shaft outboard seal alongside the tripot joint spider assembly and housing and trilobal tripot bushing for signs of wear or damage. Lay a new small seal clamp onto the joint seal's small end before sliding both components onto the wheel drive shaft bar while keeping the small end inside the joint seal groove. Apply the j 42572 tool to crimp the small seal retaining clamp before tightening it to 136 n.m (100 lb ft). Secure the wheel drive shaft bar with a new barrel retaining ring while maintaining the correct 60-degree offset arrangement. Place the reference mark of the tripot spider exactly on the wheel drive shaft bar while aligning its beveled edge toward the bar during assembly. When pressuring the barrel retaining ring with a flat-bladed tool, install the tripot spider while verifying its positive engagement by attempting to pull it free from the wheel drive shaft bar. The trilobal tripot bushing must rest against the housing face while technicians use the service kit grease to fill half of the wheel drive shaft outboard seal and the rest of the housing. First, position the trilobal tripot bushing into the housing then insert the spring and conserve its position with housing grease before guiding the spring into position using the same grease technique. Set the bigger retaining clamp on the wheel drive shaft's outboard seal before sliding the housing over the bar containing the tripot joint spider assembly on the shaft. Place the wheel drive shaft outboard seal with its large diameter across the trilobal tripot bushing while maintaining its groove location free of any seal deformation. Check the seal's shape is correct then make any needed adjustments. The joint assembly needs to be positioned at the correct vehicle dimension while properly aligning the wheel drive shaft outboard seal with the tripot housing and large seal retaining clamp during latching. Use the j 35566 tool to install the large seal retaining clamp by making sure its latching tangs fully enter the large seal clamp band. To spread the grease evenly in tripot spider bearings across the outer tripot housing you must rotate it four or five times.

Related GMC Acadia Parts
 GMC Acadia Control Arm Bushing
 GMC Acadia Axle Beam Mount
 GMC Acadia Axle Pivot Bushing
 GMC Acadia Axle Shaft
 GMC Acadia Axle Support Bushings
 GMC Acadia CV Boot
 GMC Acadia Control Arm Bracket
 GMC Acadia Lateral Arm
 GMC Acadia Shock and Strut Boot
 GMC Acadia Steering Knuckle
 GMC Acadia Sway Bar Bracket
 GMC Acadia Trailing Arm Bushing