ChevyParts
My Garage
My Account
Cart
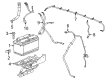
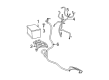
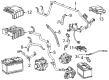
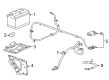
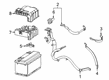
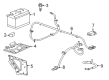
OEM GMC Battery Cable
Car Battery Cable- Select Vehicle by Model
- Select Vehicle by VIN
Select Vehicle by Model
orMake
Model
Year
Select Vehicle by VIN
For the most accurate results, select vehicle by your VIN (Vehicle Identification Number).
391 Battery Cables found


GMC Negative Cable Part Number: 84109465
$76.72 MSRP: $166.06You Save: $89.34 (54%)Ships in 1-2 Business DaysProduct Specifications- Other Name: Cable Assembly-Battery Negative; Battery Cables; Ground Strap; Cable, Battery Negative And Engine Ground
- Replaces: 23445424, 23235513


GMC Negative Cable Part Number: 84109460
$44.76 MSRP: $97.72You Save: $52.96 (55%)Ships in 1-2 Business DaysProduct Specifications- Other Name: Cable Assembly-Battery Negative; Battery Cables; Ground Strap; Cable, Battery Negative And Engine Ground
- Replaces: 23164977, 23247668


GMC Positive Cable Part Number: 84090494
$111.89 MSRP: $244.30You Save: $132.41 (55%)Ships in 1-2 Business DaysProduct Specifications- Other Name: Cable Assembly-Battery Positive; Battery Cables; Cable, Battery(Positive)
- Replaces: 15942156, 22777071

GMC Negative Cable Part Number: 87866332
$39.66 MSRP: $86.60You Save: $46.94 (55%)Ships in 1-2 Business DaysProduct Specifications- Other Name: Cable Assembly-Auxiliary Battery Negative; Cable, Battery Negative And Engine Ground
- Replaces: 84655056, 84598885

GMC Negative Cable Part Number: 22846478
$70.11 MSRP: $131.66You Save: $61.55 (47%)Ships in 1-2 Business DaysProduct Specifications- Other Name: Cable Assembly-Auxiliary Battery Negative; Battery Cables; Ground Strap; Cable, Battery Negative And Engine Ground
- Replaces: 20942923, 22759559

GMC Negative Cable Part Number: 84434159
$71.57 MSRP: $129.54You Save: $57.97 (45%)Ships in 1-2 Business DaysProduct Specifications- Other Name: Cable Assembly-Battery Negative; Battery Cables; Ground Strap; Cable, Battery Negative And Engine Ground

GMC Positive Cable Part Number: 84407042
$126.06 MSRP: $275.24You Save: $149.18 (55%)Ships in 1-2 Business DaysProduct Specifications- Other Name: Cable Assembly-Battery Positive; Battery Cables; Cable, Battery(Positive)
- Replaces: 23386298, 84172896

GMC Negative Cable Part Number: 84481617
$54.06 MSRP: $96.54You Save: $42.48 (44%)Ships in 1-3 Business DaysProduct Specifications- Other Name: Cable Assembly-Battery Negative; Battery Cables; Ground Strap; Cable, Battery Negative And Engine Ground
GMC Negative Cable Part Number: 84109463
$78.66 MSRP: $147.72You Save: $69.06 (47%)Ships in 1-2 Business DaysProduct Specifications- Other Name: Cable Assembly-Battery Negative; Battery Cables; Ground Strap
- Replaced by: 84309072

GMC Battery Cable Part Number: 85595355
$71.69 MSRP: $128.02You Save: $56.33 (44%)Ships in 1-3 Business DaysProduct Specifications- Other Name: Cable Assembly-Starter Solenoid; Positive Cable; Cable, Battery(Positive)
- Replaces: 84655052, 84598881

GMC Battery Cable Part Number: 85121074
$148.62 MSRP: $266.58You Save: $117.96 (45%)Ships in 1-3 Business DaysProduct Specifications- Other Name: Cable Assembly-Starter Solenoid; Positive Cable; Cable, Battery(Positive)
- Replaces: 84434158, 84906885

GMC Positive Cable Part Number: 84890606
$111.97 MSRP: $200.84You Save: $88.87 (45%)Ships in 1-2 Business DaysProduct Specifications- Other Name: Cable Assembly-Battery Positive; Cable, Battery(Positive)
- Replaced by: 85099703
GMC Positive Cable Part Number: 84890607
$98.48 MSRP: $175.86You Save: $77.38 (44%)Ships in 1-2 Business DaysProduct Specifications- Other Name: Cable Assembly-Battery Positive; Cable, Battery(Positive)

GMC Battery Cable Part Number: 86815399
$58.68 MSRP: $104.78You Save: $46.10 (44%)Ships in 1-2 Business DaysProduct Specifications- Other Name: Cable Assembly-Starter Solenoid; Cable, Battery(Positive)

GMC Battery Cable Part Number: 85110480
$77.46 MSRP: $138.32You Save: $60.86 (44%)Ships in 1-3 Business DaysProduct Specifications- Other Name: Cable Assembly-Starter Solenoid; Cable, Battery(Positive)
- Replaced by: 86784828

GMC Battery Cable Part Number: 23386300
$47.16 MSRP: $85.36You Save: $38.20 (45%)Ships in 1-2 Business DaysProduct Specifications- Other Name: Cable Assembly-Auxiliary Generator Battery Jumper; Battery Cables; Cable, Generator

GMC Positive Cable Part Number: 84793206
$128.49 MSRP: $230.48You Save: $101.99 (45%)Ships in 1-3 Business DaysProduct Specifications- Other Name: Cable Assembly-Auxiliary Battery Positive; Battery Cables; Cable, Battery(Positive)

GMC Negative Cable Part Number: 84602526
$51.02 MSRP: $91.10You Save: $40.08 (44%)Ships in 1-3 Business DaysProduct Specifications- Other Name: Cable Assembly-Battery Negative Cable Extension; Battery Cables; Ground Strap; Cable, Battery Negative And Engine Ground
- Replaces: 84434160
GMC Negative Cable Part Number: 84789726
$14.95 MSRP: $26.70You Save: $11.75 (45%)Ships in 1-3 Business DaysProduct Specifications- Other Name: Cable Assembly-Battery Negative; Cable, Battery Negative And Engine Ground

GMC Positive Cable Part Number: 23391081
$166.99 MSRP: $299.54You Save: $132.55 (45%)Product Specifications- Other Name: Cable Assembly-Auxiliary Battery Positive; Battery Cables; Cable; Cable, Battery(Positive)
- Replaces: 23309524
| Page 1 of 20 |Next >
1-20 of 391 Results
GMC Battery Cable
Want to cut long-term maintenance and repair costs? Choose OEM Battery Cable. Those parts deliver top durability you can trust. On our site, you'll find a huge catalog of genuine GMC parts. Prices are unbeatable, so you can keep more in your pocket. Every OEM GMC Battery Cable includes a manufacturer's warranty. You can also get an easy return policy that keeps buying risk free. Fast delivery, get your car on the road quickly. It's simple to search, compare, and order. Stop guessing about quality or fit. Order today and save with parts that last.
GMC Battery Cable Parts Questions & Experts Answers
- Q: How to replace the Battery Cable at the Positive Junction Block on GMC Acadia?A:The first step to replace the battery positive junction block cable requires disconnecting the negative Battery Cable. Then proceed to open the accessory wiring junction block cover after which you must remove the accessory wiring junction block nut. Unhook both the positive Battery Cable terminal from its stud as well as the battery positive junction block cable terminal from its stud. Unfasten the battery positive junction block cable clips which are attached to the power steering reservoir bracket and move the battery positive junction block cable boot to a new position. To proceed with the removal disconnect the battery positive junction block cable to generator nut while also deinstalling the battery positive junction block cable terminal from its generator stud. The technical intervention begins by taking away the left Catalytic Converter along with the starter heat shield bolt coupled with shield and the battery positive junction block cable clip which remains on the engine block. Lower the vehicle while removing the battery positive junction block cable after first detaching both the starter solenoid bat terminal nut and the battery positive junction block cable terminal from the starter. The vehicle receives the battery positive junction block cable before installing its terminal at the stud and its positive Battery Cable terminal at the junction block stud. The accessory wiring junction block nut requires tightening to 22 n.m (16 lb ft) then you should install the accessory wiring junction block cover . After the power steering reservoir bracket installment of the battery positive junction block cable clips the following step includes connecting the generator stud to the battery positive junction block cable terminal before securing the battery positive junction block cable to generator nut with a torque of 22 n.m (16 lb ft). Position the battery positive junction block cable boot and raise the vehicle while using proper support so you can install the battery positive junction block cable terminal to the starter and the starter solenoid bat terminal nut before tightening it to 25 n.m (18 lb ft). Position the battery positive junction block cable clip to engine block and ground first before securing it to starter heat shield with a bolt at 7 n.m (62 lb in) torque while additionally attaching it to the left Catalytic Converter. The last step is to connect the negative Battery Cable.
- Q: How to Replace a Negative Battery Cable on GMC Yukon?A:To remove the negative Battery Cable, the following has to be done, firstly disconnect the negative Battery Cable from the battery current sensor and then remove the engine wiring harness electrical connector from the battery current sensor. The negative energy cable clip will offer that you unclamp from the auxiliary bussed electrical center (BEC) as well as the negative Battery Cable ground securable hammer, haft, and bolt from the balanced hind part engine block boss. Remove the negative Battery Cable and the engine wiring harness ground leads from the engine block boss. Lift and adequately raise the vehicle, and then take off the engine wiring harness ground lead bolt from the frame and remove the engine wiring harness ground lead and the negative Battery Cable lead from the frame. Lower the vehicle and disconnect the negative Battery Cable assembly at the top of the positive Battery Cable. For installation, install the vehicle part of the negative Battery Cable assembly to the vehicle, placing it under the positive Battery Cable, and lift the vehicle once again. Before turning off the positive Battery Cable lead, position it behind the engine wiring harness ground lead and place both leads on the frame. Soak the two ends of the Battery Cable and the two ends of the in-line fuse in a paste to stop the tips from flaking off, insert the anti-rotation tab on the engine harness ground lead in the hole on the frame, install the engine wiring harness ground lead to the frame bolt and tighten to 9 nm (80 lb in). Lower the vehicle and connect the engine wiring harness ground lead behind the negative Battery Cable lead and both leads to the engine block boss. Last, attach the negative Battery Cable ground terminal to the engine block boss bolt tight to 50 nm (37 lb ft), and the negative Battery Cable clip to the auxiliary bec, then the engine wiring harness electrical connector to the battery current sensor before attaching the negative Battery Cable.
- Q: How to replace the negative battery cable on GMC Sierra 1500?A:The negative Battery Cable change starts by removing the negative Battery Cable first followed by removal of the left front wheel house panel if required. Vehicles with 4.8l, 5.3l, or 6.0l engines require you to remove the Battery Cable bracket bolt and bracket from the Power Steering Pump and disconnect the accessory power fuse block front wiring harness electrical connector from the negative cable connector. Remove the negative cable clip from the positive cable clip as well as the engine wiring harness ground/negative cable bolt. Lift the vehicle before you find a stable supporting position. Vehicle owners must remove the negative cable clip from the positive cable clip before using a crane to lift and support their vehicle for removal of the engine wiring harness ground/negative cable bolt. Vehicles with an 8.1l engine must follow this procedure and then replace the wiring harness ground/negative cables. First remove the forward lamp wiring harness ground/negative cable bolt by lowering the vehicle before removing the negative Battery Cable. Begin by installing the negative Battery Cable and raising the vehicle while positioning the negative cable and forward lamp wiring harness ring terminals to the frame. Also insert the anti-rotation tab on the forward lamp wiring harness into the frame hole. Secure the forward lamp wiring harness ground/negative cable bolt through a torque of 9 n.m (80 lb in). Install the engine wiring harness ground/negative cable bolt with a torque of 25 n.m (18 lb ft) while making sure the negative cable anti-rotation tab is properly positioned. Lower the vehicle after positioning the negative cable clip against the positive cable clip and position the engine wiring harness ground below the negative cable ground. If your vehicle uses a 4.8l, 5.3l or 6.0l engine you must attach the negative cable and engine wiring harness ring terminals to the engine block while positioning the anti-rotation tab correctly before installing and tightening the engine wiring harness ground/negative cable bolt to 25 n.m (18 lb ft). Finish installation by fitting the negative cable clip to the positive cable clip, attaching the accessory power fuse block front wiring harness electrical connector if present, installing the Battery Cable bracket and bolt to the Power Steering Pump if present, tightening the bolt to 25 n.m (18 lb ft), and before connecting the negative Battery Cable install the left front wheel house panel if needed.


Related GMC Parts
 GMC Alternator
 GMC Batteries
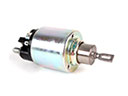 GMC Starter Solenoid
 GMC Alternator Bearing
 GMC Alternator Bracket
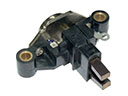 GMC Alternator Brush
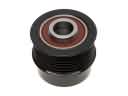 GMC Alternator Pulley
 GMC Armature
 GMC Battery Sensor
 GMC Starter Brush
 GMC Starter Drive
 GMC Voltage Regulator
Browse GMC Battery Cable by Models
Acadia Sierra 1500 Yukon Canyon Sierra 2500 HD Terrain Envoy Sonoma Typhoon Syclone Caballero C1500 Envoy XL Envoy XUV Jimmy K1500 S15 S15 Jimmy Safari Savana 2500 Savana 3500 Sierra 2500 Sierra 3500 Yukon XL Acadia Limited C2500 C3500 G2500 K2500 K3500 P3500 Savana 1500 Yukon XL 1500 C1500 Suburban C2500 Suburban G1500 G3500 Hummer EV Pickup K1500 Suburban K2500 Suburban P2500 R1500 R1500 Suburban R2500 R2500 Suburban R3500 Sierra 1500 Classic Sierra 1500 HD Sierra 1500 HD Classic Sierra 1500 Limited Sierra 2500 HD Classic Sierra 3500 Classic Sierra 3500 HD V1500 V1500 Suburban V2500 V2500 Suburban V3500 Yukon XL 2500