ChevyParts
My Garage
My Account
Cart
OEM GMC Savana 1500 A/C Compressor Cut-Out Switches
HVAC Cut-Out Switch- Select Vehicle by Model
- Select Vehicle by VIN
Select Vehicle by Model
orMake
Model
Year
Select Vehicle by VIN
For the most accurate results, select vehicle by your VIN (Vehicle Identification Number).
5 A/C Compressor Cut-Out Switches found


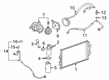
GMC Savana 1500 A/C Switch Part Number: 15144494
$38.05 MSRP: $78.17You Save: $40.12 (52%)Ships in 1-2 Business Days


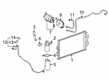
GMC Savana 1500 Pressure Relief Valve, Green Line Part Number: 13587668
$49.45 MSRP: $101.61You Save: $52.16 (52%)Ships in 1-3 Business Days


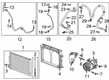
GMC Savana 1500 High Pressure Cut-Off Switch Part Number: 89019183
$48.11 MSRP: $98.86You Save: $50.75 (52%)Ships in 1 Business Day
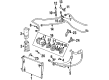
GMC Savana 1500 A/C Switch Part Number: 15035084
$46.28 MSRP: $86.92You Save: $40.64 (47%)Ships in 1-2 Business Days

GMC Savana 1500 Pressure Cycling Switch Part Number: 52473139
$27.39 MSRP: $51.44You Save: $24.05 (47%)Ships in 1 Business Day
GMC Savana 1500 A/C Compressor Cut-Out Switches
Want to cut long-term maintenance and repair costs? Choose OEM A/C Compressor Cut-Out Switches. Those parts deliver top durability you can trust. On our site, you'll find a huge catalog of genuine GMC Savana 1500 parts. Prices are unbeatable, so you can keep more in your pocket. Every OEM GMC Savana 1500 A/C Compressor Cut-Out Switches includes a manufacturer's warranty. You can also get an easy return policy that keeps buying risk free. Fast delivery, get your car on the road quickly. It's simple to search, compare, and order. Stop guessing about quality or fit. Order today and save with parts that last.
GMC Savana 1500 A/C Compressor Cut-Out Switches Parts Questions & Experts Answers
- Q: How to Replace A/C Compressor Cut-Out Switches for High Pressure Switch on GMC Savana 1500?A:The a/c high pressure switch replacement begins with engine cover removal before conducting a/c system refrigerant extraction using the j 43600 acr 2000 refrigerant station (J 43600 ACR 2000). Before removing the snap ring the control switch area needs to be cleaned then the switch electrical connector must be detached from its rear compressor head location. The switch snap ring can be removed by using snap ring pliers [j 5403] to complete the switch removal from the compressor. Use the j 9553-01 o-ring remover (J 9553-01) on the switch cavity to extract the old o-ring before inspecting the switch cavity and o-ring groove for dirt or foreign material to perform cleaning when required. The installation process requires clean 525 viscosity refrigerant oil for lubricating a new o-ring before placing it into the switch cavity groove. Apply the same refrigerant oil on the control switch housing before pushing it all the way into the cavity. After installing the switch snap ring through the j 5403 tool ensure the higher section of the curved edge faces the switch housing and fits completely into the retaining groove. Transformation of the a/c system concludes with an evacuation process followed by system recharging using the j 39400-a halogen leak detector (J 39400-A) until all specified fittings exhibit no leaks. The engine cover is then replaced.

Related GMC Savana 1500 Parts
 GMC Savana 1500 A/C Clutch
 GMC Savana 1500 A/C Condenser
 GMC Savana 1500 A/C Hose
 GMC Savana 1500 A/C Idler Pulley
 GMC Savana 1500 A/C Service Cap
 GMC Savana 1500 A/C System Valve Core
 GMC Savana 1500 Ambient Temperature Sensor
 GMC Savana 1500 Blend Door Actuator
 GMC Savana 1500 Blower Motor
 GMC Savana 1500 Blower Motor Resistor
 GMC Savana 1500 Cabin Air Filter
 GMC Savana 1500 HVAC Pressure Switch