ChevyParts
My Garage
My Account
Cart
OEM GMC Sierra 1500 Classic Water Pump
H2O Pump- Select Vehicle by Model
- Select Vehicle by VIN
Select Vehicle by Model
orMake
Model
Year
Select Vehicle by VIN
For the most accurate results, select vehicle by your VIN (Vehicle Identification Number).
3 Water Pumps found


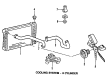
GMC Sierra 1500 Classic Water Pump Part Number: 89060527
$232.95 MSRP: $456.07You Save: $223.12 (49%)Ships in 1-3 Business Days

GMC Sierra 1500 Classic Water Pump Part Number: 15076931
$139.53 MSRP: $244.78You Save: $105.25 (43%)Ships in 1-2 Business Days
GMC Sierra 1500 Classic Water Pump Part Number: 12600767
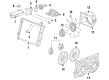
GMC Sierra 1500 Classic Water Pump
Want to cut long-term maintenance and repair costs? Choose OEM Water Pump. Those parts deliver top durability you can trust. On our site, you'll find a huge catalog of genuine GMC Sierra 1500 Classic parts. Prices are unbeatable, so you can keep more in your pocket. Every OEM GMC Sierra 1500 Classic Water Pump includes a manufacturer's warranty. You can also get an easy return policy that keeps buying risk free. Fast delivery, get your car on the road quickly. It's simple to search, compare, and order. Stop guessing about quality or fit. Order today and save with parts that last.
GMC Sierra 1500 Classic Water Pump Parts Questions & Experts Answers
- Q: How to replace the water pump on a 4.3L engine on GMC Sierra 1500 Classic?A:Use a fan clutch remover and installer tool j 41240 as the basic equipment when installing a Water Pump on a 4.3l engine. Start the work by taking off the maf/iat sensor clamp from the air cleaner outlet and removing the pcv hose and air cleaner adapter nut. Rotate the air cleaner outlet duct in an upward direction to take it off the Throttle Body. Drain the cooling system first and then take off the Drive Belt before sliding the radiator outlet hose clamps between the surge tank and Water Pump. Move the hose to new positions on the surge tank and Water Pump before disconnecting the radiator outlet hose from both locations. Install the fan clutch remover (J 41240) tool onto the Water Pump Pulley to hold it in place during bolt removal of both pulley bolts and Water Pump bolts. This will allow you to extract the Water Pump from its position. Throw away the worn gaskets and check the Water Pump's condition before cleaning its parts. Put sealant gm 12346004 (Canadian 10953480) on Water Pump bolt threads and replace it with new Water Pump gaskets before setting the Water Pump in position. Mount the Water Pump Pulley using the fan clutch remover and installer j 41240 then tighten pulley bolts to 25 nm (18 ft. Lbs). Correctly position the hose clamp tangs at the Water Pump end with forward pointing tangs and upper tang level before putting on the inlet hose and clamping it in place. Connect the radiator outlet hose to both the Water Pump and surge tank before adjusting their clamps into place. Place the Drive Belt over the parts and shift the air cleaner outlet duct down until the mounting stud enters its designated hole. Secure the air cleaner adapter nut first then attach the pcv hose before tightening the outlet duct clamp at the maf/iat sensor to a torque of 4 nm. Complete the cooling system with fluid before searching for any fluid losses.

Related GMC Sierra 1500 Classic Parts
 GMC Sierra 1500 Classic Coolant Pipe
 GMC Sierra 1500 Classic Coolant Reservoir Cap
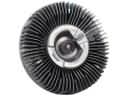 GMC Sierra 1500 Classic Cooling Fan Clutch
 GMC Sierra 1500 Classic Cooling Hose
 GMC Sierra 1500 Classic Fan Blade
 GMC Sierra 1500 Classic Fan Clutch
 GMC Sierra 1500 Classic Fan Shroud
 GMC Sierra 1500 Classic Radiator
 GMC Sierra 1500 Classic Radiator Cap
 GMC Sierra 1500 Classic Radiator Hose
 GMC Sierra 1500 Classic Thermostat Gasket
 GMC Sierra 1500 Classic Water Pump Gasket