ChevyParts
My Garage
My Account
Cart
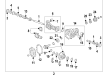
OEM GMC Sierra 1500 Differential Seal
- Select Vehicle by Model
- Select Vehicle by VIN
Select Vehicle by Model
orMake
Model
Year
Select Vehicle by VIN
For the most accurate results, select vehicle by your VIN (Vehicle Identification Number).
8 Differential Seals found


GMC Sierra 1500 Pinion Seal Part Number: 26064029
$26.73 MSRP: $44.04You Save: $17.31 (40%)Ships in 1-2 Business Days
GMC Sierra 1500 Pinion Seal Part Number: 26064028
$28.72 MSRP: $47.33You Save: $18.61 (40%)Ships in 1-3 Business Days

GMC Sierra 1500 Pinion Seal Part Number: 26064030
$27.57 MSRP: $51.77You Save: $24.20 (47%)Ships in 1-2 Business Days


GMC Sierra 1500 Pinion Seal, Front Part Number: 23270117
$16.03 MSRP: $30.09You Save: $14.06 (47%)Ships in 1 Business Day
GMC Sierra 1500 Pinion Seal Part Number: 84811694
$30.18 MSRP: $49.73You Save: $19.55 (40%)Ships in 1-2 Business Days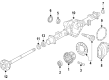
GMC Sierra 1500 Pinion Seal Part Number: 23243585
$29.69 MSRP: $48.92You Save: $19.23 (40%)Ships in 1-2 Business Days
GMC Sierra 1500 Pinion Seal, Front Part Number: 84428304
$27.10 MSRP: $50.91You Save: $23.81 (47%)Ships in 1-2 Business Days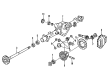
GMC Sierra 1500 Pinion Seal Part Number: 26094851
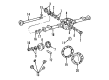
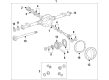
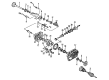
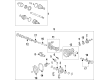
GMC Sierra 1500 Differential Seal
Want to cut long-term maintenance and repair costs? Choose OEM Differential Seal. Those parts deliver top durability you can trust. On our site, you'll find a huge catalog of genuine GMC Sierra 1500 parts. Prices are unbeatable, so you can keep more in your pocket. Every OEM GMC Sierra 1500 Differential Seal includes a manufacturer's warranty. You can also get an easy return policy that keeps buying risk free. Fast delivery, get your car on the road quickly. It's simple to search, compare, and order. Stop guessing about quality or fit. Order today and save with parts that last.
GMC Sierra 1500 Differential Seal Parts Questions & Experts Answers
- Q: How to replace the Differential Seal in the drive pinion housing on GMC Sierra 1500?A:The proper method for drive pinion housing or seal replacement involves making ram observations for all driveline components based on their propeller shaft and axle positions initially. Reassembly requires following all specifications and torque values to return components to their original positions. Start the procedure through vehicle lifting then draining the axle fluid. Mark the rear propeller shaft to its position on the rear axle pinion yoke and then remove the Axle Shafts. Unwinding the bearing caps enables the propeller shaft removal from the axle with tape applied to halt bearing rollers from escaping. Use an inch-pound torque wrench to measure the required torque needed for pinion and ring gear rotation and document the combined preload values affecting Pinion Bearings together with the pilot bearing and oil seal and differential case bearings. An alignment mark should be established between pinion yoke and pinion gear before retainer bolts and then the retainer and pinion can be removed. The torque measurement should occur after selective shim removal while assessing the pinion rotation capacity. Set up the j 8614-01 flange/pulley holding tool and loosen the pinion nut while using holding services. Place the j 8614-2 and j 8614-3 into the j 8614-01. Use the j 8614-3 to turn clockwise which will remove the pinion yoke. A suitable tool should be used to remove the pinion oil seal from the housing without damaging it before proceeding with the outer Pinion Bearing and pinion and collapsible spacer. The bearing puller (J 22912-B) and hydraulic press will extract the inner Pinion Bearing before using a hammer and brass drift to remove both outer and inner Pinion Bearing cups. Install the inner Pinion Bearing cup into the pinion gear bearing retainer through the combination of Pinion Bearing installer (J 37624) with driver handle (J 8092). Then use rear Pinion Bearing race installer (J 8608) and driver handle (J 8092) to deliver the outer Pinion Bearing cup. The installer (J 24433) should be used to install the inner Pinion Bearing until the cone seats on the pinion before adding a new collapsible spacer followed by lubricating the pinion bearings with the required axle lubricant. First install the pinion inside the bearing retainer and place the outer bearing afterward before installing a fresh oil seal using the pinion seal installer (J 44414). Apply gm p/n 12346004 (Canadian P/N 10953480) sealant to the splines of the pinion yoke before installing it while the assembly keeps the same position as marked before removal. Tighten the new pinion nut with assistance from the flange/pulley holding tool (J 8614-01) until the pinion end play reaches its limit and measure the rotating torque. Record a rotating torque measure of the pinion at 0.40-0.57 n.m (3-5 lb in) above the previously recorded value. The pinion needs multiple rotations before checking the torque again because this process secures bearing installation properly. Future torque readings might require adjustments. You must determine the specific shim thickness for the pinion gear bearing retainer before applying gm p/n 1052942 (Canadian P/N 10953466) sealant to its sealing surface. Then place the shim with its tab oriented to the unmachined surface. Employ sealant on the shim surface before installing the pinion gear bearing retainer and torquing its bolts to 88 n.m (65 lb ft). Check the torque between the pinion and ring gear after installation while confirming their reading stays between 0.57 and 1.13 n.m over the initial measurement result (5-10 lb in). Check preload until it reaches proper specifications. Reinstall the propeller shaft to the pinion yoke and keep the reference marks aligned before securing the propeller shaft yoke retaining clamps and bolts to 25 n.m (18 lb ft). Proceed with installing the axle shafts while filling the assembly with proper lubrication followed by a vehicle descent.

Related GMC Sierra 1500 Parts
 GMC Sierra 1500 Differential
 GMC Sierra 1500 Drive Shaft
 GMC Sierra 1500 Axle Shaft
 GMC Sierra 1500 Differential Bearing
 GMC Sierra 1500 Differential Cover
 GMC Sierra 1500 Driveshaft Yokes
 GMC Sierra 1500 Pinion Bearing
 GMC Sierra 1500 Pinion Washer
 GMC Sierra 1500 Slip Yoke
 GMC Sierra 1500 Universal Joint
 GMC Sierra 1500 Wheel Seal