ChevyParts
My Garage
My Account
Cart
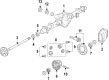
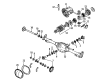
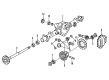
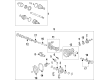
OEM GMC Sierra 1500 Universal Joint
U-Joint- Select Vehicle by Model
- Select Vehicle by VIN
Select Vehicle by Model
orMake
Model
Year
Select Vehicle by VIN
For the most accurate results, select vehicle by your VIN (Vehicle Identification Number).
9 Universal Joints found


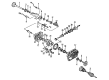
GMC Sierra 1500 Universal Joints Part Number: 23104840
$36.45 MSRP: $88.98You Save: $52.53 (60%)

GMC Sierra 1500 Universal Joints Part Number: 94772179
$163.83 MSRP: $273.43You Save: $109.60 (41%)Ships in 1-3 Business Days


GMC Sierra 1500 Universal Joints Part Number: 89059111
$163.83 MSRP: $273.43You Save: $109.60 (41%)Ships in 1-2 Business Days


GMC Sierra 1500 Universal Joints Part Number: 89040245
$107.41 MSRP: $180.82You Save: $73.41 (41%)Ships in 1-2 Business Days
GMC Sierra 1500 Universal Joints Part Number: 89040243
$112.32 MSRP: $189.10You Save: $76.78 (41%)Ships in 1-2 Business Days


GMC Sierra 1500 Universal Joints Part Number: 88964413
$196.62 MSRP: $328.19You Save: $131.57 (41%)Ships in 1-2 Business Days


GMC Sierra 1500 Universal Joints Part Number: 19121436
$130.13 MSRP: $308.44You Save: $178.31 (58%)Ships in 1-2 Business Days
GMC Sierra 1500 Universal Joints Part Number: 84712242
$124.76 MSRP: $212.40You Save: $87.64 (42%)Ships in 1 Business Day
GMC Sierra 1500 Universal Joints Part Number: 84555910
$46.37 MSRP: $72.63You Save: $26.26 (37%)Ships in 1-3 Business Days
GMC Sierra 1500 Universal Joint
Want to cut long-term maintenance and repair costs? Choose OEM Universal Joint. Those parts deliver top durability you can trust. On our site, you'll find a huge catalog of genuine GMC Sierra 1500 parts. Prices are unbeatable, so you can keep more in your pocket. Every OEM GMC Sierra 1500 Universal Joint includes a manufacturer's warranty. You can also get an easy return policy that keeps buying risk free. Fast delivery, get your car on the road quickly. It's simple to search, compare, and order. Stop guessing about quality or fit. Order today and save with parts that last.
GMC Sierra 1500 Universal Joint Parts Questions & Experts Answers
- Q: How to replace the universal joint with a nylon injected ring on GMC Sierra 1500?A:You need two tools to change the Universal Joint - start with j 9522-3 u joint bearing separator and j 9522-5 u joint bearing spacer remover. Place the propeller shaft horizontally on a press setup and take care not to put the tubing inside a vise to protect it from injury. Set a mark on the shaft ends before placing the Universal Joint so its lower yoke head fits into a 30 mm socket. To access the lower bearing cup in the yoke ear you need the u joint bearing separator (J 9522-3) to cut the plastic retaining ring before pressing the bearing cup out. Change to the replacement tool j 9522-5 to push the bearing cup completely away from its position. Adjust the propeller shaft rotation to remove the other bearing cup for future reassembly and record its position. Look for dirt or marks in the retaining ring slots and bearing cup wall before cleaning them thoroughly. Place one side of the yoke partially with the bearing cup and put the cross in position to freely fit the trunnion. Insert one bearing cup until it snaps into the yoke ear position on each side while keeping the trunnion alignment straight. Examine the needle bearings immediately after assembly because binding problems with them indicate misalignment. Push the tool until the groove on top of the bearing retainer appears while maintaining proper alignment before installing the bearing retainer and pressing both retainers for perfect fit. When needed use a dead blow hammer for the retainer while chassis grease helps installation.

Related GMC Sierra 1500 Parts
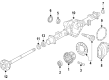
 GMC Sierra 1500 Differential
 GMC Sierra 1500 Drive Shaft
 GMC Sierra 1500 Axle Shaft
 GMC Sierra 1500 Differential Bearing
 GMC Sierra 1500 Differential Cover
 GMC Sierra 1500 Differential Seal
 GMC Sierra 1500 Driveshaft Yokes
 GMC Sierra 1500 Pinion Bearing
 GMC Sierra 1500 Pinion Washer
 GMC Sierra 1500 Slip Yoke
 GMC Sierra 1500 Wheel Seal