ChevyParts
My Garage
My Account
Cart
OEM GMC Yukon CV Boot
Axle Boot- Select Vehicle by Model
- Select Vehicle by VIN
Select Vehicle by Model
orMake
Model
Year
Select Vehicle by VIN
For the most accurate results, select vehicle by your VIN (Vehicle Identification Number).
14 CV Boots found


GMC Yukon Inner Boot, Front Part Number: 19256072
$48.93 MSRP: $83.25You Save: $34.32 (42%)


GMC Yukon Outer Boot, Front Part Number: 19256071
$108.52 MSRP: $186.34You Save: $77.82 (42%)


GMC Yukon Inner Boot, Front Part Number: 26062618
$33.23 MSRP: $54.75You Save: $21.52 (40%)


GMC Yukon Outer Boot, Front Part Number: 15868188
$65.70 MSRP: $111.85You Save: $46.15 (42%)Ships in 1-2 Business Days
GMC Yukon Boot Kit, Front Part Number: 84392104
$27.14 MSRP: $42.51You Save: $15.37 (37%)
GMC Yukon Boot Kit Part Number: 84929646
$84.38 MSRP: $132.15You Save: $47.77 (37%)Ships in 1-2 Business DaysGMC Yukon Boot Kit Part Number: 84846848
$60.40 MSRP: $94.61You Save: $34.21 (37%)Ships in 1-2 Business Days
GMC Yukon Inner Boot, Front Part Number: 26055394


GMC Yukon Outer Boot, Front Part Number: 26037370


GMC Yukon Outer Boot, Front Part Number: 26037155

GMC Yukon Inner Boot, Front Part Number: 26062615
$27.79 MSRP: $43.53You Save: $15.74 (37%)
GMC Yukon Inner CV Joint Boot, Front Part Number: 87863492
$39.03 MSRP: $61.13You Save: $22.10 (37%)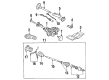
GMC Yukon Inner Boot, Front Part Number: 26036985

GMC Yukon Outer CV Joint Boot, Front Part Number: 87842370
$27.14 MSRP: $42.51You Save: $15.37 (37%)
GMC Yukon CV Boot
Our website offers an extensive catalog of genuine GMC Yukon CV Boot at unbeatable prices. Every OEM GMC Yukon CV Boot comes with a manufacturer's warranty, an easy return policy, and rapid delivery service. Don't miss out on this great opportunity!
GMC Yukon CV Boot Parts Questions & Experts Answers
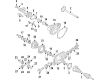
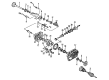
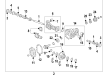
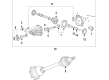
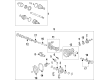
- Q: How to replace the outer CV Boot and CV Joint on GMC Yukon?A: The first step to replacing a wheel drive shaft's outer joint and boot requires wheel drive shaft removal with extra caution when working by the cv joint outer race using a hand grinder. First use side cutters to discard the boot clamp after you cut through the swage ring with a hand grinder. Use the boot slide down the halfshaft bar to a position that separates it from the cv joint outer race. Wipe all existing grease off the cv joint face. Use j-8059 (Snap Ring Pliers) to open the snap ring ears on the inner race where you've located the halfshaft bar retaining snap ring. Remove the cv joint with its boot from the halfshaft bar by pushing them off and discard the old boot. A brass drift instrument allows you to lightly tap the cv joint cage to create enough tilt for removing all six chrome alloy balls. Removing old grease and contaminants from inner and outer race assemblies and cv joint cage and chrome alloy balls requires thorough cleaning with cleaning solvent before the parts dry. Inspect for wear or damage, replacing any defective components observed before moving forward. Respond to rust contamination by brushing the halfshaft bar with a wire brush at the seal mounting location. All components require inspection for damage and wear before receiving a thin layer of grease is applied inside and outside race grooves. Insert the inner race into the cage by first aligning it with the cage windows at a 90-degree angle to cage. To install the chrome alloy balls and to place the cage and inner race into the outer race, use a brass drift to guide the cage. Use the pre-measured kit grease to fill the cv joint boot assembly before placing the new small boot clamp onto the cv joint seal and inserting the boot properly onto the halfshaft bar. Position the small-end into the joint boot groove. Use j-35910 (Drive Axle Seal Clamp Pliers) to clamp the small boot. Tighten to 136 nm (100 lb ft) as you double-check the clamp ear's gap width dimension. Press the retaining ring side of the cv joint inner race against the halfshaft bar direction while distorting the new swage ring into an oval before sliding it over the boot . Inspect cv engagement through joint pulling then place the cv joint boot's large dimension over the cv joint outer race . During boot tight clamping employ the j-36652-1 (Drive Axle Clamp Swage Tool) for 1500 models or the j-36652-2 (Axle Swage Tool) for 2500, 3500, and hummer h2 models to securely position the cv joint boot , cv joint assembly , and swage ring . The tool assembly requires direct bolt tightening from each side until the two halves meet and then allows removal of the halfshaft assembly for wheel drive shaft replacement.


