ChevyParts
My Garage
My Account
Cart
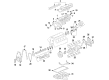
OEM GMC Yukon Rocker Arm
Engine Rocker Arm- Select Vehicle by Model
- Select Vehicle by VIN
Select Vehicle by Model
orMake
Model
Year
Select Vehicle by VIN
For the most accurate results, select vehicle by your VIN (Vehicle Identification Number).
5 Rocker Arms found


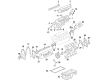
GMC Yukon Rocker Arms Part Number: 10214664
$14.44 MSRP: $23.79You Save: $9.35 (40%)Ships in 1-2 Business Days


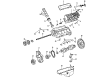
GMC Yukon Rocker Arms Part Number: 23500074
$19.84 MSRP: $32.68You Save: $12.84 (40%)Ships in 1-2 Business Days

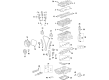
GMC Yukon Rocker Arms Part Number: 12619829
$15.74 MSRP: $25.93You Save: $10.19 (40%)Ships in 1-2 Business Days

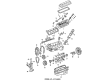
GMC Yukon Rocker Arms Part Number: 10089648
$27.98 MSRP: $43.85You Save: $15.87 (37%)Ships in 1-2 Business Days
GMC Yukon Rocker Arms Part Number: 12696105
$13.64 MSRP: $22.47You Save: $8.83 (40%)Ships in 1-2 Business Days
GMC Yukon Rocker Arm
Want to cut long-term maintenance and repair costs? Choose OEM Rocker Arm. Those parts deliver top durability you can trust. On our site, you'll find a huge catalog of genuine GMC Yukon parts. Prices are unbeatable, so you can keep more in your pocket. Every OEM GMC Yukon Rocker Arm includes a manufacturer's warranty. You can also get an easy return policy that keeps buying risk free. Fast delivery, get your car on the road quickly. It's simple to search, compare, and order. Stop guessing about quality or fit. Order today and save with parts that last.
The Rocker Arm used in GMC Yukon automobiles is very significant in the engines valvetrain system as it helps convey movement from the pushrod to the intake and exhaust valves. Usually made from stamped steel or aluminum, these parts translate the up-down articulation of the pushrod into the downward force required to open the valves. In the applications with high rotational speed such as in automotive engines, aluminum is favored for weight considerations whereas cast iron or forged carbon-steel is employed in the diesel engines for power-providing construction. Different types of rocker arms including the roller rockers use needle bearings in a bid to eliminate friction and hence enhance durability. The rocker ratio which is standardly a minimum 1.5:1 to a maximum of 1.8:1 in the contemporary motors heightens cams lift subsequently enhancing performance. Previously, such ratios as 1:1 were typical up to the 1950s. The new fulcrum bearings are also used where the pressure is likely to build up, particularly in high revving engines, to provide additional strength and thus boost the efficiency of the rocker arm.
GMC Yukon Rocker Arm Parts and Q&A
- Q: How to replace the valve rocker arm and push rods on GMC Yukon?A:Positioned first is the removal of the Rocker Arm cover as the first step to change valve rocker arms and push rods. The car engine operates through the firing sequence 1, 8, 7, 2, 6, 5, 4, 3 in which the left side bank contains cylinders 1, 3, 5 and 7. Place all rocker arms as well as pushrods and pivot support in a rack for later replacement in their factory locations after disconnecting the Spark Plug from cylinder number one. The replacement process starts with bolt removal from the rocker arms and then removal of the arms (1, 2). Next step is removing the Rocker Arm pivot support followed by the pushrods. Examine and clean the rocker arms and pushrods according to need. Before mounting the components of rocker arms and pushrods you must oil their surfaces with new engine oil while applying oil to the bolts' flange as well. First step to install the Rocker Arm pivot support is seating the pushrods correctly within the valve lifter sockets while aligning them with the ends of the rocker arms (1, 2). However, do not apply torque to the Rocker Arm bolts at this point. Install the rocker arms and bolts onto the first Piston from top dead center during compression stroke when the number one cylinder rocker arms must not be on lobe lift. The engine positioning allows you to apply 30 nm (22 lb ft) torque on exhaust valves of cylinders 1, 2, 7, 8 while tightening Intake Valve bolts of cylinders 1, 3, 4, 5 to 30 nm (22 lb ft). The procedure requires a clockwise Crankshaft rotation by 360 degrees before torquing the Exhaust Valve Rocker Arm bolts of cylinders 3, 4, 5, 6 to 30 nm (22 lb ft) and the Intake Valve Rocker Arm bolts of cylinders 2, 6, 7, 8 to 30 nm (22 lb ft). Reinstall both the number one cylinder Spark Plug along with the Rocker Arm cover into its proper place.

Related GMC Yukon Parts
 GMC Yukon Oil Filter
 GMC Yukon Camshaft Bearing
 GMC Yukon Cylinder Head
 GMC Yukon Dipstick
 GMC Yukon Exhaust Valve
 GMC Yukon Harmonic Balancer
 GMC Yukon Lash Adjuster
 GMC Yukon Motor And Transmission Mount
 GMC Yukon Oil Filler Cap
 GMC Yukon Oil Pump Gasket
 GMC Yukon Timing Belt
 GMC Yukon Valve Cover Grommet