ChevyParts
My Garage
My Account
Cart
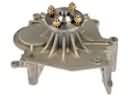
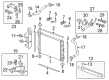
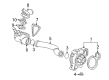
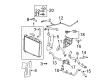
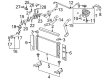
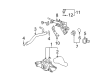
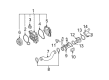
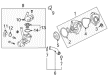
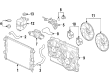
OEM Saturn Thermostat Housing
Engine Coolant Thermostat Housing- Select Vehicle by Model
- Select Vehicle by VIN
Select Vehicle by Model
orMake
Model
Year
Select Vehicle by VIN
For the most accurate results, select vehicle by your VIN (Vehicle Identification Number).
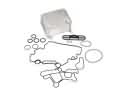
15 Thermostat Housings found


Saturn Thermostat Housing, Green Line Part Number: 12597172
$98.01 MSRP: $201.41You Save: $103.40 (52%)Ships in 1-2 Business DaysProduct Specifications- Other Name: Housing, Engine Coolant Temperature; Engine Coolant Thermostat Housing; Thermostat Housing Cover; Water Manifold; Housing, Engine Coolant Thermostat

Saturn Thermostat Housing Part Number: 12689039
$74.81 MSRP: $153.74You Save: $78.93 (52%)Ships in 1-2 Business DaysProduct Specifications- Other Name: Housing, Engine Coolant Temperature; Thermostat Housing Cover; Housing, Engine Coolant Thermostat
- Replaces: 12651113

Saturn Thermostat Housing Part Number: 12605853
$99.70 MSRP: $204.86You Save: $105.16 (52%)Product Specifications- Other Name: Housing, Engine Coolant Temperature; Thermostat Housing Cover; Housing, Engine Coolant Thermostat

Saturn Thermostat Housing Part Number: 25192231
$133.64 MSRP: $249.38You Save: $115.74 (47%)Ships in 1-2 Business DaysProduct Specifications- Other Name: Housing, Engine Coolant Thermostat; Thermostat Housing Cover
- Replaces: 12992382

Saturn Thermostat Housing Part Number: 12689041
$57.49 MSRP: $118.14You Save: $60.65 (52%)Ships in 1-2 Business DaysProduct Specifications- Other Name: Housing, Engine Coolant Temperature; Thermostat Housing Cover; Thermostat Unit; Housing, Engine Coolant Thermostat
- Replaces: 12599235, 12638893

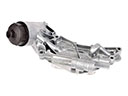
Saturn Inlet Assembly Part Number: 90537819
Product Specifications- Other Name: Housing, Engine Coolant Thermostat

Saturn Thermostat Housing Part Number: 55353492
Product Specifications- Other Name: Housing, Engine Coolant Thermostat; Thermostat Housing Cover; Thermostat Housing Gasket; Thermostat
- Replaces: 90502201

Saturn Thermostat Housing Part Number: 24447272
Product Specifications- Other Name: Cover, Engine Coolant Thermostat; Thermostat Housing Cover; Water Pump Housing; Thermostat Cover; Cover Assembly; Housing Cover; Cover

Saturn Thermostat Housing Part Number: 12612633
Product Specifications- Other Name: Housing-Engine Coolant Thermostat; Housing, Engine Coolant Thermostat

Saturn Thermostat Housing Part Number: 12590275
Product Specifications- Other Name: Housing, Engine Coolant Temperature; Thermostat Housing Cover; Housing, Engine Coolant Thermostat

Saturn Thermostat Housing Part Number: 12584898
Product Specifications- Other Name: Housing, Engine Coolant Temperature; Thermostat Housing Cover; Housing, Engine Coolant Thermostat
- Replaces: 13104425

Saturn Thermostat Housing Part Number: 12583152
Product Specifications- Other Name: Housing, Engine Coolant Thermostat

Saturn Thermostat Housing Part Number: 12583142
Product Specifications- Other Name: Cover, Engine Coolant Thermostat; Thermostat Housing Cover; Thermostat Cover

Saturn Thermostat Housing Part Number: 12581522
Product Specifications- Other Name: Housing, Engine Coolant Thermostat; Thermostat Housing Cover; Water Manifold
Saturn Thermostat Housing Part Number: 12581521
Product Specifications- Other Name: Housing-Engine Coolant Thermostat; Cover; Housing, Engine Coolant Thermostat
Saturn Thermostat Housing
Choose OEM Thermostat Housing, you're making the optimal decision for superior quality and perfect performance. You can feel confident because each component goes through stringent quality checks. Every part is carefully built to comply with Saturn's factory specifications. You'll enjoy a smooth, worry-free installation that fits just right. At ChevyPartsGiant.com, you'll find it easy to get top-quality OEM Saturn Thermostat Housing. You can shop at highly competitive prices and protect your budget. All our genuine Saturn parts include a dependable manufacturer's warranty. You'll also appreciate our straightforward return policy and swift delivery services for extra convenience.
Saturn Thermostat Housing ensures that the temperature of the coolant is maintained at the correct time to avoid temperature spikes and cover the system thus owners will not experience messy leaks. When it was introduced in 1985, Saturn aimed to be an outsider within General Motors and a crusader of new ideas in each model. The brand constructed the cars in its facility and promoted close collaboration and rapid enhancements. Drivers spotted the plastic panel board that was difficult to dent which withstood shopping carts bangs and salty snowy winter, maintaining a sleek appearance over a long period. Lost foam casting under the hood created parts of the engine that are the correct ones and are made using light weights, with the advanced paint line producing finishes that did not fade easily. These touches made Saturn cars hard, unique, and low-priced and gained a dedicated following and glorified useful innovation. A smart engineering and a sociable marketing event had helped Saturn to develop a community that was proud of owning a special ride. Prior to beginning the process of installation, you should park on a flat surface, allow the engine to cool completely as well as removing the pressure in the system. Add more drain coolant until below the Thermostat Housing level. Unscrew and lift the old Thermostat Housing, remove intake tubes or brackets, which may be in the way, tag and remove the upper radiator hose and unbolt it. Wipe the mating surface clean, using a new O-ring and a position a thermostat and place the new Thermostat Housing, and then bolts are tightened in a crisscross pattern. Reconnect hoses, refuel coolant, dispel compressed air, turn on the engine, and monitor the temperature gauge to ensure a seal is not leaking.