Make sure this part fits

GM 20882403
Muffler & Pipe

2009-2014 GM

Customer Questions & Expert Answers (6)
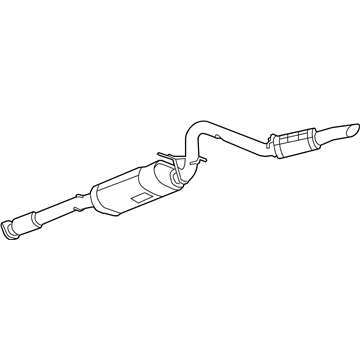
GM 20882403 Muffler & Pipe
  • Part Description
    Muffler Assembly-Exhaust (W/Resonator, Exhaust & Tail Pipe; Direct-Fit Exhaust; Exhaust System Kit; Exhaust Pipe
  • Replaces
    20779911, 25940546
  • Manufacturer
    General Motors
Make sure this part fits
$1334.71 MSRP: $2004.47
You Save: $669.76 (34%)
1
ADD TO CART
  • Related Parts
  • Product Specifications
  • Vehicle Fitment
  • Customer Questions & Expert Answers
  • Product Specifications

    BrandGenuine GM
    Manufacturer Part Number20882403
    Part DescriptionMuffler Assembly-Exhaust (W/Resonator, Exhaust & Tail Pipe; Direct-Fit Exhaust; Exhaust System Kit; Exhaust Pipe
    Other NamesMuffler; Muffler, Exhaust Tail Pipe; Muffler, Exhaust
    Item Dimensions97.9 x 27.9 x 15.1 inches
    Item Weight56.30 Pounds
    ConditionNew
    Fitment TypeDirect Replacement
    Replaces20779911, 25940546
    ManufacturerGeneral Motors
    SKU20882403
    WarrantyThis genuine GM part is guaranteed by GM's factory warranty.
    Shipping & ReturnShipping Policy Return Policy
    Warning: California's Proposition 65
  • Vehicle Fitment

    Year Make Model Trim Engine
    2009-2014 Chevrolet TahoeLS, LT, LTZ8 Cyl 5.3 L FLEX, 8 Cyl 5.3 L GAS
    2009-2014 GMC YukonSLE, SLT8 Cyl 5.3 L FLEX, 8 Cyl 5.3 L GAS
  • Customer Questions & Expert Answers

    Q:
    Can you help me check if this 20882403 is the right part for my car? Posted by ChevyPartsGiant Specialist
    A:
    Please Select Your Vehicle model to see if part number 20882403 is suitable before ordering.
    Posted by ChevyPartsGiant Specialist
    Q:
    How to replace the exhaust muffler on those equipped with LMG, LY2, or LY5 on Chevrolet Tahoe? Posted by Customer
    A:
    Replacement of an exhaust Muffler starts by elevating and securing vehicles that have lmg, ly2 or ly5 engines. Remove the chassis wiring harness electrical connector from its connection to the right rear wheel speed sensor wiring harness electrical connector. Vehicles with rpo z55 need battery disconnect before separating the right rear Shock Absorber harness connector and air line from the Shock Absorber. Detach the wire harness electrical connector clip from the frame but avoid separating the rear suspension link rod from the position sensor ball stud. Support the sensor lever before you use a twisting motion to detach the link rod ball from its ball stud on the right rear automatic level control sensor. Lift the rear axle with an adjustable jack then disconnect and remove the right axle tie rod bolt and nut and possibly the rear axle vent hose with its swivel clip from the rear brake crossover pipe. First remove right rear stabilizer shaft link to frame bolt and nut followed by right rear stabilizer shaft link from frame as well as right rear Shock Absorber lower bolt and nut. Lower the right side of the rear axle until you can remove the Muffler by loosening its Catalytic Converter to Muffler clamp bolt. The lubrication of Muffler assembly hanger insert points allows for easier removal and with help removing insulators from exhaust system hangers and the resonator insulator while avoiding flex coupler stress. Ive the Muffler assembly off then apply lubrication to the insulators before hanging it. Avoid damaging the Catalytic Converter assembly by providing support to maintain vertical movement below 6 degrees. Install the Muffler assembly and the insulators to the exhaust system hangers under assistance. Screw in the norma clamp bolt connecting the Muffler assembly to the three-way Catalytic Converter with a torque force of 28 nm (21 lb ft). Position the right side of the rear axle before inserting the right rear Shock Absorber lower bolt and nut. Tighten bolt and nut to 95 nm (70 lb ft) and install right rear stabilizer shaft link to frame while securing bolt and nut to 65 nm (48 lb ft). Place the right rear axle tie rod bolt and nut into position and tighten them to a torque of 105 nm (77 lb ft). Additionally, attach and tighten the rear axle vent hose and its swivel clip if needed. Install right rear link rod to ball studs on sensors using tool j 38185 followed by right rear wheel speed sensor wiring harness clips to both frame and Control Arm Bracket then install right rear wheel speed sensor wiring harness electrical connector clip. When vehicle is equipped with rpo z55 the right rear air line should be joined to the Shock Absorber followed by a connection between the chassis wiring harness electrical connector and right rear wheel speed sensor wiring harness electrical connector. Finally, lower the vehicle.
    Posted by ChevyPartsGiant Specialist
    Q:
    How to replace the exhaust muffler on those equipped with LC9, LMG, LY5, or L76 engines on Chevrolet Tahoe? Posted by Customer
    A:
    In order to install a new exhaust Muffler on those vehicles that are equipped with lc9, lmg, ly5, or l76 engines, start by lifting and supporting the given vehicle. Unplug the chassis wiring harness electrical from the right rear wheel speed sensor wiring harness electrical , and if necessary the chassis wiring harness electrical from the right rear Shock Absorber and the right rear air line from the Shock Absorber. Pull off the right rear wheel speed sensor wiring harness connector from the frame without prying the rear suspension sensor link rod from rear position sensor ball stud. Denothe right rear automatic level control sensor link rod from the sensor by assisting the sensor lever twisting the rod ball dis-ajoining from the ball stud. Place a suitable adjustable jack under the rear axle. Then, remove the correct suspension bolt and attach it to the right axle's mounting point. Remove the designated area around the rear opening using the appropriate tool. Also, remove the rear cover, and if necessary, remove the inner components from the rear opening. Take off the right rear stabilizer shaft link to frame bolt and nut, right rear stabilizer shaft link, right rear Shock Absorber lower bolt and nut. Lower the right side of the rear axle to take out the Muffler loosening the Catalytic Converter to Muffler clamp bolt and lubricating the insulators so that it become eady to pull them off. Even with help, you should be able to get all the insulators down from the hangers on the exhaust system (1, 2, and 3), as well as the insulator near the resonator without overstretching the flex coupler. Prolonged use causes the Muffler assembly to become loose, you need to remove the assembly, and afterwards lubricate the insulators for the installation. With the help of another person, bolt the Muffler assembly and the insulators to the exhaust system hangers (1, 2, and 3), and close to the resonator. Mount the Muffler assembly to the three-way Catalytic Converter and tighten the clamp bolt using 44 nm (32 lb ft) of torque. Lift the rear axle into position using the adjustable jack, apply the nut and lower bolt to the left rear shock, and tighten as you place all nut and bolt to 95 nm (70 lb ft). Mount the right rear stabilizer shaft link bolt to the frame and right rear stabilizer shaft link nut, connecting to 65 nm (48 lb ft). Mount the right rear axle tie rod bolt and nut and the rear axle vent hose if it is needed and the vent hose swivel clip if needed. Insert the right rear link rod to the ball studs on the sensors using the hose clamp pliers (J 38185), in making sure that the rear axle wiring harness clip is installed properly. Lastly, secure the right rear wheel speed sensor wiring harness clips to the frame and the Control Arm Bracket, secure the right rear wheel speed sensor wiring harness electrical connector clip to the frame, and if so required, secure the right rear air line to the Shock Absorber and to the chassis wiring harness electrical connector to the right rear Shock Absorber. Tie in the chassis wiring harness electrical connector with the right rear wheel speed sensor wiring harness electrical connector and then lower the vehicle.
    Posted by ChevyPartsGiant Specialist
    Q:
    How to replace the exhaust muffler on those equipped with L92 on GMC Yukon? Posted by Customer
    A:
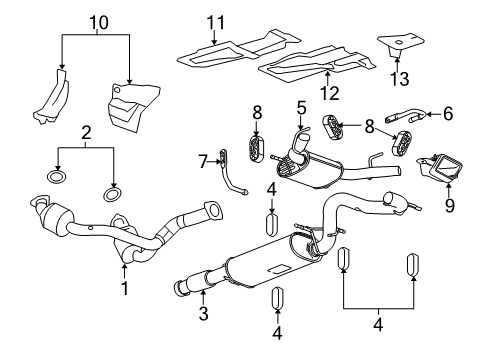
    You should gather hose clamp pliers (J 38185) as your first step to replace the exhaust Muffler on l92 vehicles. Hose clamp pliers (J 38185). First detach the right rear wheel together with its tire followed by disconnecting the wiring harness electrical connector from the right rear wheel speed sensor wiring harness electrical connector. The right rear Shock Absorber and Shock Absorber air line need separation when rpo z55 exists during this process. Carefully detach the right rear wheel speed sensor wiring harness electrical connector clip from the frame yet avoid displacing the rear suspension sensor link rod from the position sensor ball stud. Use a nut spinner to separate the right rear automatic level control sensor link rod ball from its ball stud after supporting the sensor lever. Apply an adjustable jack to support the rear axle before you disassemble the right axle tie rod bolt and nut , the rear axle vent hose, and the vent hose swivel clip from the rear brake crossover pipe (if required). First, detach the right rear stabilizer shaft link to frame bolt along with the corresponding nut followed by removing the right rear stabilizer shaft link from the frame and finally the right rear Shock Absorber lower bolt together with its nut. Lower the right side of the rear axle while removing the Muffler carefully by taking out its nuts that connect it to the catalytic converter and separating the hanger. To remove the Muffler assembly both yukon denali and escalade owners should first apply lubrication to the exhaust system hangers and the resonator insulator. Following this, mutual help allows removing the exhaust system hangers (4, and 5) and the resonator insulator before Muffler assembly removal. Perform the same procedure on all insulators of the exhaust system hangers (3, 4, and 5) and for the insulator near the resonator for yukon xl vehicles with yukon denali xl and escalade esv and escalade ext variants. You should avoid stretching the flex coupler beyond its limits to avoid damage inside the system. After lubricating the insulators once more than add the Muffler assembly together with insulators to the exhaust system hangers (3, 4, and 5) and the insulator near the resonator. Install the insulators to exhaust system hangers (2, 3) and the insulator near the resonator after reapplying lubrication for vehicles classed as yukon denali or escalade. Secure the Muffler to catalytic converter nuts with 45 nm (33 lb ft) torque and secure the insulator to its designated hanger. Raise the rear axle using the adjustable jack to position it correctly and fasten the right rear Shock Absorber lower bolt and nut with a torque of 95 nm (70 lb ft). Begin by attaching the right rear stabilizer shaft link to the frame structure then bolt and start tightening the right rear stabilizer shaft link to frame assembly to 65 nm (48 lb ft). Put the right rear axle tie rod bolt and nut into place then tighten them to 105 nm (77 lb ft) and replace the rear axle vent hose and vent hose swivel clip when needed. Attach the right rear link rod to ball studs through hose clamp pliers (J 38185) while making sure the harness clip of the rear axle maintains proper orientation. The installation process requires you to attach the right rear wheel speed sensor wiring harness clips to the frame and Control Arm Bracket followed by connecting the right rear wheel speed sensor wiring harness electrical connector clip to the frame. For vehicles with rpo z55 you must also connect the right rear air line and chassis wiring harness electrical connector to the right rear Shock Absorber before you connect the chassis wiring harness electrical connector to the right rear wheel speed sensor wiring harness electrical connector . Replace the right rear wheel with its tire after completing the procedure.
    Posted by ChevyPartsGiant Specialist
    Q:
    How to replace the exhaust muffler with LFA on GMC Yukon? Posted by Customer
    A:
    To replace the exhaust Muffler with lfa first, raise and support vehicle. Unscrew the Catalytic Converter to Muffler clamp bolt and release the Muffler assembly from the resonator. Grease the insulators to which the Muffler pipe hangers are fitted, easing their removal; remove the insulators from the exhaust system hangers (1, 2, and 3). With help, extract the Muffler pipe assembly from the vehicle. To install, grease the insulators for easy installation with help installing the Muffler pipe assembly to the hangers on the exhaust system (1, 2 and 3). Join the mugler assembly to the resonator by connecting it ensuring the Muffler assembly is fixed to the three-way Catalytic Converter norma clamp bolt and tighten to 28 nm (21 lb ft). Finally lower the vehicle and check the exhaust system for leakages.
    Posted by ChevyPartsGiant Specialist
    Q:
    What is the procedure for installing the muffler assembly for the 2010 GMC Yukon? Posted by Customer
    A:
    Lubricate the insulators again and install the muffler assembly with assistance, then install the insulators to the exhaust system hangers and ensure not to overextend the flex coupler.
    Posted by ChevyPartsGiant Specialist
    See expert answers on similar Muffler
    If you have any questions about this product, please don't hesitate to ask us. We will be happy to help you!

OEM GM 20882403, Excellent Performance and Perfect Fitment

To ensure reliability, purchase GM part # 20882403 Muffler & Pipe. It is sometimes referred to as GM Exhaust Pipe, GM Muffler. Choosing OEM parts is the optimal decision for guaranteeing superior quality and perfect performance. These components undergo stringent quality checks and are carefully constructed to comply with GM's factory specifications, ensuring a smooth installation process.

ChevyPartsGiant.com is a leading supplier of genuine GM parts such as GM 20882403 Muffler & Pipe. Our website boasts an extensive inventory of OEM GM parts, available at highly competitive prices in the market. Should you require any new genuine GM parts, rest assured we will deliver them swiftly and efficiently to your doorstep. Furthermore, all our parts come with the assurance of a manufacturer's warranty. For detailed Chevy parts information, click here.
Choose ChevyPartsGiant for discounted prices, exceptional service and fast delivery