ChevyParts
My Garage
My Account
Cart
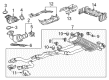
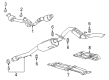
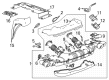
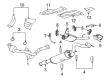
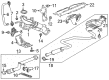
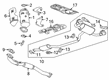
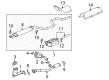
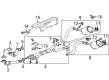
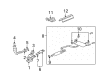
OEM Chevrolet Muffler
Exhaust Muffler- Select Vehicle by Model
- Select Vehicle by VIN
Select Vehicle by Model
orMake
Model
Year
Select Vehicle by VIN
For the most accurate results, select vehicle by your VIN (Vehicle Identification Number).
831 Mufflers found

Chevrolet Muffler & Pipe Part Number: 84072838
$1756.65 MSRP: $3357.02You Save: $1600.37 (48%)Ships in 1-3 Business DaysProduct Specifications- Other Name: Muffler Assembly-Exhaust (W/Exhaust Aftertreatment); Exhaust Pipe; Muffler & Pipe Assembly; Muffler, Exhaust; Muffler
- Replaces: 23371134, 23405918
Chevrolet Muffler & Pipe Part Number: 84190987
$1892.94 MSRP: $3051.72You Save: $1158.78 (38%)Ships in 1-3 Business DaysProduct Specifications- Other Name: Muffler Assembly-Exhaust (W/Exhaust Aftertreatment); Exhaust Pipe; Muffler & Pipe Assembly; Muffler, Exhaust; Muffler
- Replaces: 23371135, 84057128, 23405917

Chevrolet Muffler & Pipe Part Number: 84665236
$922.41 MSRP: $1385.28You Save: $462.87 (34%)Ships in 1-3 Business DaysProduct Specifications- Other Name: Muffler, Exhaust; Exhaust Pipe; Muffler
- Replaced by: 85052291
- Replaces: 23377842, 23487119, 84053744, 84327965, 20757703, 23219691, 84020522, 23239259

Chevrolet Muffler & Pipe Assembly Part Number: 85047977
$2437.57 MSRP: $3660.75You Save: $1223.18 (34%)Ships in 1-2 Business DaysProduct Specifications- Other Name: Muffler, Exhaust; Muffler, Engine Exhaust
- Replaces: 84896564, 84769452


Chevrolet Muffler & Pipe Part Number: 85626343
$2784.55 MSRP: $4181.84You Save: $1397.29 (34%)Ships in 1-2 Business DaysProduct Specifications- Other Name: Muffler, Exhaust; Muffler & Pipe Assembly; Muffler, Engine Exhaust
- Replaced by: 85723236
Chevrolet Muffler & Pipe Part Number: 19420285
$1985.63 MSRP: $2969.41You Save: $983.78 (34%)Ships in 1-3 Business DaysProduct Specifications- Other Name: Muffler Assembly, Exhaust (W/ Exhaust Aftertreatment); Exhaust Pipe; Muffler & Pipe Assembly; Muffler, Exhaust; Muffler
- Replaces: 23371133, 84190988, 23405919, 84057131

Chevrolet Muffler & Pipe Part Number: 22818060
$327.35 MSRP: $489.41You Save: $162.06 (34%)Ships in 1-3 Business DaysProduct Specifications- Other Name: Muffler, Exhaust; Exhaust Pipe; Muffler; Muffler, Exhaust Pipe
- Replaces: 20921946

Chevrolet Muffler & Pipe Part Number: 20882403
$1361.40 MSRP: $2044.56You Save: $683.16 (34%)Product Specifications- Other Name: Muffler Assembly-Exhaust (W/Resonator, Exhaust & Tail Pipe; Direct-Fit Exhaust; Exhaust System Kit; Exhaust Pipe; Muffler; Muffler, Exhaust Tail Pipe; Muffler, Exhaust
- Replaces: 20779911, 25940546

Chevrolet Muffler & Pipe Part Number: 84251081
$897.20 MSRP: $1347.42You Save: $450.22 (34%)Ships in 1-3 Business DaysProduct Specifications- Other Name: Muffler, Exhaust; Exhaust Pipe; Muffler
- Replaces: 84008129
Chevrolet Muffler & Pipe Part Number: 19420307
$1834.35 MSRP: $2884.23You Save: $1049.88 (37%)Ships in 1-3 Business DaysProduct Specifications- Other Name: Muffler Assembly, Exhaust (W/ Exhaust Aftertreatment); Exhaust Pipe; Muffler & Pipe Assembly; Muffler, Exhaust; Muffler
- Replaces: 23371132, 84073485, 23405920

Chevrolet Muffler & Pipe Part Number: 19420243
$1163.29 MSRP: $1747.03You Save: $583.74 (34%)Ships in 1-3 Business DaysProduct Specifications- Other Name: Muffler Assembly, Exhaust; Muffler & Pipe Assembly; Muffler, Exhaust
- Replaces: 84632430, 23350610, 84465359, 23405925
Chevrolet Muffler & Pipe Part Number: 84896568
$2711.13 MSRP: $4071.58You Save: $1360.45 (34%)Ships in 1-3 Business DaysProduct Specifications- Other Name: Muffler, Exhaust; Exhaust Pipe; Muffler & Pipe Assembly; Muffler, Engine Exhaust; Muffler
- Replaced by: 85047985
Chevrolet Muffler & Pipe Part Number: 85590473
$1456.76 MSRP: $2174.71You Save: $717.95 (34%)Ships in 1-2 Business DaysProduct Specifications- Other Name: Muffler Assembly-Exhaust (W/Exhaust Aftertreatment); Muffler & Pipe Assembly; Muffler, Exhaust
- Replaces: 84864951, 84560764, 84203359, 84397018, 84897437

Chevrolet Muffler & Pipe Part Number: 19420252
$1506.90 MSRP: $2250.45You Save: $743.55 (34%)Ships in 1-3 Business DaysProduct Specifications- Other Name: Muffler Assembly, Exhaust (W/ Exhaust Aftertreatment); Exhaust Pipe; Muffler & Pipe Assembly; Muffler, Exhaust; Muffler
- Replaces: 23413301, 23371136, 84057134, 84864964, 84314679, 84465355, 84560768, 84190989
Chevrolet Muffler & Pipe Part Number: 20757703
$922.41 MSRP: $1385.28You Save: $462.87 (34%)Ships in 1-3 Business DaysProduct Specifications- Other Name: Muffler, Exhaust; Exhaust Pipe; Muffler
- Replaced by: 85052291

Chevrolet Muffler & Pipe Part Number: 85154367
$859.02 MSRP: $1290.07You Save: $431.05 (34%)Ships in 1-3 Business DaysProduct Specifications- Other Name: Muffler, Exhaust
- Replaces: 84600348, 84779198

Chevrolet Muffler & Pipe Part Number: 15828658
$180.38 MSRP: $269.69You Save: $89.31 (34%)Ships in 1-3 Business DaysProduct Specifications- Other Name: Muffler, Exhaust; Direct-Fit Exhaust; Exhaust System Kit; Exhaust Pipe; Muffler
- Replaces: 15232956, 22716770

Chevrolet Muffler & Pipe, Driver Side Part Number: 86540883
$1008.79 MSRP: $1515.00You Save: $506.21 (34%)Ships in 1-2 Business DaysProduct Specifications- Other Name: Muffler, Exhaust Muffler/Resonator; Muffler
- Position: Driver Side
- Replaces: 20968760, 84231598, 84679000, 84433547, 84364341, 23290445, 84078558, 23497434

Chevrolet Muffler & Pipe Assembly Part Number: 84897448
$1506.90 MSRP: $2250.45You Save: $743.55 (34%)Ships in 1-3 Business DaysProduct Specifications- Other Name: Muffler Assembly-Exhaust (W/Exhaust Aftertreatment); Muffler, Exhaust
- Replaces: 84314681, 84057136, 84560763, 19420314, 23413304, 84190991, 84016913, 84864957, 84397014

Chevrolet Muffler & Pipe Part Number: 25972366
$1709.04 MSRP: $2554.03You Save: $844.99 (34%)Ships in 1-3 Business DaysProduct Specifications- Other Name: Muffler, Exhaust System Kit with Tail Pipe & 3 Way Catalytic Converter; Direct-Fit.; Muffler; Muffler, Exhaust
| Page 1 of 42 |Next >
1-20 of 831 Results
Chevrolet Muffler
Choose OEM Muffler, you're making the optimal decision for superior quality and perfect performance. You can feel confident because each component goes through stringent quality checks. Every part is carefully built to comply with Chevrolet's factory specifications. You'll enjoy a smooth, worry-free installation that fits just right. At ChevyPartsGiant.com, you'll find it easy to get top-quality OEM Chevrolet Muffler. You can shop at highly competitive prices and protect your budget. All our genuine Chevrolet parts include a dependable manufacturer's warranty. You'll also appreciate our straightforward return policy and swift delivery services for extra convenience.
Chevrolet Muffler Parts and Q&A
- Q: How to replace the exhaust muffler on LLV/LLR with 2.9L/3.7L engines on Chevrolet Colorado?A:To replace the exhaust Muffler for llv/llr vehicles with 2.9l/3.7l engines, first lift and support the vehicle without overextending the rear brake hose. Start with the removal of the lower shock absorber nuts and bolts , then remove right rear leaf spring nut and bolt . Put a piece of wood between the rear axle and the frame without being over-flexed or run the risk of breaking the flex joint. Then, remove the nuts that attach the Muffler to the Catalytic Converter with no use of oil-based lubricants. Spray the soapy solution to the exhaust pipe hanger rods in order to make the removal of the exhaust hangers easier, pry the hangers out. To remove the Muffler, slide it towards the rear, rotate it 90 degrees counterclockwise and carefully remove it from the vehicle. For installation, rotate the Muffler 90 degrees counterclockwise and insert it over the rear axle and slide it back until the flange is near Catalytic Converter and then rotate it clockwise 90 degrees to the position installed and slid it forward until the stud aligns to the rear of Catalytic Converter. Again, avoid oil-based lubricants. Use a soapy solution to lubricate the inner diameter of the exhaust pipe hanger and the exhaust pipe hanger rod in order to make the installation of the hangers easier, follow by pressing in on the rods. Screw the nuts holding the Muffler to the Catalytic Converter on with hands only until it touches the metal flange before tightening to 45 nm (33 lb ft). Remove that block of wood , then install the right rear leaf spring bolt and nut to 85nm (63 lb ft) tightening and install the lower shock absorber bolts and nuts to a 95 nm (70 lb ft). Finally check for leaks in the exhaust system and underbody contact before lowering the vehicle.
- Q: How to replace the muffler on a pickup on Chevrolet S10?A:Wear protective goggles and gloves before starting work on a pickup Muffler replacement. Support the vehicle properly and elevate it. Start by unscrewing the nuts connecting the Catalytic Converter to the Muffler flange followed by disconnection of the insulator from both the Tail Pipe hanger and Muffler and Tail Pipe hanger. Extract both the Muffler along with its gasket from the vehicle. Put the new gasket along with the Muffler on the vehicle by attaching the insulator with the Muffler and Tail Pipe hanger followed by connecting it to the Tail Pipe hanger. Secure the Muffler to the Catalytic Converter flange by using nuts that need to be tightened to 40 nm (30 ft. Lbs.)lower the vehicle after completing the Muffler and gasket installation.


Related Chevrolet Parts
 Chevrolet Catalytic Converter
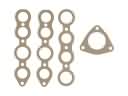 Chevrolet Exhaust Manifold
 Chevrolet EGR Valve
 Chevrolet Exhaust Manifold Gasket
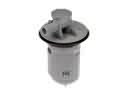 Chevrolet Fuel Tank Vent Valve
 Chevrolet Canister Purge Valves
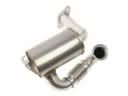 Chevrolet EGR Filter
 Chevrolet EGR Vacuum Solenoid
 Chevrolet EGR Valve Gasket
 Chevrolet Exhaust Heat Shield
 Chevrolet Secondary Air Injection Check Valve
 Chevrolet Secondary Air Injection Pump
Browse Chevrolet Muffler by Models
Nova S10 Colorado C10 Tahoe Cruze Malibu Camaro Equinox Impala SS SSR Avalanche Silverado 1500 Silverado 2500 HD Caprice Classic Cobalt Suburban Traverse Blazer HHR Sonic Tracker Volt El Camino K10 Spark Trax Trailblazer Astro Cavalier Corvette C20 Aveo Beretta C1500 C2500 C30 C3500 Celebrity City Express Corsica Express 1500 Express 2500 Express 3500 G10 G20 G30 K1500 K20 K2500 K30 K3500 K5 Blazer Lumina Metro Monte Carlo P30 Prizm S10 Blazer Silverado 2500 Sprint Uplander Venture Lumina APV Silverado 3500 Suburban 1500 Trailblazer EXT Avalanche 1500 Avalanche 2500 Aveo5 C10 Suburban C1500 Suburban C20 Suburban C2500 Suburban Captiva Sport Cruze Limited Impala Limited K10 Suburban K1500 Suburban K20 Suburban K2500 Suburban Malibu Limited P20 R10 R10 Suburban R1500 Suburban R20 R20 Suburban R2500 R2500 Suburban R30 R3500 Silverado 1500 Classic Silverado 1500 HD Silverado 1500 HD Classic Silverado 1500 LD Silverado 1500 LTD Silverado 2500 HD Classic Silverado 3500 Classic Silverado 3500 HD Spark EV Spectrum Suburban 2500 Suburban 3500 HD V10 V10 Suburban V1500 Suburban V20 V20 Suburban V2500 Suburban V30 V3500