ChevyParts
My Garage
My Account
Cart
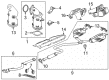
OEM Chevrolet Catalytic Converter
Cat. Converter- Select Vehicle by Model
- Select Vehicle by VIN
Select Vehicle by Model
orMake
Model
Year
Select Vehicle by VIN
For the most accurate results, select vehicle by your VIN (Vehicle Identification Number).
579 Catalytic Converters found

Chevrolet Catalytic Converter, Front Passenger Side Part Number: 22909889
$969.97 MSRP: $1443.80You Save: $473.83 (33%)Ships in 1-3 Business DaysProduct Specifications- Other Name: Converter Assembly-3Way Catalytic (W/Exhaust Front Pipe; Exhaust Pipe; Converter & Pipe; Converter, Catalytic Converter
- Position: Front Passenger Side
- Replaces: 92247640, 92225677

Chevrolet Catalytic Converter, Passenger Side Part Number: 19418947
$989.00 MSRP: $1472.37You Save: $483.37 (33%)Ships in 1-3 Business DaysProduct Specifications- Other Name: Converter Assembly, 3Way Catalytic (W/Exhaust Front Pipe) "Kit"; Converter & Pipe; Converter, Catalytic Converter
- Position: Passenger Side
- Replaces: 22980286, 92239552

Chevrolet Catalytic Converter Part Number: 22839597
$1355.32 MSRP: $2473.07You Save: $1117.75 (46%)Ships in 1-3 Business DaysProduct Specifications- Other Name: Converter, Catalytic Converter; Exhaust Pipe; Converter & Pipe
- Position: Rear
- Replaces: 20831817
Chevrolet Catalytic Converter, Front Driver Side Part Number: 22909890
$957.69 MSRP: $1425.37You Save: $467.68 (33%)Ships in 1-3 Business DaysProduct Specifications- Other Name: Converter Assembly-3Way Catalytic (W/Exhaust Front Pipe; Exhaust Pipe; Converter & Pipe; Converter, Catalytic Converter
- Position: Front Driver Side
- Replaces: 92225676, 92247641

Chevrolet Catalytic Converter, Passenger Side Part Number: 20941739
$1270.76 MSRP: $1895.43You Save: $624.67 (33%)Ships in 1-3 Business DaysProduct Specifications- Other Name: Converter, Catalytic Converter; Exhaust Pipe; Converter & Pipe
- Position: Passenger Side


Chevrolet Catalytic Converter, Front Driver Side Part Number: 22909888
$1067.92 MSRP: $1590.87You Save: $522.95 (33%)Product Specifications- Other Name: Converter Assembly-3Way Catalytic (W/Exhaust Front Pipe; Exhaust Pipe; Converter & Pipe; Converter, Catalytic Converter
- Position: Front Driver Side
- Replaces: 92225678, 92246945
Chevrolet Catalytic Converter, Front Passenger Side Part Number: 22909887
$1077.77 MSRP: $1605.67You Save: $527.90 (33%)Product Specifications- Other Name: Converter Assembly-3Way Catalytic (W/Exhaust Front Pipe; Exhaust Pipe; Converter & Pipe; Converter, Catalytic Converter
- Position: Front Passenger Side
- Replaces: 92246944, 92225679

Chevrolet Catalytic Converter, Rear Part Number: 19420100
$1205.44 MSRP: $1797.35You Save: $591.91 (33%)Ships in 1-3 Business DaysProduct Specifications- Other Name: Converter Assembly, 3Way Catalytic (W/Exhaust Rear Manifold Pipe) "Kit"; Exhaust Pipe; Converter & Pipe; Converter; Preconverter; Converter, Catalytic Converter
- Position: Rear
- Replaces: 21000000, 22794847

Chevrolet Catalytic Converter Part Number: 19420223
$1110.25 MSRP: $1654.43You Save: $544.18 (33%)Ships in 1-3 Business DaysProduct Specifications- Other Name: Converter Assembly, Warm Up 3Way Catalytic (Kit); Converter; Converter, Catalytic Converter
- Replaces: 12645922, 12660225

Chevrolet Converter & Pipe Part Number: 15909238
$1844.94 MSRP: $2757.56You Save: $912.62 (34%)Ships in 1-3 Business DaysProduct Specifications- Other Name: Converter Assembly-3Way Catalytic (W/Exhaust Manifold P; Catalytic Converter; Exhaust Pipe; Converter, Catalytic Converter; Converter, Exhaust Pipe

Chevrolet Catalytic Converter Part Number: 19418970
$1086.78 MSRP: $2074.80You Save: $988.02 (48%)Ships in 1-3 Business DaysProduct Specifications- Other Name: Converter Assembly, 3Way Catalytic (W/Exhaust Manifold Pipe) "Kit"; Converter & Pipe; Converter, Catalytic Converter; Converter, Exhaust Pipe
- Replaces: 25937659, 20847946

Chevrolet Catalytic Converter, Passenger Side Part Number: 84338054
$1630.11 MSRP: $2435.00You Save: $804.89 (34%)Ships in 1-3 Business DaysProduct Specifications- Other Name: Converter, Catalytic Converter; Exhaust Pipe; Converter & Pipe; Converter, Exhaust Pipe
- Position: Passenger Side
- Replaces: 22906769
Chevrolet Catalytic Converter, Driver Side Part Number: 19418959
$956.11 MSRP: $1823.40You Save: $867.29 (48%)Product Specifications- Other Name: Converter Assembly, 3Way Catalytic (W/Exhaust Front Pipe) "Kit"; Exhaust Pipe; Converter & Pipe; Converter, Catalytic Converter
- Position: Driver Side
- Replaces: 92239551, 22980285
Chevrolet Catalytic Converter Part Number: 25820196
$2170.84 MSRP: $3246.90You Save: $1076.06 (34%)Ships in 1-3 Business DaysProduct Specifications- Other Name: Converter Assembly-3Way Catalytic (W/Exhaust Manifold P; Exhaust Pipe; Converter & Pipe; Converter, Catalytic Converter; Converter, Exhaust Pipe

Chevrolet Converter & Pipe Part Number: 25820197
$1742.09 MSRP: $2603.13You Save: $861.04 (34%)Ships in 1-3 Business DaysProduct Specifications- Other Name: Converter Assembly-3Way Catalytic (W/Exhaust Manifold P; Catalytic Converter; Exhaust Pipe; Converter, Catalytic Converter; Converter, Exhaust Pipe
- Replaces: 15912308
Chevrolet Catalytic Converter Part Number: 25950920
$1684.26 MSRP: $2516.30You Save: $832.04 (34%)Ships in 1-3 Business DaysProduct Specifications- Other Name: Converter Assembly-3Way Catalytic (W/Exhaust Manifold P; Exhaust Pipe; Converter & Pipe; Converter, Catalytic Converter; Converter, Exhaust Pipe
Chevrolet Catalytic Converter, Driver Side Part Number: 20941740
$1268.67 MSRP: $1892.30You Save: $623.63 (33%)Ships in 1-3 Business DaysProduct Specifications- Other Name: Converter, Catalytic Converter; Exhaust Pipe; Converter & Pipe
- Position: Driver Side


Chevrolet Catalytic Converter Part Number: 19420254
$717.69 MSRP: $1064.99You Save: $347.30 (33%)Ships in 1-3 Business DaysProduct Specifications- Other Name: Converter Assembly, 3Way Catalytic (W/Exhaust Pipe); Preconverter; Converter, Catalytic Converter
- Replaces: 23276242

Chevrolet Catalytic Converter Part Number: 12686306
$1272.45 MSRP: $1897.97You Save: $625.52 (33%)Ships in 1-3 Business DaysProduct Specifications- Other Name: Converter, Catalytic Converter; Exhaust Pipe; Converter & Pipe

Chevrolet Catalytic Converter Part Number: 12684676
$357.72 MSRP: $522.15You Save: $164.43 (32%)Ships in 1-3 Business DaysProduct Specifications- Other Name: Converter, Catalytic Converter
| Page 1 of 29 |Next >
1-20 of 579 Results
Chevrolet Catalytic Converter
Want to cut long-term maintenance and repair costs? Choose OEM Catalytic Converter. Those parts deliver top durability you can trust. On our site, you'll find a huge catalog of genuine Chevrolet parts. Prices are unbeatable, so you can keep more in your pocket. Every OEM Chevrolet Catalytic Converter includes a manufacturer's warranty. You can also get an easy return policy that keeps buying risk free. Fast delivery, get your car on the road quickly. It's simple to search, compare, and order. Stop guessing about quality or fit. Order today and save with parts that last.
Chevrolet Catalytic Converter Parts Questions & Experts Answers
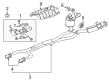
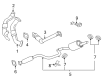
- Q: How to replace the rear catalytic converter on a 3.5L engine on Chevrolet Malibu?A:The replacement of rear catalytic converters from 3.5l engines starts by uninstalling the main Muffler assembly. Remove the connector position assurance (CPA) retainer from the system while disconnecting the heated oxygen sensor (HO2S) electrical connector but make sure the permanently attached pigtail stays intact. The heated oxygen sensor wrench (J 39194-B) should be used to detach the ho2s . Start by removing the Catalytic Converter to rear Catalytic Converter nuts, then proceed to the Catalytic Converter bolt and nuts at the Exhaust Manifold, and conclude by taking out the rear Catalytic Converter . Dispose of the old gasket and confirm that the Catalytic Converter-to-exhaust manifold flange shows no more than 0.7 mm (0.028 inch) maximum deformation during inspection. During installation place a new gasket onto the Catalytic Converter studs before installing the rear Catalytic Converter then secure it with the Catalytic Converter bolt and nuts at the Exhaust Manifold using 31 nm of torque (23 ft. Lbs.). Secure the front Catalytic Converter to the rear Catalytic Converter using nuts while twisting them to 31 nm (23 ft. Lbs.). Use the heated oxygen sensor wrench (J 39194-B) to reinstall the ho2s and tighten it to 42 nm (31 ft. Lbs.). Afterward, connect the ho2s electrical connector and install the cpa retainer. Reinstall the Muffler assembly before beginning the engine and checking for exhaust leaks.
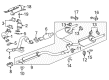
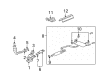
- Q: How to replace the catalytic converter on 4.81- and 5.31-engine on Chevrolet Tahoe?A:In order to replace the Catalytic Converter on 4.81- and 5.31- engines the first task to undertake is to raise and support the vehicle. Unbolting then remove the engine shield bolts and shield, and oil pan skid plate bolts and plate if needed. Pull out the Oxygen Sensor connection from the floor reinforcement, remove the clip around the engine harness and air sensor pigtail, and remove the connector position assurance (CPA) retainers and Oxygen Sensor electrical connectors. Disconnect the Oxygen Sensor electrical connectors from the hose clip and transmission crossmember, and remove cpa retainers, and Oxygen Sensor electrical connectors (1, 2). Take off the left and right exhaust manifold pipe nuts, exhaust muffler nuts, and then the Catalytic Converter. In the case of replacing the Catalytic Converter apply anti-seize compound gm p/n 12377953 or equivalent to the threads of the old oxygen sensors; install and tighten to 42 nm (31ft.lbs). Next, then install the catalyticconverter and new exhaust manifold pipe seals to the exhaust manifolds followed by the right and left exhaust manifold pipe nuts, tighten thetop to fifty nm (39 ft.Words). Attach the exhaust muffler nuts and tighten them to 40 nm (30 ft. Lbs.). Connect the Oxygen Sensor electrical connectors (1,2) and the cpa retainers, and attach the oxygen sensors electrical connectors to the hose clip and transmission crossmember. Connect the Oxygen Sensor electrical connectors and the cpa retainers, install the clip through the engine harness and the Oxygen Sensor pigtail and clip the connection of the Oxygen Sensor to the floor reinforcement. Lastly, install the oil pan skid plate and the bolts if needed with a torque of 20 nm (15 ft. Lbs.) followed by the engine shield and bolts if needed with a torque of 20 nm (15 ft. Lbs.); then lower the vehicle.
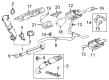
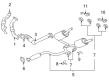
- Q: How to replace the catalytic converter on Chevrolet SSR?A:Begin Catalytic Converter replacement by properly elevating the vehicle. Remove the connector from the Oxygen Sensor that is attached to the floor reinforcement before removing its clips from the frame structure. Remove the connector position assurance retainers alongside the Oxygen Sensor electrical connectors from the system. First remove Oxygen Sensor electrical connections from attachments on the hose clip and transmission crossmember before you re-attach the cpa retainers together with Oxygen Sensor electrical connectors (1, 2). Disassemble the exhaust system by removing exhaust manifold pipe nuts at each side and exhaust muffler nuts then pull out the transmission support before getting rid of the Catalytic Converter. Remove the oxygen sensors when necessitated. The threads of old oxygen sensors require gm p/n 12377953 or equivalent anti-seize compound before installation and tightening to 42 nm (31 ft. Lbs.) torques. You need to install both the Catalytic Converter and transmission support. New exhaust manifold pipe seals should be installed to each exhaust manifold followed by a right and left exhaust manifold pipe nut snug rotation to a torque setting of 50 nm (37 ft. Lbs.). Screw and tighten exhaust muffler nuts until they reach 45 nm (33 ft. Lbs.). Link the Oxygen Sensor electrical connectors (1, 2) and install cpa retainers before fastening the oxygen sensors electrical connectors to a hose clip supported by the transmission crossmember. You should lower the vehicle before performing these steps: install the clip around the engine harness and the Oxygen Sensor pigtail, clip the Oxygen Sensor connection to the floor reinforcement, reattach the cpa retainers then Oxygen Sensor electrical connectors, and lastly install the clip.


Related Chevrolet Parts
 Chevrolet Exhaust Manifold
 Chevrolet Muffler
 Chevrolet Canister Purge Valves
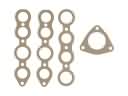
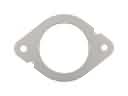 Chevrolet Catalytic Converter Gasket
 Chevrolet Diverter Valve
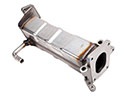 Chevrolet EGR Cooler
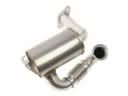 Chevrolet EGR Filter
 Chevrolet EGR Vacuum Solenoid
 Chevrolet Exhaust Gas Temperature Sensor
 Chevrolet PCV Valve Elbow
 Chevrolet Secondary Air Injection Check Valve
 Chevrolet Secondary Air Injection Pump
Browse Chevrolet Catalytic Converter by Models
Nova S10 Colorado C10 Tahoe Cruze Malibu Camaro Equinox Impala SS SSR Avalanche Silverado 1500 Silverado 2500 HD Caprice Classic Cobalt Suburban Traverse Blazer HHR Sonic Tracker Volt El Camino K10 Spark Trax Trailblazer Astro Cavalier Corvette C20 Aveo Beretta C1500 C2500 C30 C3500 Celebrity Chevette City Express Corsica Express 1500 Express 2500 Express 3500 G10 G20 G30 K1500 K20 K2500 K30 K3500 K5 Blazer Lumina Metro Monte Carlo P30 Prizm S10 Blazer Silverado 2500 Uplander Venture Lumina APV Silverado 3500 Suburban 1500 Trailblazer EXT Avalanche 1500 Avalanche 2500 Aveo5 C10 Suburban C1500 Suburban C20 Suburban C2500 Suburban Captiva Sport Citation II Cruze Limited Impala Limited K10 Suburban K1500 Suburban K20 Suburban K2500 Suburban Malibu Limited P20 R10 R10 Suburban R20 R20 Suburban R2500 R2500 Suburban R30 R3500 Silverado 1500 Classic Silverado 1500 HD Silverado 1500 HD Classic Silverado 1500 LD Silverado 1500 LTD Silverado 2500 HD Classic Silverado 3500 Classic Silverado 3500 HD Spectrum Suburban 2500 Suburban 3500 HD V10 V10 Suburban V20 V20 Suburban V30 V3500