ChevyParts
My Garage
My Account
Cart
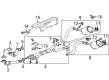
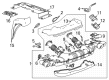
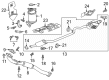
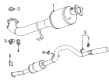
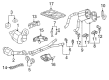
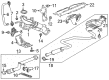
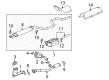
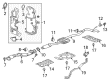
OEM Chevrolet Exhaust Pipe
Exhaust Tail Pipe- Select Vehicle by Model
- Select Vehicle by VIN
Select Vehicle by Model
orMake
Model
Year
Select Vehicle by VIN
For the most accurate results, select vehicle by your VIN (Vehicle Identification Number).
1370 Exhaust Pipes found

Chevrolet Catalytic Converter, Passenger Side Part Number: 19418947
$989.00 MSRP: $1472.37You Save: $483.37 (33%)Ships in 1-3 Business DaysProduct Specifications- Other Name: Converter Assembly, 3Way Catalytic (W/Exhaust Front Pipe) "Kit"; Converter & Pipe; Converter, Catalytic Converter
- Position: Passenger Side
- Replaces: 22980286, 92239552

Chevrolet Muffler & Pipe Part Number: 84864960
$1855.11 MSRP: $2772.84You Save: $917.73 (34%)Ships in 1-3 Business DaysProduct Specifications- Other Name: Muffler Assembly-Exhaust (W/Exhaust Aftertreatment); Muffler & Pipe Assembly; Muffler, Exhaust
- Replaces: 84465354, 23413303, 84314678

Chevrolet Catalytic Converter Part Number: 19418970
$1086.78 MSRP: $2074.80You Save: $988.02 (48%)Ships in 1-3 Business DaysProduct Specifications- Other Name: Converter Assembly, 3Way Catalytic (W/Exhaust Manifold Pipe) "Kit"; Converter & Pipe; Converter, Catalytic Converter; Converter, Exhaust Pipe
- Replaces: 25937659, 20847946


Chevrolet Muffler & Pipe Part Number: 85154374
$859.02 MSRP: $1290.07You Save: $431.05 (34%)Ships in 1-3 Business DaysProduct Specifications- Other Name: Muffler, Exhaust
- Replaces: 84779201, 84724456, 84997139, 84693993

Chevrolet Muffler & Pipe Part Number: 15144842
$323.13 MSRP: $483.10You Save: $159.97 (34%)Ships in 1-3 Business DaysProduct Specifications- Other Name: Muffler, Exhaust; Direct-Fit Exhaust; Exhaust System Kit; Exhaust Pipe; Muffler

Chevrolet Muffler & Pipe Part Number: 25811688
$901.24 MSRP: $1353.49You Save: $452.25 (34%)Ships in 1-3 Business DaysProduct Specifications- Other Name: Muffler, Exhaust; Exhaust Pipe; Muffler

Chevrolet Muffler & Pipe Part Number: 84665237
$903.54 MSRP: $1356.94You Save: $453.40 (34%)Ships in 1-3 Business DaysProduct Specifications- Other Name: Muffler, Exhaust; Exhaust Pipe; Muffler
- Replaced by: 85052292
Chevrolet Muffler & Pipe Part Number: 20757703
$922.41 MSRP: $1385.28You Save: $462.87 (34%)Ships in 1-3 Business DaysProduct Specifications- Other Name: Muffler, Exhaust; Exhaust Pipe; Muffler
- Replaced by: 85052291

Chevrolet Muffler & Pipe Part Number: 84496909
$828.98 MSRP: $1244.97You Save: $415.99 (34%)Ships in 1-3 Business DaysProduct Specifications- Other Name: Muffler, Exhaust; Exhaust Pipe; Muffler
- Replaces: 23219847, 84012769, 23226904, 23440151, 23289701, 84125232, 84327969, 23367635

Chevrolet Muffler & Pipe Assembly Part Number: 84897448
$1506.90 MSRP: $2250.45You Save: $743.55 (34%)Ships in 1-3 Business DaysProduct Specifications- Other Name: Muffler Assembly-Exhaust (W/Exhaust Aftertreatment); Muffler, Exhaust
- Replaces: 84314681, 84057136, 84560763, 19420314, 23413304, 84190991, 84016913, 84864957, 84397014

Chevrolet Muffler & Pipe Part Number: 20779916
$414.11 MSRP: $619.12You Save: $205.01 (34%)Ships in 1-3 Business DaysProduct Specifications- Other Name: Muffler Assembly-Exhaust (W/Resonator, Exhaust & Tail Pipe; Exhaust Pipe; Muffler; Muffler, Exhaust Tail Pipe; Muffler, Exhaust
- Replaces: 25940551

Chevrolet Muffler & Pipe, Driver Side Part Number: 86540883
$1008.79 MSRP: $1515.00You Save: $506.21 (34%)Ships in 1-2 Business DaysProduct Specifications- Other Name: Muffler, Exhaust Muffler/Resonator; Muffler
- Position: Driver Side
- Replaces: 20968760, 84231598, 84679000, 84433547, 84364341, 23290445, 84078558, 23497434

Chevrolet Muffler & Pipe Assembly Part Number: 85047985
$2711.13 MSRP: $4071.58You Save: $1360.45 (34%)Product Specifications- Other Name: Muffler, Exhaust; Muffler, Engine Exhaust
- Replaces: 84896568, 84769445

Chevrolet Muffler W/Tpipe Part Number: 15241771
$328.17 MSRP: $490.63You Save: $162.46 (34%)Ships in 1-3 Business DaysProduct Specifications- Other Name: Muffler, Exhaust; Direct-Fit Exhaust; Exhaust System Kit; Exhaust Pipe; Muffler
- Replaces: 15144840, 10312664

Chevrolet Exhaust Pipe Part Number: 84602101
$183.86 MSRP: $274.83You Save: $90.97 (34%)Ships in 1-3 Business DaysProduct Specifications- Other Name: Pipe, Exhaust Pipe; Front Pipe
- Position: Front
- Replaces: 84056871, 84469158

Chevrolet Muffler & Pipe Part Number: 84021293
$547.86 MSRP: $822.78You Save: $274.92 (34%)Ships in 1-3 Business DaysProduct Specifications- Other Name: Muffler, Exhaust; Exhaust Pipe; Muffler

Chevrolet Exhaust Pipe Part Number: 25958410
$305.13 MSRP: $456.10You Save: $150.97 (34%)Ships in 1-3 Business DaysProduct Specifications- Other Name: Pipe, Exhaust Pipe; Intermed Pipe

Chevrolet Front Pipe Part Number: 84413377
$192.95 MSRP: $288.47You Save: $95.52 (34%)Product Specifications- Other Name: Pipe, Exhaust Pipe; Exhaust Pipe
- Position: Front
- Replaces: 23322557, 84043294

Chevrolet Front Pipe Part Number: 22674118
$159.09 MSRP: $237.85You Save: $78.76 (34%)Ships in 1-3 Business DaysProduct Specifications- Other Name: Pipe, Exhaust Pipe; Exhaust Pipe
- Position: Front

Chevrolet Muffler & Pipe Part Number: 86807343
$678.00 MSRP: $1018.22You Save: $340.22 (34%)Ships in 1-3 Business DaysProduct Specifications- Other Name: Muffler, Exhaust; Muffler
- Replaces: 84826974, 84276460, 84364859, 84205371
| Page 1 of 69 |Next >
1-20 of 1370 Results
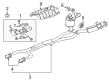
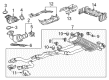
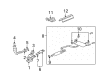
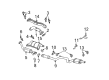
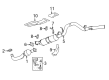
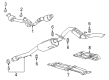
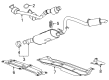
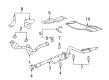
Chevrolet Exhaust Pipe
Choose OEM Exhaust Pipe, you're making the optimal decision for superior quality and perfect performance. You can feel confident because each component goes through stringent quality checks. Every part is carefully built to comply with Chevrolet's factory specifications. You'll enjoy a smooth, worry-free installation that fits just right. At ChevyPartsGiant.com, you'll find it easy to get top-quality OEM Chevrolet Exhaust Pipe. You can shop at highly competitive prices and protect your budget. All our genuine Chevrolet parts include a dependable manufacturer's warranty. You'll also appreciate our straightforward return policy and swift delivery services for extra convenience.
Chevrolet Exhaust Pipe Parts and Q&A
- Q: How to replace the Exhaust Pipe on Chevrolet S10?A:Protective goggles together with gloves need to be worn prior to starting the replacement of the exhaust manifold pipe. Start by raising the vehicle properly and then support it before removing the Catalytic Converter. The first step involves removing the manifold flange bolts connecting the exhaust manifold pipe to the vehicle. After that, separate the exhaust manifold pipe along with its seal from the vehicle structure. The new seal and exhaust manifold pipe should go on the vehicle before installing the exhaust manifold pipe to manifold flange bolts by torqueing them to 30 nm (22 ft. Lbs.). From the last step the technician reinstalling the Catalytic Converter before he lowers the vehicle.
- Q: How to service and repair the Exhaust Pipe on Chevrolet Tahoe?A:The first step in servicing and repairing the Exhaust Pipe requires users to elevate their vehicle before producing support. Start by removing protective shields when needed before extracting both rear exhaust system and Catalytic Converter from the vehicle. First remove the electrical connector of the Oxygen Sensor and then separate the three nuts at the Exhaust Manifold. The exhaust hanger bracket and the entire front pipe assembly with its exhaust seal need to be detached for service followed by disposal of the seal. Installation requires you to place a fresh exhaust seal on the Exhaust Manifold before installing the front pipe while securing it at the exhaust hanger bracket. Secure the three manifold exhaust nuts by using 50 nm torque value which corresponds to 39 ft. Lbs measurement. Reinstall the Oxygen Sensor electrical connector before placing the Catalytic Converter together with the rear exhaust system into position. The procedure ends with protective shield reinstallments when needed together with safety stand removal and vehicle lowering.


Related Chevrolet Parts
 Chevrolet PCV Valve
 Chevrolet Exhaust Flange Gasket
 Chevrolet Exhaust Manifold Clamp
 Chevrolet Canister Purge Valves
 Chevrolet EGR Cooler
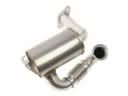 Chevrolet EGR Filter
 Chevrolet EGR Vacuum Solenoid
 Chevrolet Exhaust Gas Temperature Sensor
 Chevrolet Exhaust Hanger
 Chevrolet PCV Valve Elbow
 Chevrolet Secondary Air Injection Check Valve
 Chevrolet Tail Pipe
Browse Chevrolet Exhaust Pipe by Models
Nova S10 Colorado C10 Tahoe Cruze Malibu Camaro Equinox Impala SS SSR Avalanche Silverado 1500 Silverado 2500 HD Caprice Classic Cobalt Suburban Traverse Blazer HHR Sonic Tracker Volt El Camino K10 Spark Trax Trailblazer Astro Cavalier Corvette C20 Aveo Beretta C1500 C2500 C30 C3500 Celebrity Chevette City Express Corsica Express 1500 Express 2500 Express 3500 G10 G20 G30 K1500 K20 K2500 K30 K3500 K5 Blazer Lumina Metro Monte Carlo P30 Prizm S10 Blazer Silverado 2500 Sprint Uplander Venture Lumina APV Silverado 3500 Suburban 1500 Trailblazer EXT Avalanche 1500 Avalanche 2500 Aveo5 C10 Suburban C1500 Suburban C20 Suburban C2500 Suburban Captiva Sport Citation II Cruze Limited Impala Limited K10 Suburban K1500 Suburban K20 Suburban K2500 Suburban Malibu Limited P20 R10 R10 Suburban R1500 Suburban R20 R20 Suburban R2500 R2500 Suburban R30 R3500 Silverado 1500 Classic Silverado 1500 HD Silverado 1500 HD Classic Silverado 1500 LD Silverado 1500 LTD Silverado 2500 HD Classic Silverado 3500 Classic Silverado 3500 HD Spark EV Spectrum Suburban 2500 Suburban 3500 HD V10 V10 Suburban V1500 Suburban V20 V20 Suburban V2500 Suburban V30 V3500