Make sure this part fits

GM 25766510
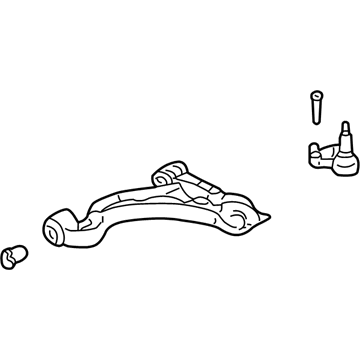
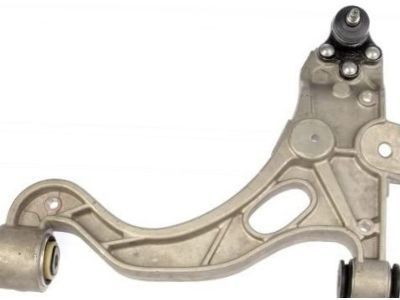
Control Arm, Passenger Side

1998-2005 GM

Customer Questions & Expert Answers (17)
GM 25766510 Control Arm, Passenger Side
  • Part Description
    Arm, Steering Knuckle Upper & Lower Control; Suspension Control Arm and Ball Joint Assembly; Control Arm Assembly
  • Position
    Passenger Side
  • Replaces
    19202594, 25696335, 25766509, 25672871, 88986633, 25746325, 25702222, 25703056, 25699468
  • Manufacturer
    General Motors
Make sure this part fits
$195.81 MSRP: $317.79
You Save: $121.98 (39%)
1
ADD TO CART
  • Related Parts
  • Product Specifications
  • Vehicle Fitment
  • Customer Questions & Expert Answers
  • Product Specifications

    BrandGenuine GM
    Manufacturer Part Number25766510
    Part DescriptionArm, Steering Knuckle Upper & Lower Control; Suspension Control Arm and Ball Joint Assembly; Control Arm Assembly
    Other NamesLower Control Arm; Arm, Steering Knuckle Lower Control
    Item Dimensions19.3 x 16.2 x 4.3 inches
    Item Weight8.40 Pounds
    PositionPassenger Side
    ConditionNew
    Fitment TypeDirect Replacement
    Replaces19202594, 25696335, 25766509, 25672871, 88986633, 25746325, 25702222, 25703056, 25699468
    ManufacturerGeneral Motors
    SKU25766510
    WarrantyThis genuine GM part is guaranteed by GM's factory warranty.
    Shipping & ReturnShipping Policy Return Policy
    Warning: California's Proposition 65
  • Vehicle Fitment

    Year Make Model Trim Engine
    2000-2005 Buick LeSabreCustom, Limited6 Cyl 3.8 L GAS
    1998-2005 Buick Park AvenueBase, Ultra6 Cyl 3.8 L GAS
    1998-1999 Buick RivieraBase6 Cyl 3.8 L GAS
    2000-2005 Cadillac DeVilleBase, DHS, DTS, Protection Series8 Cyl 4.6 L GAS
    1998-2004 Cadillac SevilleSLS, STS8 Cyl 4.6 L GAS
    2001-2003, 1998-1999 Oldsmobile AuroraBase6 Cyl 3.5 L GAS, 8 Cyl 4.0 L GAS
    2000-2005 Pontiac BonnevilleGXP, SE, SLE, SSEi6 Cyl 3.8 L GAS, 8 Cyl 4.6 L GAS
  • Customer Questions & Expert Answers

    Q:
    Can you help me check if this 25766510 is the right part for my car? Posted by ChevyPartsGiant Specialist
    A:
    Please Select Your Vehicle model to see if part number 25766510 is suitable before ordering.
    Posted by ChevyPartsGiant Specialist
    Q:
    How to replace the lower control arm in the front suspension on Buick LeSabre? Posted by Customer
    A:
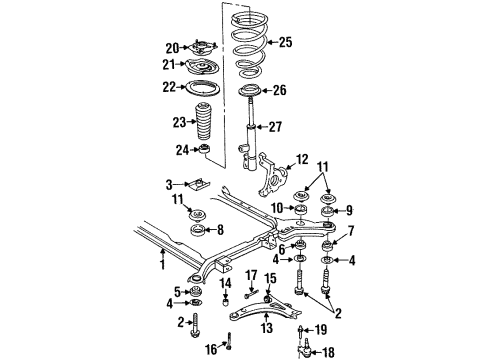
    To replace the lower Control Arm of the front suspension, lift and support the vehicle, the tire and wheel and the lastly the stabilizer shaft link. Then, take out the cotter pin and loosen the lower Ball Joint retaining nut from the ball stud, and make sure that the over-extension of the tri-pot joints is avoided, as its internal component separation and failure. Utilise the j43828 Ball Joint separator (J43828) to remove the lower Ball Joint from the Steering Knuckle, after this remove the lower Ball Joint retaining nut and finally the lower control-arm-mounting bolts and nuts that will hold the lower control-arm to the frame. In installation, hook the lower Control Arm to the frame without tightening the Control Arm nuts first. Support vehicle weight with the use of the control arms in order to establish correct trim height prior to installation of the lower bolts, Control Arm and nuts. Mount and tighten the lower Ball Joint and retaining nut to the Steering Knuckle ensuring that it is tightened to 10 nm (89 inch lbs.) and another 180 degrees with at no point being more than two slots away from a cotter pin alignment. Once the cotter pin is in place, install it, reconnect the stabilizer shaft link, tire, and wheel, lower the vehicle, and check the trim height. Finally, adjust the Control Arm bolts in sequence with rear mounting bolt 158 nm 117ft.lbs., and not mounting nut 158 nm 117ft.lbs.
    Posted by ChevyPartsGiant Specialist
    Q:
    How to service and repair the front lower control arm on Buick LeSabre? Posted by Customer
    A:
    To properly service and repair the front lower Control Arm, first, lift and hold the vehicle, second, uninstall the tire and the wheel, third, uninstall the stabilizer shaft link. Then discard the cotter pin and loosen the honey nut of lower Ball Joint from the pollution, while avoiding over extension of the tri- pot joints that might result in loss of separation of internal components and failure of the joints. Separate the lower Ball Joint from the Steering Knuckle using the j43828 Ball Joint separator (J43828), and remove the lower Control Arm of the Steering Knuckle, followed by the lower Ball Joint retaining nut, the lower Control Arm mounting bolts and nuts, and remove the lower Ball Joint from the frame. For laying, fix the lower Control Arm to the frame but do not tighten the nuts of lower Control Arm takes but first; support the weight of the vehicle with the control arms so as to attain the design trim heights before fitting the lower bolts, the Control Arm, and the nuts. Replace the opposite Ball Joint and nut to the Steering Knuckle and tighten the lower Ball Joint scoring nut to 10 nm (88 in. Lbs.), the two flats to a minimum of 55 nm (41 ft. Lbs.) to align the cotter pin slot and the cotter pin. Replace the stabilizer shaft link, tire, and wheel, lower the vehicle and perform trim height check. Lastly, tighten the Control Arm bolts in the following order: rear mounting bolt 158 nm (117 ft. Lbs) and the front mounting nut 158 nm (117 ft. Lbs).
    Posted by ChevyPartsGiant Specialist
    Q:
    How to replace the front lower control arm on Cadillac Seville? Posted by Customer
    A:
    The front lower Control Arm replacement process begins with vehicle elevation for support followed by tire removal and wheel removal and subsequent removal of the stabilizer shaft link and road sensing suspension link from the lower Control Arm. To begin the installation start by removing both the lower ball joint cotter pin and retaining nut. Begin by using the ball joint separator (J43828) on the lower ball joint-steering knuckle assembly to free up both components. Finally remove the lower Control Arm mounting hardware to fully extract the arm. Begin installation by fitting the lower Control Arm to the frame but do not tighten the Control Arm nuts at first until reaching the design trim height while supporting the vehicle weight through the control arms. Place the lower ball joint stud into the Steering Knuckle before installing the lower ball joint retaining nut. Secure the lower Control Arm bolts and nuts at their proper positions. Tighten the lower ball joint stud nut to 10 nm (88 inch lbs.) before continuing to torque it an additional 150 degrees while keeping additional torque to less than 60 degrees for cotter pin installation. The installation process begins with the cotter pin followed by the road sensing suspension then the stabilizer shaft link and ends with tire and wheel installation. The vehicle needs to go down and then come up again to firm the lower Control Arm nuts to 157 nm (116 ft. Lbs.).
    Posted by ChevyPartsGiant Specialist
    Q:
    What should be done after attaching the lower control arm for the 2001 Buick LeSabre? Posted by Customer
    A:
    Install the lower control arm bolts and nuts, followed by the wheel bearing/hub, while adhering to the Fastener Notice in Service Precautions.
    Posted by ChevyPartsGiant Specialist
    See expert answers on similar Control Arm
    Q:
    What is the next step after installing the wheel bearing/hub for the 2004 Buick LeSabre? Posted by Customer
    A:
    Connect the adjustment link to the lower control arm and secure it with the adjustment link retaining nut, tightening it to 50 Nm (36 ft. lbs.).
    Posted by ChevyPartsGiant Specialist
    See expert answers on similar Control Arm
    Q:
    What should be done after attaching the lower control arm for the 2005 Buick LeSabre? Posted by Customer
    A:
    Install the lower control arm bolts and nuts, then install the lower ball joint and retaining nut to the steering knuckle.
    Posted by ChevyPartsGiant Specialist
    See expert answers on similar Control Arm
    Q:
    What is the procedure for installing the lower control arm for the 2001 Buick Park Avenue? Posted by Customer
    A:
    First, install the lower control arm to the frame without tightening the control arm nuts to ensure the vehicle design trim heights are achieved.
    Posted by ChevyPartsGiant Specialist
    See expert answers on similar Control Arm
    Q:
    What should be done after removing the lower ball joint retaining nut for the 2002 Buick Park Avenue? Posted by Customer
    A:
    Proceed to remove the lower control arm mounting bolts and nuts, followed by the lower control arm from the frame.
    Posted by ChevyPartsGiant Specialist
    See expert answers on similar Control Arm
    Q:
    What is the initial step for installation of the lower control arm for the 2005 Buick Park Avenue? Posted by Customer
    A:
    Attach the lower control arm to the frame without tightening the control arm nuts initially.
    Posted by ChevyPartsGiant Specialist
    See expert answers on similar Control Arm
    Q:
    What is the first step to replace the rear axle lower control arm for the 2005 Buick Park Avenue? Posted by Customer
    A:
    First, remove the rear suspension support assembly, the automatic level control height sensor link from the left control arm, the stabilizer shaft link, the wheel bearing/hub, the adjustment link retaining nut, and the adjustment link from the lower control arm.
    Posted by ChevyPartsGiant Specialist
    See expert answers on similar Control Arm
    Q:
    What is the final step in the process for the 2001 Cadillac DeVille? Posted by Customer
    A:
    Tighten the control arm nuts to 106 Nm (78 ft. lbs.), install the tire and wheel, and lower the vehicle.
    Posted by ChevyPartsGiant Specialist
    See expert answers on similar Control Arm
    Q:
    What components should be reinstalled after securing the adjustment link for the 2004 Buick Park Avenue? Posted by Customer
    A:
    Reinstall the wheel bearing/hub, the stabilizer shaft link, and the Automatic Level Control height sensor link on the left control arm.
    Posted by ChevyPartsGiant Specialist
    See expert answers on similar Control Arm
    Q:
    What components need to be removed next for the 2002 Cadillac DeVille? Posted by Customer
    A:
    Remove the stabilizer shaft link bolt, stabilizer shaft insulators, and spacer, and if necessary, take out the hub and bearing.
    Posted by ChevyPartsGiant Specialist
    See expert answers on similar Control Arm
    Q:
    What should be done after installing the ball joint and stabilizer link for the 2002 Cadillac DeVille? Posted by Customer
    A:
    Install the cotter pin, then reinstall the wheel and tire, tightening the wheel nuts to 125 Nm (80 ft. lbs.).
    Posted by ChevyPartsGiant Specialist
    See expert answers on similar Control Arm
    Q:
    What should be removed after separating the adjustment link for the 2001 Cadillac Seville? Posted by Customer
    A:
    Remove the wheel bearing and hub from the lower control arm.
    Posted by ChevyPartsGiant Specialist
    See expert answers on similar Control Arm
    Q:
    What should be installed after attaching the lower control arm for the 2002 Cadillac Seville? Posted by Customer
    A:
    Install the lower control arm mounting bolts and nuts, followed by the wheel bearing and hub.
    Posted by ChevyPartsGiant Specialist
    See expert answers on similar Control Arm
    If you have any questions about this product, please don't hesitate to ask us. We will be happy to help you!

OEM GM 25766510, Excellent Performance and Perfect Fitment

To ensure reliability, purchase GM part # 25766510 Control Arm, Passenger Side. It is sometimes referred to as GM Control Arm. Choosing OEM parts is the optimal decision for guaranteeing superior quality and perfect performance. These components undergo stringent quality checks and are carefully constructed to comply with GM's factory specifications, ensuring a smooth installation process.

ChevyPartsGiant.com is a leading supplier of genuine GM parts such as GM 25766510 Control Arm, Passenger Side. Our website boasts an extensive inventory of OEM GM parts, available at highly competitive prices in the market. Should you require any new genuine GM parts, rest assured we will deliver them swiftly and efficiently to your doorstep. Furthermore, all our parts come with the assurance of a manufacturer's warranty. For detailed Cadillac parts information, click here.
Choose ChevyPartsGiant for discounted prices, exceptional service and fast delivery