Make sure this part fits

GM 19330172
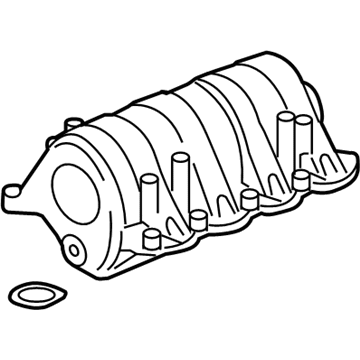
Intake Manifold

2000-2011 GM

Customer Questions & Expert Answers (38)
GM 19330172 Intake Manifold
  • Part Description
    Intake Manifold
  • Replaces
    19303933, 12588847, 12564771
  • Manufacturer
    General Motors
Make sure this part fits
$551.24 MSRP: $946.70
You Save: $395.46 (42%)
Ships in 1-2 Business Days
1
ADD TO CART
  • Related Parts
  • Product Specifications
  • Vehicle Fitment
  • Customer Questions & Expert Answers
  • Product Specifications

    BrandGenuine GM
    Manufacturer Part Number19330172
    Part DescriptionIntake Manifold
    Other NamesManifold; Manifold, Engine Fuel Intake Manifold
    Item Dimensions25.3 x 15.5 x 12.7 inches
    Item Weight8.80 Pounds
    ConditionNew
    Fitment TypeDirect Replacement
    Replaces19303933, 12588847, 12564771
    ManufacturerGeneral Motors
    SKU19330172
    WarrantyThis genuine GM part is guaranteed by GM's factory warranty.
    Shipping & ReturnShipping Policy Return Policy
    Warning: California's Proposition 65
  • Vehicle Fitment

    Year Make Model Trim Engine
    2006-2011 Buick LucerneCXL, CXS, Super8 Cyl 4.6 L GAS
    2006-2011 Cadillac DTSBase, Livery, Luxury, Platinum, Premium8 Cyl 4.6 L GAS
    2002-2005 Cadillac DeVilleBase, DHS, DTS, Protection Series8 Cyl 4.6 L GAS
    2000-2002 Cadillac EldoradoESC, ETC8 Cyl 4.6 L GAS
    2004-2009 Cadillac SRXBase8 Cyl 4.6 L GAS
    2005-2010 Cadillac STSBase8 Cyl 4.6 L GAS
    2000-2004 Cadillac SevilleSLS, STS8 Cyl 4.6 L GAS
    2004-2009 Cadillac XLRBase, Platinum8 Cyl 4.6 L GAS
    2001-2003 Oldsmobile AuroraBase8 Cyl 4.0 L GAS
    2004-2005 Pontiac BonnevilleGXP8 Cyl 4.6 L GAS
  • Customer Questions & Expert Answers

    Q:
    Is this 19330172 designed for my car? Posted by ChevyPartsGiant Specialist
    A:
    Please Select Your Vehicle model to see if part number 19330172 is suitable before ordering.
    Posted by ChevyPartsGiant Specialist
    Q:
    How to replace the lower intake manifold on Buick Lucerne? Posted by Customer
    A:
    In order to change the lower Intake Manifold, take off the upper Intake Manifold, drive belt tensioner, generator rear brace bolt and nut, and the generator rear brace. Next, remove the bolt and nut of the exhaust gas recirculation pipe, then the egr valve outlet pipe. Reposition the hose clamp at the Thermostat Housing using the hose clamp pliers (J 38185) and remove the radiator inlet hose from the Thermostat Housing. Proceed with the removal of the generator brace bracket bolts and the generator brace bracket and spacer as well as the lower Intake Manifold bolts to remove the lower Intake Manifold itself, and its lower Intake Manifold seals and gaskets. When changing the lower Intake Manifold, first, detach the engine coolant temperature (ECT) sensor, the Thermostat Housing bolt and stud, and the Thermostat Housing with the Thermostat. For the installation, begin and install the Thermostat and housing, and fasten the Thermostat Housing bolt/stud to 25 n.m (18 lb ft), and set the ect sensor, tightening to 23 n.m (17 lb ft). Clean the lower Intake Manifold sealing surface and before installing the lower Intake Manifold gaskets apply sealer the ends of the Intake Manifold seal, and install the seals. Next, install the lower Intake Manifold bolt by using applying a thread lock to the thread of the lower Intake Manifold bolt, and install the lower Intake Manifold bolt with 15 n.m (11 lb ft). Mount the generator brace bracket and spacer with generator brace bracket bolts; tighten these bolts to a torque of 50 n.m (37 lb ft). Replace the radiator inlet hose to Thermostat Housing, reset the hose clamp on the Thermostat Housing using the hose clamp pliers (J 38185), and install the egr valve outlet pipe and its bolt and nut and tighten to 25 n.m (18 lb ft). Lastly, install the generator rear brace and bolt and nut tightening to 50 n.m (37 lb ft), and then install drive belttensioner and upper Intake Manifold.
    Posted by ChevyPartsGiant Specialist
    Q:
    How to replace the intake manifold on Cadillac DTS? Posted by Customer
    A:
    To replace the Intake Manifold, first, you should remove the fuel injector sight shield cover and the air cleaner outlet. Remove the front and rear ignition coil module engine harness electric connectors and the front and rear fuel injectors engine harness electric connectors. Separate the positive crankcase ventilation (PCV) foul air tube quick connect fitting from the right camshaft cover and the pcv fresh air tube quick connect fitting from the camshaft cover. Remove the fuel feed line quick connect fitting at the Fuel Rail. Reposition the radiator surge tank inlet hose/ pipe clamps, pull the surge tank inlet hose or pipe from both the surge tank and engine fitting. Unfasten the pushnuts that hold the surge tank inlet hose/pipe to the Fuel Rail studs, followed by the Fuel Rail bracket nut, fuel rail studs, and the Fuel Rail. Lose the plenum duct clamp screw at water pump housing, disengage the Intake Manifold bolts, and leave the power steering to the side before the removal of the Intake Manifold. Remove the pcv foul air tube from where it is connected to the Intake Manifold quick connect fitting. Throw away the old seals and clean and check the Intake Manifold. For installation, you have to install new Intake Manifold seals and attaching pcv foul air tube quick connect fitting on the Intake Manifold and then pcv foul air tube with retaining features. Slightly grease the inside perimeter of the rubber plenum duct on the water pump housing and install the Intake Manifold and tighten the Intake Manifold bolts. Fasten intake bolts in specified sequence to 10nm (89 lb in) and ensure the Intake Manifold is fully inserted into plenum duct. Reinstall the Power Steering Pump, and tighten the plenum duct clamp screw to 2.75 nm (24 lb in). Use clean engine oil to lubricate the fuel injector lower o-ring seals and then fit the Fuel Rail and tighten the Fuel Rail studs to 10 nm (89 lb in). Install the Fuel Rail bracket nut and tighten with force of 10 nm (89 lb in), or coil heater cord tabs if equipped, and the harness retainer at the Fuel Rail stud. Refit the surge tank inlet hose/pipe to the Fuel Rail studs and engine fitting using pushnuts and clamping. Join the fuel feed line quick connect fitting at the Fuel Rail, the pcv fresh air tube quick connect fitting to the camshaft cover and the pcv foul air tube quick connect fitting to the right camshaft cover. Finally, reconnect rear and front fuel injectors and ignition coil module engine harness electrical ends, then reinstall the air cleaner outlet duct and fuel injector sight shield cover.
    Posted by ChevyPartsGiant Specialist
    Q:
    How to replace the intake manifold on Cadillac Seville? Posted by Customer
    A:
    To replace the Intake Manifold, first remove the 2 nuts from the Intake Manifold sight shield and then pry off the sight shield from the engine. Unplug the coil module connectors from the coil modules of the camshaft covers, the PCV Valve from the camshaft cover, the PCV fresh air tube from the camshaft cover, the fuel regulator vacuum tube, and the vacuum tubes of the air solenoid. Next, one has to remove the fuel inlet and return quick-connect fittings at the Fuel Rail, remove the Fuel Rail bracket retaining nut at the rear lift bracket, and remove the 8 electrical connectors from the 8 fuel injectors. Unbolt and then lift the entire Fuel Rail with its associated injectors out of the intake. Clear the plenum duct clamp at the rear of the Intake Manifold and then remove the 10 bolts connecting the Intake Manifold to the cylinder heads, lifting the Intake Manifold while pulling up in the front. Clean and check the Intake Manifold and oil the inside of the rubber plenum duct with minimal grease, then clean any debris from the Cylinder Head or Intake Manifold. Mount new gaskets to the Intake Manifold and check the PCV Valve hose against the fitting at the front of the Intake Manifold, which must be well-clipped in place before installing by resting the rear in the plenum duct and the front on the cylinder heads. Mount the 10 bolts holding the Intake Manifold onto the cylinder heads with a circular outward pattern starting from the center to a 10 nm. Secure the plenum duct to the back of the Intake Manifold and the plenum duct clamp to 2.25 nm. Prevent damage to the o-ring seals by not forcing the injectors into position, and cover the insert the accompanying Fuel Rail and injector assembly to put it on a given plug in the Intake Manifold, delivering it into the right position from a simultaneous squeeze. Install 4 bolts to fix the Fuel Rail to the Intake Manifold, and tighten them up to 10 nm. Attach the 8 electrical connectors to the fuel injectors, mount the engine coolant heater wire onto the Fuel Rail studs if applicable, and mount the 2 pushnuts. Install the Fuel Rail bracket retaining nut to the rear lift bracket and screw it to 10 nm. Connect the quick connect fittings to the Fuel Rail, the vacuum tubes to the air solenoid, the fuel regulator vacuum tube, the PCV fresh air tube to the camshaft cover, the PCV Valve to the camshaft cover, and coil module connectors to the coil modules in the camshaft covers. Finally, put the Intake Manifold sight shield onto the engine and fix the 2 sight shield nuts on it, fixing them in position by using 3 nm of tightness.
    Posted by ChevyPartsGiant Specialist
    Q:
    How to replace the lower intake manifold (LP1, LY7) on Cadillac STS? Posted by Customer
    A:
    Beginning the lower Intake Manifold (LP1, LY7) replacement process requires a procedure of turning off the ignition and removing the fuel injector sight shield. Begin by removing the air inlet duct then record how the booster hose runs before you disconnect the brake booster check valve and hose. Detach the purge solenoid valve electrical connector from the Intake Manifold and its purge line as well as the fuel injector and Throttle Body electrical connectors. Position the brake booster hose onto the Intake Manifold. Move the upper Intake Manifold brace stud and wire harness retainer and bolt before repositioning the brace with the wiring harness active. Remove the wiring harness retainer from the Throttle Body's right side then disconnect the barometric pressure sensor electrical connector and the Intake Manifold runner control solenoid electrical connector. Unplug the left bank ignition coil wiring harness from its bracket retaining position without disassembling the uppers to lower Intake Manifold bolts and avoiding damage to the fuel pipe. After removing the Intake Manifold bolts you should relocate the manifold to expose the fuel pipe connector so you can disconnect the fuel feed pipe from the Fuel Rail by removing the retainer clip. Clean all surfaces of the Intake Manifold before performing needed manifold assembly steps and replace the lower Intake Manifold gasket when it is worn or damaged. First, install the Intake Manifold along with the fuel injector harness electrical connector next to the Intake Manifold runner control solenoid electrical connector and barometric pressure sensor electrical connector and pcv hose from the right bank camshaft cover. Connect the wiring harness retainer while confirming that all connections engage correctly. Then link the Throttle Body electrical connector followed by connecting the fuel feed pipe to the Fuel Rail and the purge line to the purge solenoid valve. The final installation steps include the fuel pipe retainer together with the purge solenoid valve electrical connection followed by attaching the brake booster hose with check valve to the brake booster and reattaching the air inlet duct and fuel injector sight shield.
    Posted by ChevyPartsGiant Specialist
    Q:
    How to replace the upper intake manifold on Cadillac SRX? Posted by Customer
    A:
    Begin your upper Intake Manifold replacement process by shutting off the ignition and setting aside the fuel injector sight shield and air inlet duct alongside the Brake Booster Vacuum Hose. Separate the wiring harness retaining bracket from the Throttle Body electrical connection before you disconnect the Throttle Body connector and the purge solenoid valve connector from its electrical harness and purge line. Disassemble the upper Intake Manifold assembly completely by removing the brace stud , bolt , and brace followed by detaching the pcv hose from right bank camshaft cover, barometric pressure sensor electrical connector, and Intake Manifold runner control solenoid electrical connector. After you remove the injector harness bracket bolt and the left bank ignition coil wiring harness from the bracket you can remove the upper Intake Manifold bolts but sometimes you'll need to deflect the cowl panel to obtain the right rear bolt. Take out the upper Intake Manifold that includes the Throttle Body for replacement while you must disassemble and clean up and inspect any replaceable upper Intake Manifold. Construct an Intake Manifold for replacement if necessary then position a new upper Intake Manifold gasket before installing the upper Intake Manifold. Start by tightening the upper Intake Manifold bolts at the center and move toward the exterior until each bolt reaches 23 nm (17 ft. Lbs.). Connect the right bank camshaft cover to barometric pressure sensor electrical connector and Intake Manifold runner control solenoid electrical connector alongside pcv hose. After installing the upper Intake Manifold brace with its bolt and stud you must tighten both components. Start by bolting to 65 nm (48 ft. Lbs.) then stud to 10 nm (89 inch lbs.). Connect the electrical connector across the Throttle Body while making sure the wiring harness connector properly locks into place before putting on the retainer. The purge system requires a connection between the purge line and solenoid valve and its power source in addition to reestablishing the vacuum hose from the Intake Manifold to the brake booster. Then attach the air inlet duct and fuel injector shield.
    Posted by ChevyPartsGiant Specialist
    Q:
    What is the next step after removing the vacuum fitting for the 2008 Buick Lucerne? Posted by Customer
    A:
    Take off the intake manifold gasket carrier from the upper intake manifold.
    Posted by ChevyPartsGiant Specialist
    See expert answers on similar Intake Manifold
    Q:
    What should be done if installing a replacement manifold for the 2009 Buick Lucerne? Posted by Customer
    A:
    Remove the throttle body-to-manifold studs, followed by the EVAP canister purge solenoid valve bolt and the valve itself.
    Posted by ChevyPartsGiant Specialist
    See expert answers on similar Intake Manifold
    Q:
    What electrical connectors need to be disconnected during the process for the 2004 Cadillac SRX? Posted by Customer
    A:
    The purge solenoid valve electrical connector, the fuel injector harness electrical connector, and the throttle body electrical connector.
    Posted by ChevyPartsGiant Specialist
    See expert answers on similar Intake Manifold
    Q:
    How should the upper intake manifold be secured for the 2007 Buick Lucerne? Posted by Customer
    A:
    With the upper intake manifold bolts and studs, tightening them to 10 N.m (89 lb in).
    Posted by ChevyPartsGiant Specialist
    See expert answers on similar Intake Manifold
    Q:
    What is the next step after cleaning and inspecting the intake manifold for the 2004 Cadillac XLR? Posted by Customer
    A:
    Install new gaskets to the intake manifold, ensuring the PCV valve hose is firmly connected to the fitting at the rear before positioning the intake manifold.
    Posted by ChevyPartsGiant Specialist
    See expert answers on similar Intake Manifold
    Q:
    What components should be removed next for the 2006 Buick Lucerne? Posted by Customer
    A:
    Remove the generator brace bracket bolts, the generator brace bracket, and spacer, followed by the lower intake manifold bolts and the lower intake manifold itself, along with the lower intake manifold seals and gaskets.
    Posted by ChevyPartsGiant Specialist
    See expert answers on similar Intake Manifold
    Q:
    What should be installed last for the 2010 Buick Lucerne? Posted by Customer
    A:
    Install the PCV foul air tube and the PCV fresh air tube.
    Posted by ChevyPartsGiant Specialist
    See expert answers on similar Intake Manifold
    Q:
    What is the next step after disconnecting the electrical connectors from the fuel injectors for the 2001 Cadillac Eldorado? Posted by Customer
    A:
    Remove the four bolts attaching the fuel rail to the intake manifold and lift the entire fuel rail and injector assembly from the intake manifold.
    Posted by ChevyPartsGiant Specialist
    See expert answers on similar Intake Manifold
    Q:
    What electrical connectors need to be reconnected for the 2010 Cadillac DTS? Posted by Customer
    A:
    Reconnect the rear fuel injectors engine harness electrical connectors, the rear ignition coil module engine harness electrical connector, the front fuel injectors engine harness electrical connectors, and the front ignition coil module engine harness electrical connector.
    Posted by ChevyPartsGiant Specialist
    See expert answers on similar Intake Manifold
    Q:
    How do you remove the fuel rail for the 2002 Cadillac Eldorado? Posted by Customer
    A:
    Remove the 4 bolts attaching the fuel rail to the intake manifold and disconnect the fuel inlet and return quick-connect fittings at the fuel rail.
    Posted by ChevyPartsGiant Specialist
    See expert answers on similar Intake Manifold
    Q:
    What should be done with the surge tank inlet hose/pipe for the 2007 Cadillac DTS? Posted by Customer
    A:
    Connect the surge tank inlet hose/pipe to the engine fitting, position the radiator surge tank inlet hose/pipe clamp at the engine, and then connect the surge tank inlet hose/pipe to the surge tank.
    Posted by ChevyPartsGiant Specialist
    See expert answers on similar Intake Manifold
    Q:
    What components need to be removed from the fuel rail for the 2008 Cadillac DTS? Posted by Customer
    A:
    Remove the engine harness retainer and coolant heater cord tabs, followed by the fuel rail bracket nut, fuel rail studs, and the fuel rail itself.
    Posted by ChevyPartsGiant Specialist
    See expert answers on similar Intake Manifold
    Q:
    What is the procedure for reinstalling the fuel rail bracket for the 2004 Cadillac DeVille? Posted by Customer
    A:
    Reinstall the fuel rail bracket retaining nut and tighten it to 10 Nm, then install the quick connect fittings to the fuel rail.
    Posted by ChevyPartsGiant Specialist
    See expert answers on similar Intake Manifold
    Q:
    How should the quick connect fittings and vacuum tubes be connected for the 2003 Cadillac DeVille? Posted by Customer
    A:
    Install the quick connect fittings to the fuel rail and connect the vacuum tubes to the AIR solenoid, fuel regulator vacuum tube, PCV fresh air tube, and PCV dirty air tube.
    Posted by ChevyPartsGiant Specialist
    See expert answers on similar Intake Manifold
    Q:
    What should be disconnected from the camshaft cover for the 2006 Cadillac DTS? Posted by Customer
    A:
    Disconnect the positive crankcase ventilation (PCV) foul air tube quick connect fitting and the PCV fresh air tube quick connect fitting.
    Posted by ChevyPartsGiant Specialist
    See expert answers on similar Intake Manifold
    Q:
    What is the first step to replace the intake manifold for the 2002 Cadillac DeVille? Posted by Customer
    A:
    Remove the 2 nuts from the intake manifold sight shield and take the sight shield off the engine.
    Posted by ChevyPartsGiant Specialist
    See expert answers on similar Intake Manifold
    Q:
    What is the final step in the process for the 2000 Cadillac Eldorado? Posted by Customer
    A:
    Position the intake manifold sight shield to the engine and install the two intake manifold sight shield nuts, tightening them to 3 Nm (27 inch lbs.).
    Posted by ChevyPartsGiant Specialist
    See expert answers on similar Intake Manifold
    Q:
    What should be connected after installing the upper intake manifold for the 2008 Cadillac SRX? Posted by Customer
    A:
    Connect the barometric pressure sensor electrical connector, intake manifold runner control solenoid electrical connector, and PCV hose to the right bank camshaft cover.
    Posted by ChevyPartsGiant Specialist
    See expert answers on similar Intake Manifold
    Q:
    What preparations are needed for installation for the 2002 Cadillac Seville? Posted by Customer
    A:
    Lightly grease the inside edge of the rubber plenum duct and clean any debris from the cylinder head or intake manifold before installing new gaskets to the intake manifold.
    Posted by ChevyPartsGiant Specialist
    See expert answers on similar Intake Manifold
    Q:
    How do you remove the upper intake manifold for the 2007 Cadillac STS? Posted by Customer
    A:
    Take out the upper intake manifold bolts, noting that some deflection of the cowl panel may be necessary to extract the right rear bolt, then remove the upper intake manifold with the throttle body.
    Posted by ChevyPartsGiant Specialist
    See expert answers on similar Intake Manifold
    Q:
    What is the first step to replace the intake manifold for the 2005 Cadillac DeVille? Posted by Customer
    A:
    Remove the 2 nuts from the intake manifold sight shield and take the sight shield off the engine.
    Posted by ChevyPartsGiant Specialist
    See expert answers on similar Intake Manifold
    Q:
    What should be disconnected after removing the initial components for the 2005 Cadillac SRX? Posted by Customer
    A:
    Disconnect the purge solenoid valve electrical connector and the purge line from the valve, then remove the wiring harness retainer and disconnect the throttle body electrical connector.
    Posted by ChevyPartsGiant Specialist
    See expert answers on similar Intake Manifold
    Q:
    What is the first step to replace the intake manifold for the 2000 Cadillac Seville? Posted by Customer
    A:
    Remove the two nuts from the intake manifold sight shield and take the sight shield off the engine.
    Posted by ChevyPartsGiant Specialist
    See expert answers on similar Intake Manifold
    Q:
    How is the fuel rail and injector assembly installed for the 2007 Cadillac SRX? Posted by Customer
    A:
    Install the entire fuel rail and injector assembly into the intake manifold by pressing them simultaneously into place, then install and tighten the fuel rail bolts to 10 N.m (89 lb in).
    Posted by ChevyPartsGiant Specialist
    See expert answers on similar Intake Manifold
    Q:
    What should be checked before installation for the 2008 Cadillac XLR? Posted by Customer
    A:
    Ensure the PCV valve hose is firmly connected to the fitting at the rear of the intake manifold.
    Posted by ChevyPartsGiant Specialist
    See expert answers on similar Intake Manifold
    Q:
    What should be done before installing the fuel rail and injector assembly for the 2004 Cadillac Seville? Posted by Customer
    A:
    Lubricate the intake manifold fuel injector bores with light mineral oil, clean engine oil, or equivalent.
    Posted by ChevyPartsGiant Specialist
    See expert answers on similar Intake Manifold
    Q:
    What should be done after reconnecting the electrical connectors for the 2008 Cadillac STS? Posted by Customer
    A:
    Install the wiring harness retainer, ensuring proper engagement of the wiring harness connector.
    Posted by ChevyPartsGiant Specialist
    See expert answers on similar Intake Manifold
    Q:
    How should the plenum duct be secured for the 2005 Cadillac STS? Posted by Customer
    A:
    Ensure the plenum duct is fully attached to the front of the intake manifold and tighten the plenum duct clamp to 2.25 Nm (20 inch lbs.).
    Posted by ChevyPartsGiant Specialist
    See expert answers on similar Intake Manifold
    Q:
    What is the first step to replace the lower intake manifold (LP1, LY7) (3.6L) for the 2009 Cadillac STS? Posted by Customer
    A:
    Turn the ignition OFF and remove the fuel injector sight shield.
    Posted by ChevyPartsGiant Specialist
    See expert answers on similar Intake Manifold
    Q:
    What additional components need to be disconnected from the throttle body for the 2006 Cadillac SRX? Posted by Customer
    A:
    Remove the wiring harness retainer from the right side of the throttle body and disconnect the positive crankcase ventilation (PCV) hose, the barometric pressure sensor electrical connector, and the intake manifold runner control solenoid electrical connector.
    Posted by ChevyPartsGiant Specialist
    See expert answers on similar Intake Manifold
    Q:
    What should be done with the throttle body electrical connector for the 2010 Cadillac STS? Posted by Customer
    A:
    Connect the electrical connector to the throttle body, install the wiring harness retainer, and reconnect the purge line to the purge solenoid valve and its electrical connector.
    Posted by ChevyPartsGiant Specialist
    See expert answers on similar Intake Manifold
    Q:
    What components should be removed while repositioning the brace for the 2009 Cadillac SRX? Posted by Customer
    A:
    Remove the wiring harness retainer, the upper intake manifold brace stud, and bolt.
    Posted by ChevyPartsGiant Specialist
    See expert answers on similar Intake Manifold
    If you have any questions about this product, please don't hesitate to ask us. We will be happy to help you!

OEM GM 19330172, Excellent Performance and Perfect Fitment

To ensure reliability, purchase GM part # 19330172 Intake Manifold. It is sometimes referred to as GM Intake Manifold. Choosing OEM parts is the optimal decision for guaranteeing superior quality and perfect performance. These components undergo stringent quality checks and are carefully constructed to comply with GM's factory specifications, ensuring a smooth installation process.

ChevyPartsGiant.com is a leading supplier of genuine GM parts such as GM 19330172 Intake Manifold. Our website boasts an extensive inventory of OEM GM parts, available at highly competitive prices in the market. Should you require any new genuine GM parts, rest assured we will deliver them swiftly and efficiently to your doorstep. Furthermore, all our parts come with the assurance of a manufacturer's warranty. For detailed Cadillac parts information, click here.
Choose ChevyPartsGiant for discounted prices, exceptional service and fast delivery